Overview
Trong phần này, mình sẽ chia sẻ các bước để tạo AWS Virtual Private Cloud với CloudFormation Template file.
Trước đó, hãy làm rõ một số khái niệm trước:
- Virtual Private Cloud: một network ảo riêng biệt cho phép bạn dễ dàng khởi tạo và quản trị tài nguyên AWS trên đó. Mỗi VPC sẽ có tập IP address riêng.
- Subnet: là một tập IP adresss con của VPC. Subnet có hai loại: private subnet và public subnet
- Internet Gateway: cổng kết nối public subnet với Internet
- NAT Gateway: cổng kết nối private subnet với Internet, thường được đặt ở public subnet
- Route table: bảng gồm các bản ghi dạng
<destination> <target>quy định cách thức điều hướng các request trong hệ thống. Ví dụ bản ghi10.169.0.0/8 igw-idsẽ điều hướng tất cả các request có đích là IP thuộc tập 10.169.0.0/8 tới Internet Gateway có id igw-id. - Router: thành phần trực tiếp thực hiện việc điều hướng request, dựa vào route table.
Chúng ta sẽ khởi tạo VPC với thiết kế gồm các thành phần như sau:
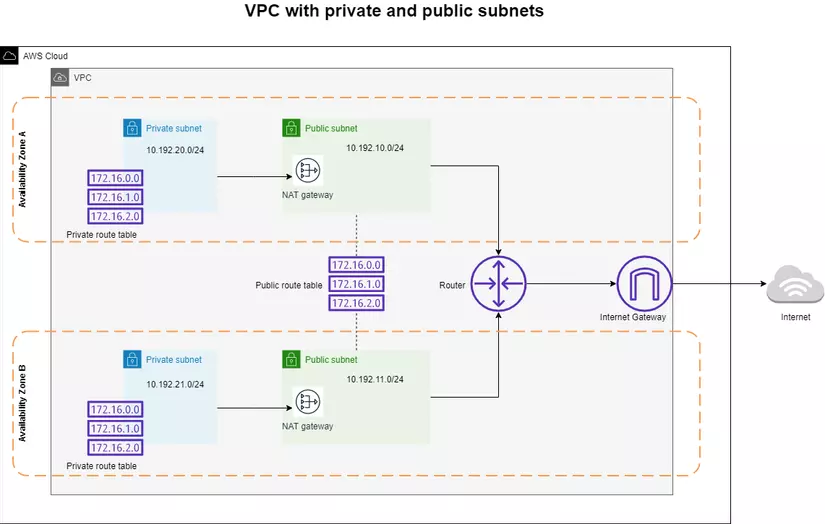 Cụ thể, VPC sẽ gồm:
- 4 subnet: 2 subnet (1 private, 1 public) tại Available Zone A, 2 subnet (1 private, 1 public) tại Available Zone B
- 1 InternetGateway
- 2 NAT Gateway
- 3 Route table: 1 public route table và 2 private route table
Hands-on
Bước 1: Khởi tạo template file
Khởi tạo file template.yml với bản mô tả đơn giản
## =================== DESCRIPTION =================== #
Description: >- AWS CloudFormation sample template. Create a custom VPC with a pair of public and private subnets spread across two AZs
Bổ sung các tham số
## =================== PARAMETERS =================== #
Parameters: paramVpcCIDR: Description: Enter the IP range (CIDR notation) for VPC Type: String Default: 10.192.0.0/16 paramPublicSubnet1CIDR: Description: Enter the IP range (CIDR notation) for the public subnet in AZ A Type: String Default: 10.192.10.0/24 paramPublicSubnet2CIDR: Description: Enter the IP range (CIDR notation) for the public subnet in AZ B Type: String Default: 10.192.11.0/24 paramPrivateSubnet1CIDR: Description: Enter the IP range (CIDR notation) for the private subnet in AZ A Type: String Default: 10.192.20.0/24 paramPrivateSubnet2CIDR: Description: Enter the IP range (CIDR notation) for the private subnet in AZ B Type: String Default: 10.192.21.0/24 paramUniqueName: Description: Give a unique name for "CloudFormationLab" tag value Type: String Default: CodeFormation Practise
Các tham số này tương ứng với dải IP (dạng CIDR notation) cho VPC và 4 subnet. Ngoài ra, thêm một tham số paramUniqueName để đánh tag cho các resources.
Tiếp theo, ta khởi tạo các resources.
Bổ sung resource VPC
Resources: # Create a VPC myVPC: Type: AWS::EC2::VPC Properties: CidrBlock: !Ref paramVpcCIDR EnableDnsSupport: true # let instances in the VPC get DNS hostnames EnableDnsHostnames: true # allow DNS resolution Tags: - Key: MasteringCF Value: !Ref paramUniqueName
Internet Gateway
myInternetGateway: Type: AWS::EC2::InternetGateway Properties: Tags: - Key: MasteringCF Value: !Ref paramUniqueName
NAT Gateway
myVPCGatewayAttachment: Type: AWS::EC2::VPCGatewayAttachment Properties: VpcId: !Ref myVPC InternetGatewayId: !Ref myInternetGateway
Public Route Table với bản ghi route 0.0.0.0/0 myInternetGateway nhằm điều hướng tất cả request tới Internet Gateway đã thêm phía trên.
# Create a public route table for the VPC (will be public once it is associated with the Internet Gateway) myPublicRouteTable: Type: AWS::EC2::RouteTable Properties: VpcId: !Ref myVPC Tags: - Key: MasteringCF Value: !Ref paramUniqueName # Associate the public route table with the Internet Gateway myPublicRoute: Type: AWS::EC2::Route DependsOn: myVPCGatewayAttachment Properties: RouteTableId: !Ref myPublicRouteTable DestinationCidrBlock: 0.0.0.0/0 GatewayId: !Ref myInternetGateway
Khởi tạo 2 public subnet
# Create a public subnet in AZ 1 (will be public once it is associated with public route table) myPublicSubnet1: Type: AWS::EC2::Subnet Properties: VpcId: !Ref myVPC AvailabilityZone: !Select [ 0, !GetAZs '' ] # AZ 1 CidrBlock: !Ref paramPublicSubnet1CIDR MapPublicIpOnLaunch: true # allow instances launched in this subnet receive a public IPv4 address Tags: - Key: MasteringCF Value: !Ref paramUniqueName # Create a public subnet in AZ 2 (will be public once it is associated with public route table) myPublicSubnet2: Type: AWS::EC2::Subnet Properties: VpcId: !Ref myVPC AvailabilityZone: !Select [ 1, !GetAZs '' ] # AZ 2 CidrBlock: !Ref paramPublicSubnet2CIDR MapPublicIpOnLaunch: true # allow instances launched in this subnet receive a public IPv4 address Tags: - Key: MasteringCF Value: !Ref paramUniqueName
Liên kết hai public subnet vừa tạo với public route table
# Associate the public route table with the public subnet in AZ 1 myPublicSubnet1RouteTableAssociation: Type: AWS::EC2::SubnetRouteTableAssociation Properties: RouteTableId: !Ref myPublicRouteTable SubnetId: !Ref myPublicSubnet1 # Associate the public route table with the public subnet in AZ 2 myPublicSubnet2RouteTableAssociation: Type: AWS::EC2::SubnetRouteTableAssociation Properties: RouteTableId: !Ref myPublicRouteTable SubnetId: !Ref myPublicSubnet2
Khởi tạo 2 NAT Gateway, mỗi NAT Gateway sẽ cần được gán Elastic IP nằm trong public subnet
# Specify an Elastic IP (EIP) address for a NAT Gateway in AZ 1
myEIPforNatGateway1: Type: AWS::EC2::EIP DependsOn: myVPCGatewayAttachment Properties: Domain: vpc # if the region supports EC2-Classic, the default is "standard", otherwise - "vpc" Tags: - Key: MasteringCF Value: !Ref paramUniqueName # Specify an Elastic IP (EIP) address for a NAT Gateway in AZ 2 myEIPforNatGateway2: Type: AWS::EC2::EIP DependsOn: myVPCGatewayAttachment Properties: Domain: vpc # if the region supports EC2-Classic, the default is "standard", otherwise - "vpc" Tags: - Key: MasteringCF Value: !Ref paramUniqueName # Create a NAT Gateway in the public subnet for AZ 1 myNatGateway1: Type: AWS::EC2::NatGateway Properties: AllocationId: !GetAtt myEIPforNatGateway1.AllocationId SubnetId: !Ref myPublicSubnet1 Tags: - Key: MasteringCF Value: !Ref paramUniqueName # Create a NAT Gateway in the public subnet for AZ 2 myNatGateway2: Type: AWS::EC2::NatGateway Properties: AllocationId: !GetAtt myEIPforNatGateway2.AllocationId SubnetId: !Ref myPublicSubnet2 Tags: - Key: MasteringCF Value: !Ref paramUniqueName
Tạo 2 route table nhằm điều hướng tất cả request tới 2 NAT Gateway tương ứng
# Create a private route table for AZ 1 myPrivateRouteTable1: Type: AWS::EC2::RouteTable Properties: VpcId: !Ref myVPC Tags: - Key: MasteringCF Value: !Ref paramUniqueName # Create a private route table for AZ 2 myPrivateRouteTable2: Type: AWS::EC2::RouteTable Properties: VpcId: !Ref myVPC Tags: - Key: MasteringCF Value: !Ref paramUniqueName # Associate the private route table with the Nat Gateway in AZ 1 myPrivateRouteForAz1: Type: AWS::EC2::Route DependsOn: myVPCGatewayAttachment Properties: RouteTableId: !Ref myPrivateRouteTable1 DestinationCidrBlock: 0.0.0.0/0 NatGatewayId: !Ref myNatGateway1 # Associate the private route table with the Nat Gateway in AZ 2 myPrivateRouteForAz2: Type: AWS::EC2::Route DependsOn: myVPCGatewayAttachment Properties: RouteTableId: !Ref myPrivateRouteTable2 DestinationCidrBlock: 0.0.0.0/0 NatGatewayId: !Ref myNatGateway2
Bước cuối cùng, bổ sung 2 private subnet và liên kết chúng với 2 route table
# Create a private subnet in AZ 1 myPrivateSubnet1: Type: AWS::EC2::Subnet Properties: VpcId: !Ref myVPC AvailabilityZone: !Select [ 0, !GetAZs '' ] # AZ 1 CidrBlock: !Ref paramPrivateSubnet1CIDR MapPublicIpOnLaunch: false # private subnet doesn't need public IP Tags: - Key: MasteringCF Value: !Ref paramUniqueName # Create a private subnet in AZ 2 myPrivateSubnet2: Type: AWS::EC2::Subnet Properties: VpcId: !Ref myVPC AvailabilityZone: !Select [ 1, !GetAZs '' ] # AZ 2 CidrBlock: !Ref paramPrivateSubnet2CIDR MapPublicIpOnLaunch: false # private subnet doesn't need public IP Tags: - Key: MasteringCF Value: !Ref paramUniqueName # Associate the private route table with the private subnet in AZ 1 myPrivateSubnet1RouteTableAssociation: Type: AWS::EC2::SubnetRouteTableAssociation Properties: RouteTableId: !Ref myPrivateRouteTable1 SubnetId: !Ref myPrivateSubnet1 # Associate the private route table with the private subnet in AZ 2 myPrivateSubnet2RouteTableAssociation: Type: AWS::EC2::SubnetRouteTableAssociation Properties: RouteTableId: !Ref myPrivateRouteTable2 SubnetId: !Ref myPrivateSubnet2
Vậy là hoàn tất, bạn có thể tham khảo file template hoàn chỉnh tại đây.
Chi tiết về cú pháp sử dụng trong Template file, bạn có thể tham khảo tại "Sơ lược về CloudFormation".
Bước 2: Khởi tạo stack từ template file
Chạy lệnh sau để khởi tạo stack trên AWS
aws cloudformation create-stack \ --stack-name custom-vpc \ --template-body file://template.yml
Truy cập website AWS, mục CloudFormation để kiểm tra trạng thái của stack vừa tạo.
Tham khảo các phần Resources được tạo:

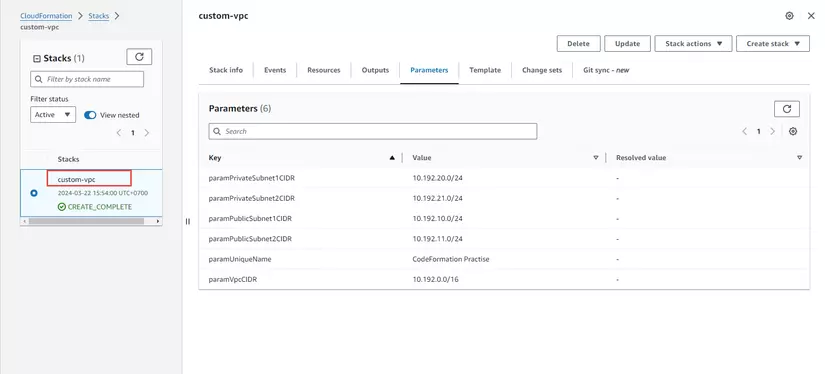
Kiểm tra mục Parameter của stack trong tab "Parameters"
Bước 3: Cập nhật stack
Trong phần này, ta sẽ tạo changeset để cập nhật dải IP của một subnet
Sử dụng lệnh sau để tạo changeset
aws cloudformation create-change-set --change-set-name update-private-subnet-id\ --stack-name custom-vpc \ --use-previous-template \ --parameters ParameterKey=paramPrivateSubnet2CIDR,ParameterValue="10.192.41.0/24"
Mục tiêu ở đây là cập nhật giá trị của tham số paramPrivateSubnet2CIDR - dải IP của private subnet 2 với giá trị: 10.192.41.0/24
Truy cập website AWS, click chọn changeset vừa tạo để view các resources sẽ cập nhật nếu execute changeset:
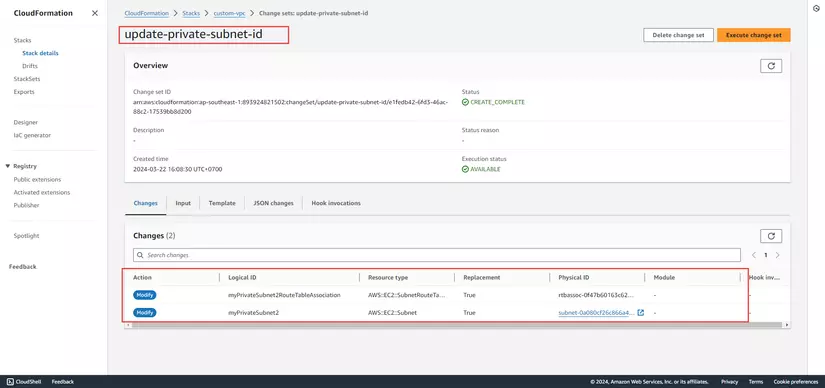
Ở đây, nếu ta apply changeset sẽ có hai đối tượng được cập nhật là: myPrivateSubnet2 và myPrivateSubnet2RouteTableAssociation (đối tượng liên kết subnet với route table)
Để apply changeset, chạy lệnh
aws cloudformation execute-change-set \ --change-set-name update-private-subnet-id \ --stack-name custom-vpc
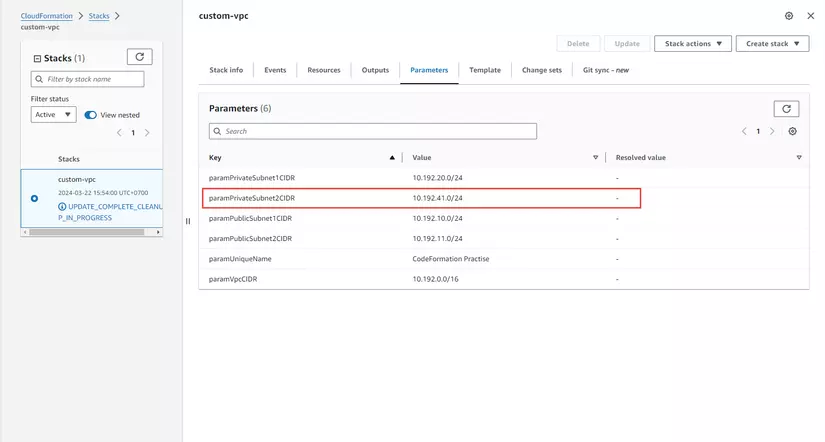
Theo dõi stack được cập nhật trên website. Parameter sau khi được cập nhật:
Vậy là xong, bạn đã thực hiện hầu hết các thao tác cơ bản khi làm việc với AWS CloudFormation.
Bước 4: Delete stack
Last but not least, đừng quên xóa stack để tránh bị tính phí ngoài ý muốn.
aws cloudformation delete-stack --stack-name custom-vpc
Kết luận
Trong bài viết này, mình đã chia sẻ chi tiết các bước để triển khai Virtual Private Cloud sử dụng CloudFormation template. Hi vọng bài viết này có ích cho bạn. Trân trọng!
Link tham khảo
https://docs.aws.amazon.com/AWSCloudFormation/latest/UserGuide/template-guide.html