WordPress migration is the procedure of moving the site from one hosting ecosystem to another. And to perform it, you need to transfer all the files and databases securely and seamlessly. The WordPress site migration requires utmost focus, as even a minor complexity can lead to downtime.
But don't worry about the site's unavailability; here, you will learn about the complete migration procedure. By following the step-by-step guide provided further, you can smoothly transition from your current server to the new one.
So, let’s get started.
How To Migrate a WordPress Site: Step-by-Step Guide
To perform WordPress site migration, primarily two methods are available – Manual and Plugin-based. Under the manual approach, you have to execute all operations by yourself. And under the plugin-based approach, most of the work gets completed by plugins.
Let’s have a look at both of them one-by-one.
Manual Migration Approach
Step 1: Find and Finalize a New Host/WordPress Hosting Service Provider
The WordPress site migration process starts with finding a new hosting service provider. You can effortlessly search for multiple hosting providers on Google. However, you must focus on the following factors before finalizing one among them:
- The pricing models
- SSD Storage availability
- Unlimited bandwidth availability
- 24/7 Support Service availability
- Compatibility with cPanel or hPanel
- eCommerce support
- Cyber-Security service
- Free professional email address
- Data backup feature and more
Once you find multiple hosting providers with all mentioned leverages, compare them to find the most relevant one. In addition, check their client feedback, online reviews, and the company's authenticity before selection.
Step 2: Backup All WordPress Site Files
Following the finalization of the new service provider, it's time to back up the WordPress site files. It would help you publish the site on a new server without losing theme customization. And to execute the backup operation, you need to use FTP (File Transfer Protocol). However, you don't need detailed knowledge about it; you can use a tool called FileZilla. FileZilla would help you connect to the current server and utilize the FTP protocol to download the files to the local machine. You only need to follow the below steps for it:
Step 1: Download and install FileZilla.
Step 2: Open FileZilla and connect it to the current hosting server.
Step 3: Access the public_html folder and make a selection of all files available under it.
Step 4: Right-click on the select files and then select Download.
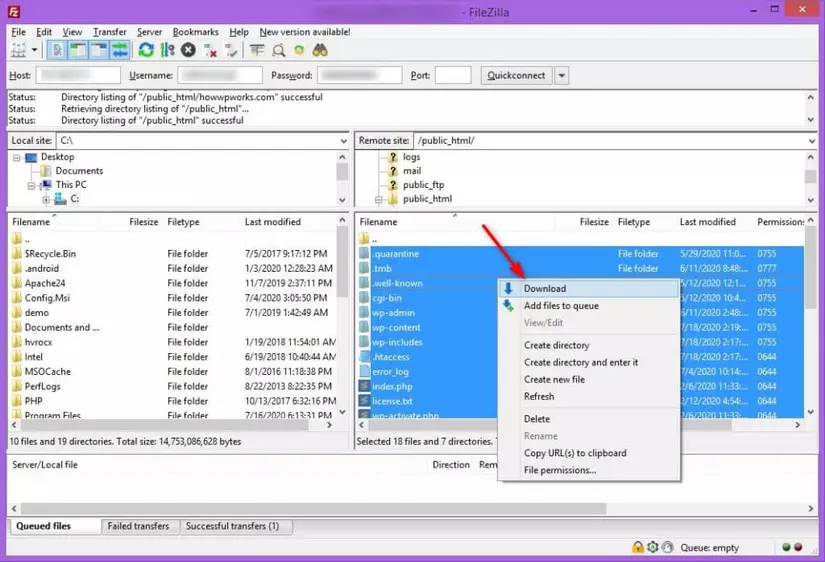
Figure 1 https://wp-staging.com/how-to-migrate-wordpress-to-new-server-step-by-step-guide/
Step 5: All the files will get downloaded on your machine. Further, verify that all the files get downloaded; if not, repeat the procedure.
Step 3: Download and Export WordPress Site Database
Along with the WordPress site files, you also need the associated database. Otherwise, you will lose all the end-user and other essential data. To download the database, follow the below-provided steps:
Step 1: Login and access the cPanel dashboard.
Step 2: After you log in, go to the phpMyAdmin page. It will show you the available databases.
Step 3: Select the database that you want to export/download.
Step 4: Now, go to the export tab and select the Quick option from the interface.
Step 5: Choose the database format as SQL and click on the Go button.
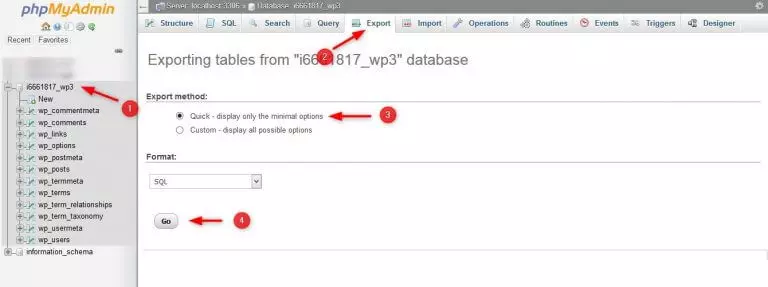
Figure 2 https://wp-staging.com/how-to-migrate-wordpress-to-new-server-step-by-step-guide/
As a result, the database will get downloaded to the local system.
Step 4: Generate a SQL Database on New Server
Prior to migrating the complete website and uploading site files, it's important to set up the database. Therefore, at this stage, access the control panel of your new service provider and generate a SQL database.
In addition, some hosting providers use cPanel, and some utilize their own dedicated dashboard. If your provider uses cPanel, you can follow the below procedure. Otherwise, you must contact the service provider to avail of the guidance on doing so.
Step 1: Access the MySQL database and move to the new database creation area.
Step 2: Set a name for the new database and click on Create Database button.
Step 3: Add username and password details and click on Create User button.
Step 4: Select the user created in Step 3 and the database created in Step 1 and click on Add button.
As an output, your new user will get added to the new SQL database on the new server.
Step 5: Upload The WordPress Files To New Server
After creating a database on the new server, you must now upload the files that you downloaded in the beginning. To execute the upload operation, you will again use the FileZilla tool. However, to know the host's credentials, you must access the cPanel.
After opening cPanel, go to the FTP accounts; under it, you will find the credentials. Further, open the FileZilla tool and connect with a new host and follow the below steps:
Step 1: On the Remote Site column, select the public_html folder.
Step 2: On the Local site column, select all the downloaded files available on the local hard disk.
Step 3: Right-click on the selected files and click on Upload. And after it, the tool will upload all the website files to the new host by using the FTP protocol.
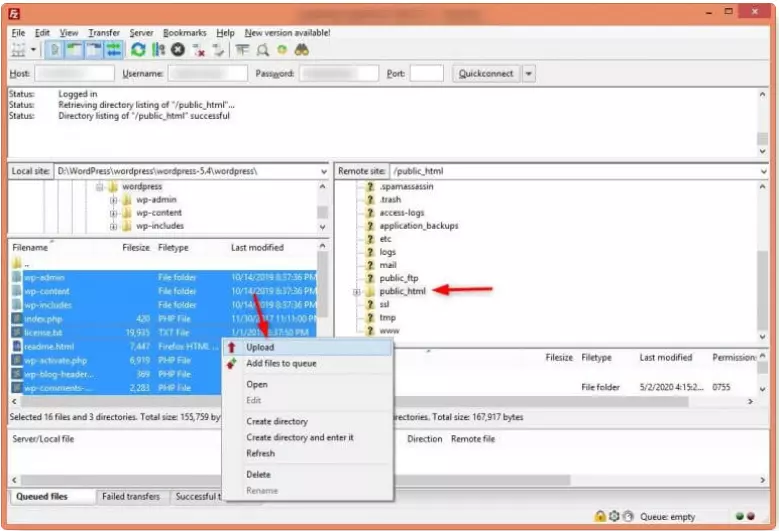
Figure 3 https://wp-staging.com/how-to-migrate-wordpress-to-new-server-step-by-step-guide/
Step 6: Modify the wp-config.php File and Import Database
Configuring the wp-config.php file is a crucial task, as it creates the connection between the website and the database. You can find this file under the root folder of the WordPress site. By utilizing the FTP client (FileZilla), access the wp-config-php file and edit it. To execute the operation, undergo the following procedures:
Step 1: Connect FileZilla to the server.
Step 2: Under the public_html folder, find the wp-config.php file.
Step 3: Right-click on the file name and select the option to View/Edit the file.
Step 4: Modify the database name (db_name), username (db_user), password (db_password), and host (db_host) details.
/** The name of the database for WordPress / define('DB_NAME', 'userna5_wp02'); /* MySQL database username / define('DB_USER', 'userna5_wp02'); /* MySQL database password / define('DB_PASSWORD', 'FGdgA%#5'); /* MySQL hostname */ define('DB_HOST', 'localhost');
Figure 4 https://www.inmotionhosting.com/support/edu/wordpress/easily-move-wordpress-site-to-new-server/
After performing the modification, save the file and move to the next step of importing the database. To import the database, login to the cPanel and then undergo the below-listed steps:
Step 1: Go to the phpMyAdmin interface.
Step 2: Navigate to the Import tab and click on the Browse button.
Step 3: Select the database file that you exported on the local machine.
Step 4: Hit the Go button, and your database will get imported to the new host. Although, it can take some time, depending on the database size.
Step 7: Modify DNS
At this step, you must change the DNS address of the website. However, you should only modify it if you change the domain name. Otherwise, the site will function appropriately. And to execute the DNS modification, access the phpMyAdmin page and navigate to the wp_options table.
Further, discover the website URL and double-click on the option_value variable. Now, change the old URL with the new one and save the settings. WordPress Migration Plugin: An Effortless Approach For Migrating Small and Medium-Scale Sites
Besides the manual migration approach, WordPress also leverages to migrate a website using plugins. There are plenty of plugins that are developed only for migration purposes. You only need to install and activate such a plugin on your site, and it will reduce the efforts to back up files, move them to a new server, and import/export the databases. In addition, top WordPress site migration plugins include the following:
- Migrate Guru
- All-In-One WP Migration
- Duplicator
- UpdraftPlus
- WP Migrate DB
- VaultPress
- Backup Guard
- Super Backup and Clone and more
You can use any of the mentioned plugins. But, before performing the migration, ensure to back up the overall website. It would help you restore the site if anything goes wrong or you encounter an error.
Moreover, prefer using the plugins for small and medium-scale sites, as some of them have data migration limits. For instance, the All-In-One WP migration plugin can only perform migration of up to 512 MB of data in the free version. However, if the data limit exceeds, you need to pay for the premium version to use the plugin. Due to such reasons, plugin migration gets recommended for small-scale sites.
Additionally, small sites, such as blogging sites, don't contain sensitive information, which also makes plugin migration a relevant method for it. Although, for large sites and sites that process confidential data, you must prefer manual methods for them.
Relief Yourself From Complexities Through WordPress Migration Services
Whether it's about migrating a WordPress site manually or using a plugin, there are many hidden factors that only a developer knows. An experienced WordPress Development company, such as Positiwise, can help you remove all complexities from the migration procedure.
You must avail of WordPress migration services to leverage the seamless moving of a site from one server to another. And it would also help you benefit from the following:
- Data integrity, confidentiality, and availability assurance
- Completion of migration procedure within the defined time
- Complete testing after the migration
- Different pricing models as per needs
- 24/7 support services
- Transparent procedure and a dedicated team
You only need to relax, as Positiwise will take care of every process.
Wrapping Up
WordPress site migration is a crucial process that you must perform after gaining all the details about it. Otherwise, it can result in to permanent loss of the site and all its associated data. In addition, before you initiate the migration, finalize a new hosting service provider and undergo its guidelines and features. Further, backup all the site files and databases through FTP and phpMyAdmin interface simultaneously.
Following the backup, upload files and database on a new server and configure the wp-config.php file. It will maintain the connection between the database and the site, and as a result, your website will get migrated to a new server. But, if you are not sure about doing the procedure yourself. Then, you must avail of WordPress migration services from Positiwise for seamless and secure migration.