Installing cuDNN on Linux
1. Prerequisites
👍 Update the System
sudo apt update
sudo apt upgrade
👍 Verify GPU
lspci | grep -i nvidia
If you have your GPU you can proceed with the following installation.
Output
01:00.0 VGA compatible controller: NVIDIA Corporation TU117M [GeForce GTX 1650 Ti Mobile] (rev a1)
👍 For Ubuntu users, to install the zlib package, run:
sudo apt-get install zlib1g
2. Installing NVIDIA Graphics Drivers
Install up-to-date NVIDIA graphics drivers on your Linux system. If your computer installed driver then you can be skip.
- Go to: NVIDIA download drivers
- Select the GPU and OS version from the drop-down menus.
- Download and install the NVIDIA graphics driver as indicated on that web page. For more information, select the ADDITIONAL INFORMATION tab for step-by-step instructions for installing a driver
- Restart your system to ensure that the graphics driver takes effect.
3. Installing the CUDA Toolkit for Linux
The CUDA Development Tools are only supported on some specific distributions of Linux. These are listed in the CUDA Toolkit release notes.
👍 To determine which distribution and release number you’re running, type the following at the command line:
uname -m && cat /etc/*release
You should see output similar to the following, modified for your particular system:
x86_64
DISTRIB_ID=Ubuntu
DISTRIB_RELEASE=22.04
DISTRIB_CODENAME=jammy
DISTRIB_DESCRIPTION="Ubuntu 22.04.3 LTS"
👍 Verify the System Has gcc Installed:
gcc --version
👍 The NVIDIA CUDA Toolkit is available at https://developer.nvidia.com/cuda-downloads.
Choose the platform you are using and download the NVIDIA CUDA Toolkit.
The CUDA Toolkit contains the CUDA driver and tools needed to create, build and run a CUDA application as well as libraries, header files, and other resources. Such as:
wget https://developer.download.nvidia.com/compute/cuda/repos/ubuntu2204/x86_64/cuda-ubuntu2204.pin
sudo mv cuda-ubuntu2204.pin /etc/apt/preferences.d/cuda-repository-pin-600
wget https://developer.download.nvidia.com/compute/cuda/12.2.2/local_installers/cuda-repo-ubuntu2204-12-2-local_12.2.2-535.104.05-1_amd64.deb
sudo dpkg -i cuda-repo-ubuntu2204-12-2-local_12.2.2-535.104.05-1_amd64.deb
sudo cp /var/cuda-repo-ubuntu2204-12-2-local/cuda-*-keyring.gpg /usr/share/keyrings/
sudo apt-get update
sudo apt-get -y install cuda
Wait for sometime for the installation to complete.
Now CUDA will get installed in /usr/local/cuda-12.2 location.
Symlink the directory.
sudo ln -snf /usr/local/cuda-12.1 /usr/local/cuda
4. Installing cuDNN for Linux
In order to download cuDNN
- Go to: NVIDIA cuDNN home page
- Click Download.
- Complete the short survey and click Submit.
- Accept the Terms and Conditions. A list of available download versions of cuDNN displays.
- Select the cuDNN version that you want to install. A list of available resources displays.(such as: https://developer.nvidia.com/downloads/compute/cudnn/secure/8.9.5/local_installers/12.x/cudnn-local-repo-ubuntu2204-8.9.5.29_1.0-1_amd64.deb/)
Download the Debian local repository installation package. Before issuing the following commands, you must replace X.Y and 8.x.x.x with your specific CUDA and cuDNN versions.
- Navigate to your downloads directory containing the cuDNN Debian local installer file.
- Enable the local repository
sudo dpkg -i cudnn-local-repo-$distro-8.x.x.x_1.0-1_amd64.deb
Where $distro is ubuntu1804, ubuntu2004, ubuntu2204, or debian11.
- Import the CUDA GPG key
sudo cp /var/cudnn-local-repo-*/cudnn-local-*-keyring.gpg /usr/share/keyrings/
- Refresh the repository metadata
sudo apt-get update
- Install the runtime library, the developer library, the code samples
sudo apt-get install libcudnn8=8.x.x.x-1+cudaX.Y
sudo apt-get install libcudnn8-dev=8.x.x.x-1+cudaX.Y
sudo apt-get install libcudnn8-samples=8.x.x.x-1+cudaX.Y
5. Update environment after CUDA and CUDNN installed.
Now you have CUDA and CUDNN installed.
Once the installation is complete, update the environment variables, and add the following lines to ~/.bashrc
export CUDA_HOME=/usr/local/cuda-12.2
export LD_LIBRARY_PATH=${CUDA_HOME}/lib64
export PATH=${CUDA_HOME}/bin:${PATH}
Activate the environment variables:
source ~/.bashrc
6. Check CUDA and CUDNN
👍 You can check cuda version using the below command.
nvcc -V
If CUDA installed such as:
nvcc: NVIDIA (R) Cuda compiler driver
Copyright (c) 2005-2023 NVIDIA Corporation
Built on Tue_Aug_15_22:02:13_PDT_2023
Cuda compilation tools, release 12.2, V12.2.140
Build cuda_12.2.r12.2/compiler.33191640_0
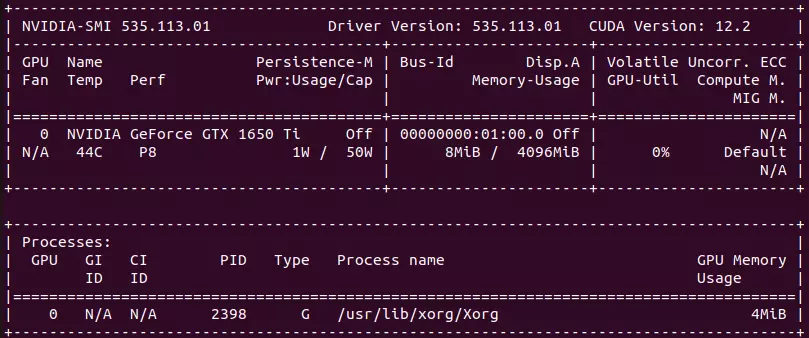
👍 You can also check Nvidia driver installation status using the following command.
nvidia-smi

👍 Try verify GPU
import torch
torch.cuda.is_available()
torch.cuda.get_device_name(torch.cuda.current_device())
