Cài đặt:
#https://helm.sh/docs/intro/install/ curl -k -O https://get.helm.sh/helm-canary-linux-amd64.tar.gz
tar -xvzf helm-canary-linux-amd64.tar.gz
cd linux-amd64/
mv helm /usr/bin/
chmod 755 /usr/bin/helm
#Bash Complete for helm
yum install bash-completion -y helm completion bash > /etc/bash_completion.d/helm
Thoát session ssh và vào lại hoặc
P1: Làm quen Helm Chart
# Add Repo
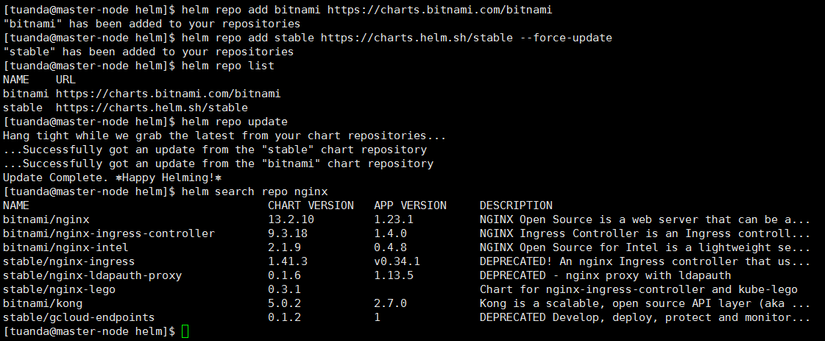
helm repo add bitnami https://charts.bitnami.com/bitnami
helm repo add stable https://charts.helm.sh/stable --force-update
(Note: khi add repo, helm sẽ tạo file config tại ~/.config/helm/repositories.yaml)
helm repo list #(liệt kê repo)
helm repo update #(cập nhập repo)
helm search repo nginx #(search nginx từ các repo đã add)
1.1 Tải helm chart từ ArtifactHub
https://artifacthub.io/ chứa rất nhiều helm được chia sẻ từ cộng đồng.
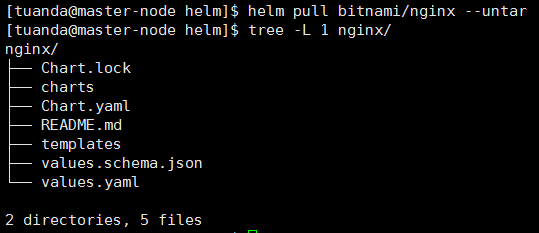
helm pull bitnami/nginx
helm pull bitnami/nginx --untar
1.2 Run helm chart
- Chạy helm trực tiếp từ repo internet
# helm install first-chart1 bitnami/nginx -n tuanda --create-namespace
# helm ls -A - Chạy helm từ folder đã pull về
# helm pull bitnami/nginx --untar
# cd nginx
# helm template first-chart2 . --namespace=tuanda #(Kiểm tra helm)
# helm install first-chart2 . --namespace=tuanda --create-namespace #(install nginx bitnami)
# helm ls -A - Xóa helm chart
helm status first-chart2 -n tuanda
helm uninstall first-chart2 -n tuanda
1.3 Test Chart
Ta có 3 cách kiểm tra config helm đã đúng chưa:
cd nginx
helm template .
helm lint .
helm install nginx . --dry-run --debug
1.4 Show thông tin của chart trên ArtifactHub
helm show chart bitnami/nginx
helm show values bitnami/nginx
1.5 Liệt kê chart nào đang chạy
helm ls -n tuanda #(-n là namespace)
helm ls -A
P2: Tự tạo Helm Chart
2.1 Tạo self chart
# helm create nginx-test2 > Cấu trúc thư mục helm như sau:
├── charts
├── Chart.yaml
├── templates (chứa toàn bộ thông tin yaml để deploy k8s)
│ ├── deployment.yaml (Chứa deployment k8s)
│ ├── _helpers.tpl (chứa teamplate / include)
│ ├── hpa.yaml
│ ├── ingress.yaml
│ ├── NOTES.txt
│ ├── serviceaccount.yaml
│ ├── service.yaml
│ └── tests
│ └── test-connection.yaml
└── values.yaml (chứ tham số để thay vào file yaml trong thư mục template)
2.2 Upgrade Chart
Nếu Chart yaml có update (ví dụ thêm biến ở configmap, thay đổi image deployment), ta chạy như sau:
helm template nginx-test2 . --namespace=tuanda
helm install nginx-test2 . -n tuanda #Ta tăng số pod lên 5 và thử chạy upgrade
(vim values.yaml và sửa replicaCount: 5)
helm upgrade nginx-test2 . -n tuanda
2.3 Rollback Chart
$ helm history nginx-test2 -n tuanda
REVISION	UPDATED STATUS CHART APP VERSION	DESCRIPTION 1 Sat Oct 15 10:57:24 2022	superseded	nginx-test2-0.1.0	1.16.0 Install complete
2 Sat Oct 15 10:59:37 2022	deployed nginx-test2-0.1.0	1.16.0 Upgrade complete $ helm rollback nginx-test2 -n tuanda (về bản trước đó)
$ helm rollback nginx-test2 1 -n tuanda (về bản chỉ định)
P3: .Values / .Chart
Để chuẩn bị cho các bài test từ phần 3,4... trở đi, ta thực hiện xóa vài thư mục sau
helm create nginx-test3
cd nginx-test3
rm -rf templates/*
cat /dev/null > values.yaml # tạo 2 file MẪU
kubectl create configmap nginx-test3-cfg --from-literal=PORT=80 --dry-run=client -o yaml > templates/configmap.yaml
kubectl create deployment nginx-test3-dpl --image=nginx:alpine --replicas=2 --dry-run=client -o yaml > templates/deployment.yaml
VD1: Load tham số .Values từ values.yaml
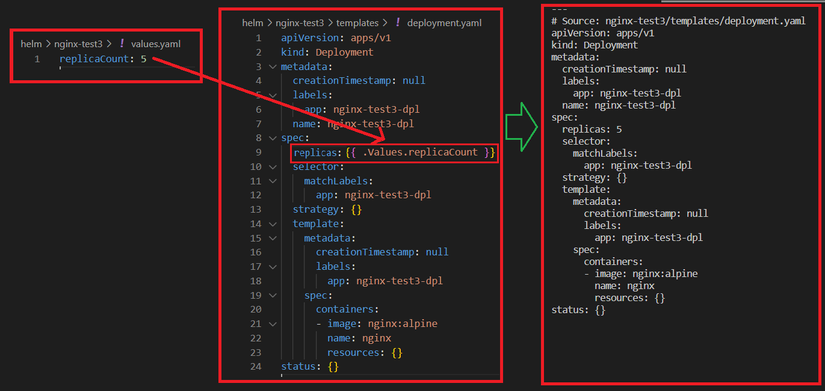
B1: Chuẩn bị values.yaml
echo 'replicaCount: 5' > values.yaml
B2: Sửa deployment.yaml
vi templates/deployment.yaml
sửa replicas: 2
thành: replicas: {{ .Values.replicaCount }}
B3: Kết quả
Replicas đã được ghi đè từ 2 lên 5 khi chạy helm template (hoặc install/upgrade)
VD2: Load tham số .Chart từ Chart.yaml
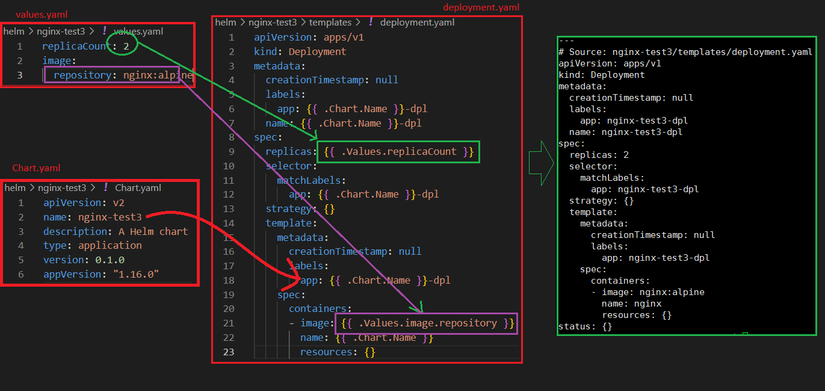
B1: values.yaml
replicaCount: 2
image: repository: nginx:alpine
B2: Sửa deployment.yaml
apiVersion: apps/v1
kind: Deployment
metadata: creationTimestamp: null labels: app: {{ .Chart.Name }}-dpl name: {{ .Chart.Name }}-dpl
spec: replicas: {{ .Values.replicaCount }} selector: matchLabels: app: {{ .Chart.Name }}-dpl strategy: {} template: metadata: creationTimestamp: null labels: app: {{ .Chart.Name }}-dpl spec: containers: - image: {{ .Values.image.repository }} name: {{ .Chart.Name }} resources: {}
B3: Kết quả
Ngoài ra, ta còn có một số Values, chart build-in có sẵn hay sử dụng:
Release.Name
Chart.Name
Chart.ApiVersion
...
URL: https://helm.sh/docs/chart_template_guide/builtin_objects/
P4: Function và Pipeline
Các Function helm ta có thể tìm ở đây: https://helm.sh/docs/chart_template_guide/function_list/#string-functions
VD1: Function
B1: Sửa file values.yaml và Chart.yaml
# vim values.yaml
replicaCount: 2
image: repository: nginx:alpine
-----------------
#vim Chart.yaml
apiVersion: v2
name: nginx-test3
description: A Helm chart for Kubernetes
type: application
version: 0.1.0
appVersion: "1.16.0"
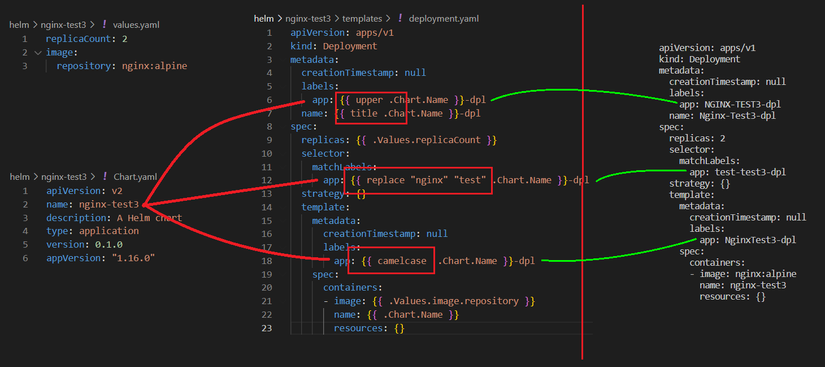
B2: Sửa deployment.yaml. Áp dụng function: upper, title, replace, camelcase...
apiVersion: apps/v1
kind: Deployment
metadata: creationTimestamp: null labels: app: {{ upper .Chart.Name }}-dpl name: {{ title .Chart.Name }}-dpl
spec: replicas: {{ .Values.replicaCount }} selector: matchLabels: app: {{ replace "nginx" "test" .Chart.Name }}-dpl strategy: {} template: metadata: creationTimestamp: null labels: app: {{ camelcase .Chart.Name }}-dpl spec: containers: - image: {{ .Values.image.repository }} name: {{ .Chart.Name }} resources: {}
B3: Kết quả
VD2: Pipeline
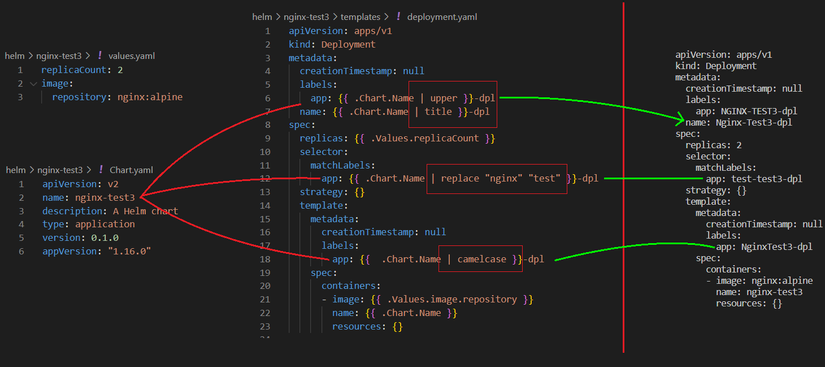
Pipeline có kêt quả tương tự như function, ta có thể xem ví dụ dưới đây về upper, title, replace, camelcase...
apiVersion: apps/v1
kind: Deployment
metadata: creationTimestamp: null labels: app: {{ .Chart.Name | upper }}-dpl name: {{ .Chart.Name | title }}-dpl
spec: replicas: {{ .Values.replicaCount }} selector: matchLabels: app: {{ .Chart.Name | replace "nginx" "test" }}-dpl strategy: {} template: metadata: creationTimestamp: null labels: app: {{ .Chart.Name | camelcase }}-dpl spec: containers: - image: {{ .Values.image.repository }} name: {{ .Chart.Name }} resources: {}
Kết quả:
Phần 5: IF
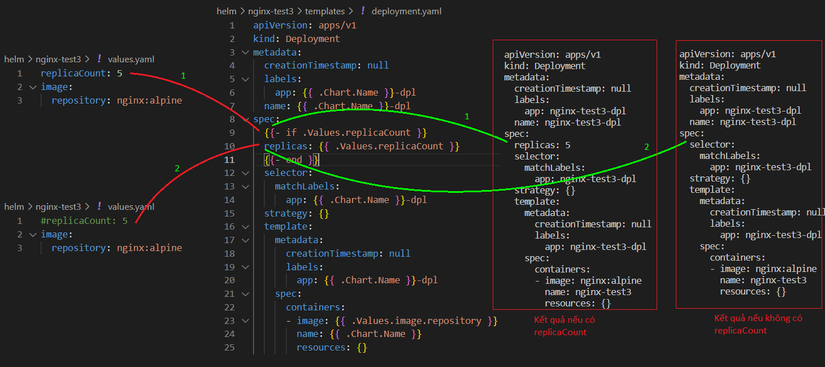
Chức năng: (1) so sánh, (2) Nếu exist sẽ in ra
VD1: Kiểm tra tồn tại bằng if
B1: File values.yaml
replicaCount: 5
B2: Sửa deployment.yaml
spec: {{- if .Values.replicaCount }} replicas: {{ .Values.replicaCount }} {{- end }}
B3: Kết quả
VD2: Các ví dụ so sánh về IF
{{- if and (eq $.Values.service.type "NodePort") .Values.nodePort }}
> nếu service.type là NodePort -VÀ- nodePort=8080 tồn tại thì thực hiện ... {{- if eq (include "paperless.trash.enabled" .) "true" }}
> nếu template paperless.trash.enabled được khai báo thì thực hiện ... {{- if or .Values.serverBlock .Values.existingServerBlockConfigmap }}
> nếu tồn tại 1 trong 2 value thì thực hiện ... {{- if or (eq .Values.service.type "LoadBalancer") (eq .Values.service.type "NodePort") }}
> nếu svc khai báo là "LoadBalancer hoặc NodePort" thì thực hiện ... {{- if and (or (eq .Values.service.type "NodePort") (eq .Values.service.type "LoadBalancer")) (not (empty .Values.service.nodePorts.http)) }} nodePort: {{ .Values.service.nodePorts.http }} {{- end }}
P6: With
Chức năng:
- Dùng để rút gọn Chart.
- Kiểm tra tồn tại nếu có thì insert., nếu ko có thì xóa (giống IF).
- Dùng để load 1 list string vào trong Chart.
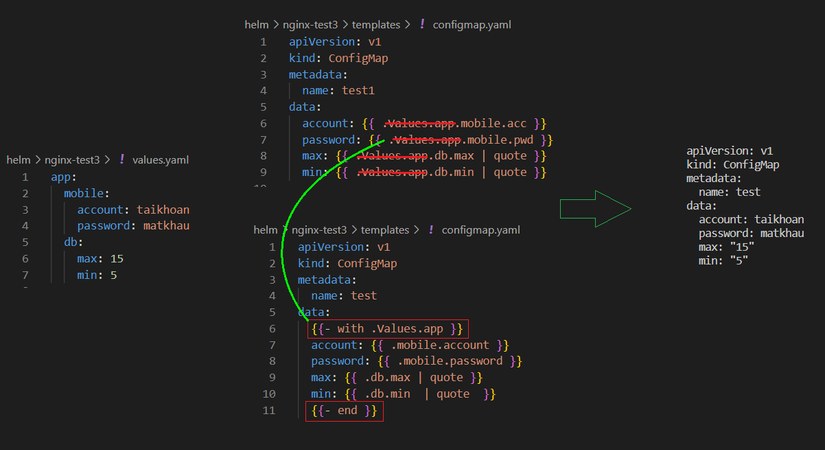
VD1: Rút gọn Chart
B1: File values.yaml
app: mobile: account: taikhoan password: matkhau db: max: 15 min: 5
B2: File configmap.yaml khi chưa sửa
apiVersion: v1
kind: ConfigMap
metadata: name: test
data: account: {{ .Values.app.mobile.acc }} password: {{ .Values.mobile.ui.pwd }} max: {{ .Values.app.db.max }} min: {{ .Values.app.db.min }}
B3: Sửa configmap.yaml rút gọn ".Values.app." đưa vào with
apiVersion: v1
kind: ConfigMap
metadata: name: test
data: {{- with .Values.app. }} account: {{ .mobile.account }} password: {{ .mobile.password }} max: {{ .db.max }} min: {{ .db.min }}
B4: Kết quả
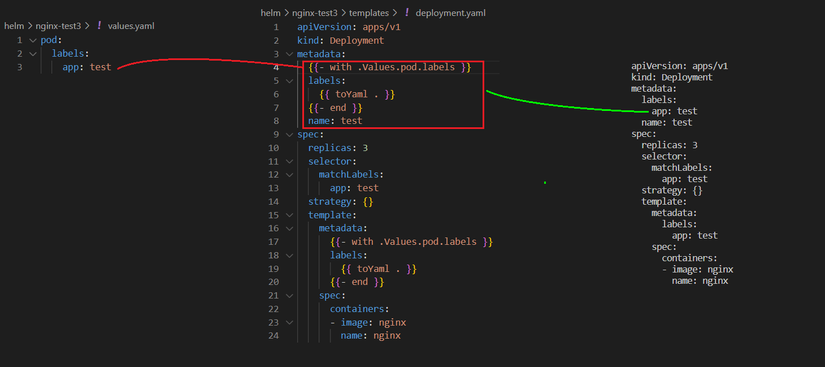
VD2: kiểm tra tồn tại nếu có thì insert., nếu ko có thì xóa (giống IF)
B1: File values.yaml
pod: labels: app: test
B2: Sửa deployment.yaml
apiVersion: apps/v1
kind: Deployment
metadata: {{- with .Values.pod.labels }} labels: {{ toYaml . }} {{- end }} name: test
spec: replicas: 3 selector: matchLabels: app: test strategy: {} template: metadata: {{- with .Values.pod.labels }} labels: {{ toYaml . }} {{- end }} spec: containers: - image: nginx name: nginx
B3: Kết quả
P7: Range (for i)
Range gần giống như with để load values ra, nhưng sử dụng cho array values. Ta có thể xem ví dụ sau
VD1: Range sử dụng để fill array list
B1: File values.yaml
configMapReload: #extraArgs: [] extraArgs: - --webhook-method HEAD - --webhook-retries 5
B2: Sửa deployment.yaml
args: - --webhook-url=http://127.0.0.1:{{ .Values.ports.http.port }}/-/reload {{- range $i, $val := .Values.configMapReload.extraArgs }} - {{ $val }} {{- end }}
B3: Kết quả
args: - --webhook-url=http://127.0.0.1:9090/-/reload - --webhook-method HEAD - --webhook-retries 5
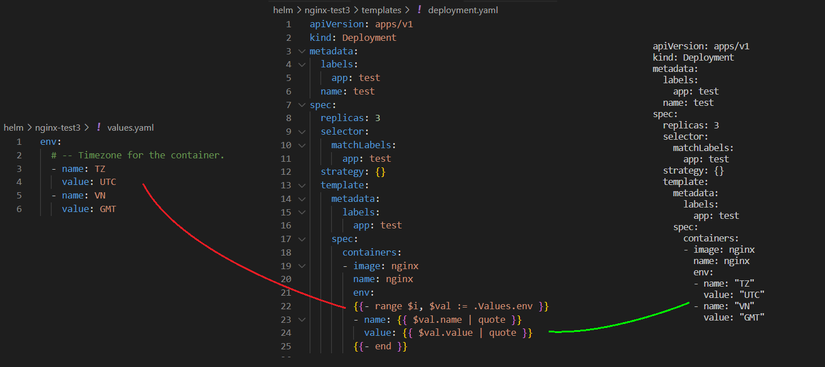
VD2: Range with multi values
B1: File values.yaml
env: # -- Timezone for the container. - name: TZ value: UTC - name: VN value: GMT
B2: Sửa deployment.yaml
apiVersion: apps/v1
kind: Deployment
metadata: labels: app: test name: test
spec: replicas: 3 selector: matchLabels: app: test strategy: {} template: metadata: labels: app: test spec: containers: - image: nginx name: nginx env: {{- range $i, $val := .Values.env }} - name: {{ $val.name | quote }} value: {{ $val.value | quote }} {{- end }}
B3: Kết quả
VD3: Range without $val
B1: File values.yaml
configMapReload: extraConfigMapMounts: - name: alerts configMap: prometheus-alerts mountPath: /etc/alerts subPath: 'test'
B2: Sửa deployment.yaml
{{- range .Values.configMapReload.extraConfigMapMounts }} - name: {{ .name }} configMap: name: {{ .configMap }} {{- end }}
B3: Kết quả
- name: alerts configMap: name: prometheus-alerts
P8: Include/Template
helm create self-chart
B1: File _helper.tpl
{{- define "self-chart.labels" -}}
helm.sh/chart: {{ include "self-chart.chart" . }}
{{ include "self-chart.selectorLabels" . }}
{{- if .Chart.AppVersion }}
app.kubernetes.io/version: {{ .Chart.AppVersion | quote }}
{{- end }}
app.kubernetes.io/managed-by: {{ .Release.Service }}
{{- end }}
B2: Trong deployment.yaml có gọi include
apiVersion: apps/v1
kind: Deployment
metadata: name: {{ include "self-chart.fullname" . }} labels: {{- include "self-chart.labels" . | nindent 4 }}
spec:
B3: Kết quả
apiVersion: apps/v1
kind: Deployment
metadata: name: release-name-nginx-test3 labels: helm.sh/chart: nginx-test3-0.1.0 app.kubernetes.io/name: nginx-test3 app.kubernetes.io/instance: release-name app.kubernetes.io/version: "1.16.0" app.kubernetes.io/managed-by: Helm
spec:
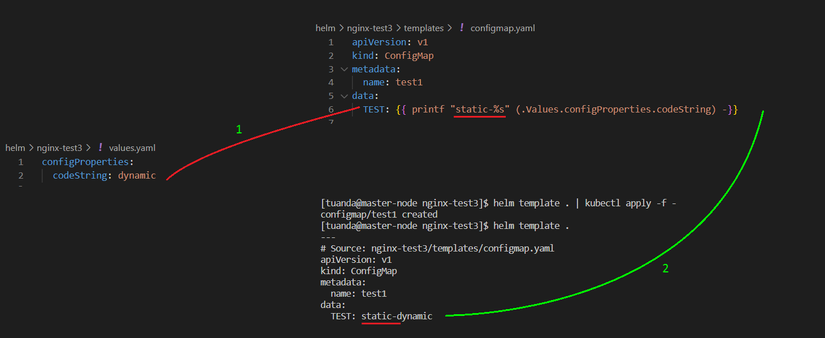
P9: Print function
B1: File values.yaml
configProperties: codeString: dynamic
B2: Sửa configmap.yaml
apiVersion: v1
kind: ConfigMap
data: TEST: {{ printf "static-%s" (.Values.configProperties.codeString) -}}
B3: Kết quả
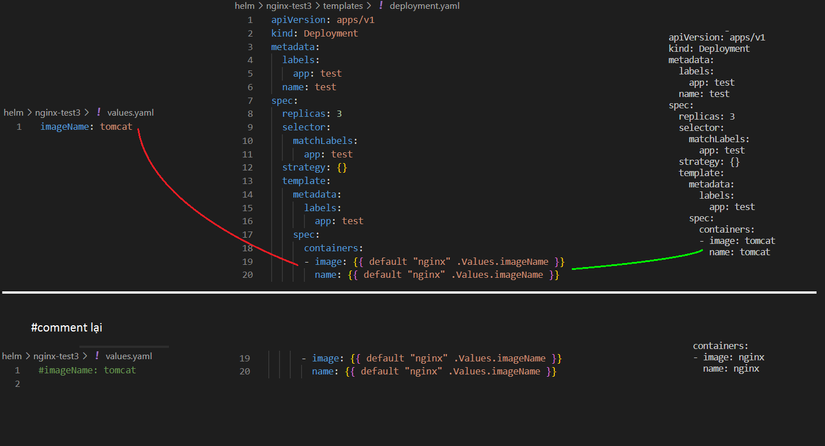
P10: Default
B1: File values.yaml
imageName: tomcat
B2: Sửa deployment.yaml
spec: containers: - image: {{- default "nginx" .Values.imageName }} name: {{- default "nginx" .Values.imageName }} resources: {}
B3: Kết quả
P11: Đẩy Helm Chart lên ArtifactHub hoặc Local registry
(updating...)
Bài viết trong phạm vi kiến thức của người viết, có thể các bạn có idea hay hơn, xin hướng dẫn. Cảm ơn!