Tại sao chúng ta phải dùng NetworkPolicy:
- Allow đến mức pod gọi pod, giới hạn pod gọi internet. Tránh trường hợp 1 pod bị chiếm quyền tấn công loạn xạ toàn bộ hệ thống k8s.
Để hiểu cơ bản về việc các pod gọi nhau trong k8s, ta sẽ đi P1 và P2 khi chưa có chặn networkpolicies. Và P3,P4 sẽ thực hiện chặn lại.
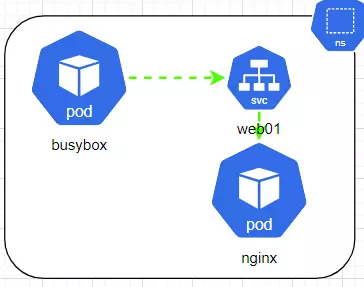
Phần 1: Pod gọi Pod - cùng Namespace:
Phần này ta tạo 2 pod nằm trong cùng 1 NS, sau đó thực hiện gọi nhau thông qua service_name
# kubectl create ns tuanda0
# kubectl -n tuanda0 run --image=nginx web01
# kubectl -n tuanda0 expose pod web01 --port=80
# kubectl -n tuanda0 run busybox --image=busybox --restart=Never -- /bin/sh -c 'echo hello;sleep 36000'
Thực hiện kiểm tra bằng việc truy cập busybox và gọi service_name nginx
# kubectl -n tuanda0 exec -it busybox -- /bin/sh
> wget web01 Hello World
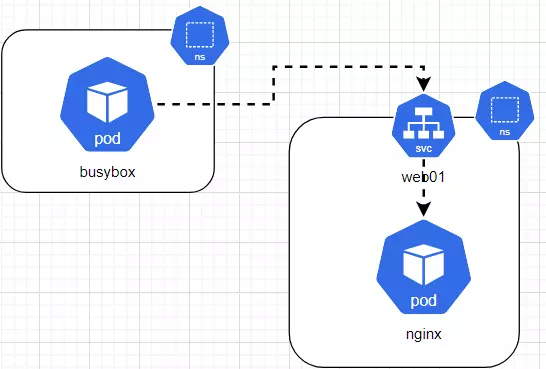
Phần 2: Pod gọi Pod - khác Namespace
Phần này ta tạo 2 pod nằm khác NS, Để gọi chéo ta thêm tiền tố namespace sau service_name :
<svcname>.<namespace>.svc.cluster.local hoặc rút gọn: <svcname>.<namespace>
kubectl create ns tuanda1
kubectl create ns tuanda2
kubectl -n tuanda1 run --image=nginx web01
kubectl -n tuanda1 expose pod web01 --port=80
kubectl -n tuanda2 run busybox --image=busybox --restart=Never -- /bin/sh -c 'echo hello;sleep 36000'
# Ta thực hiện vào pod2 (ns: tuanda2) để kiểm tra thông với pod1 ở ns tuanda1
kubectl -n tuanda2 exec -it busybox -- /bin/sh
> nslookup web01.tuanda1.svc.cluster.local [OK]
> wget web01.tuanda1.svc.cluster.local Hello World
Phần 3: Pod gọi nhau sử dụng Networkpolicies Deny all - cùng NameSpace
Chuẩn bị pod và ns để test:
kubectl create ns frontend
kubectl label namespaces frontend role=frontend --overwrite=true
kubectl -n frontend run --image=nginx --labels="app=web_frontend" nginx
kubectl -n frontend expose pod nginx --port=80
kubectl -n frontend run busybox --image=busybox --restart=Never -- /bin/sh -c 'echo hello;sleep 36000'
Step1: DENY ALL
Việc đầu tiên phải làm là ta cần deny all và mở những rule cần thiết ở các VD tiếp.
# vim 01.deny-frontend.yaml apiVersion: networking.k8s.io/v1
kind: NetworkPolicy
metadata: name: default-deny-all namespace: frontend
spec: podSelector: {} policyTypes: - Ingress - Egress
Kết quả:
Case1 : Allow Egress (outbound)
Trong case này, ta giả lập cần mở cho busybox gọi ra ngoài web google, api sendmail, api sms....
# kubectl get ns --show-labels (để lấy label của namespace)
# kubectl get all -n frontend --show-labels (để lấy label của pod)
# vim 02.allow-http-dns.yaml
apiVersion: networking.k8s.io/v1
kind: NetworkPolicy
metadata: name: allow-http-dns namespace: frontend
spec: policyTypes: - Egress podSelector: {} egress: - ports: - port: 53 protocol: UDP - port: 80 protocol: TCP - port: 443 protocol: TCP Vào pod busybox thực hiện wget google.com KQ: [return 200]. Với trường hợp ta chỉ định pod nhất định > thì có thể sửa podSelector: podSelector: matchLabels: role: db
Ngoài ra có thể giới hạn chính xác IP được gọi, chứ ko mở all 80/443 ra ngoài như sau: egress: - to: - ipBlock: cidr: 123.123.68.68/32 ports: - protocol: TCP port: 8080
Case2: Allow Ingress (Inbound)
Vậy với trường hợp Pod gọi Pod khi bị DenyAll, ta thực hiện như sau
# kubectl get ns --show-labels (để lấy label của namespace)
# kubectl get all -n frontend --show-labels (để lấy label của pod) # vim 03.allow-http-ingress.yaml
apiVersion: networking.k8s.io/v1
kind: NetworkPolicy
metadata: name: 03-allow-http-ingress namespace: frontend
spec: podSelector: matchLabels: app: web_frontend policyTypes: - Ingress ingress: - from: - namespaceSelector: matchLabels: role: frontend podSelector: matchLabels: run: busybox ports: - protocol: TCP port: 80 # kubectl apply -f 03.allow-http-ingress.yaml
# kubectl -n frontend exec -it busybox -- sh (vào pod busybox để kiểm tra)
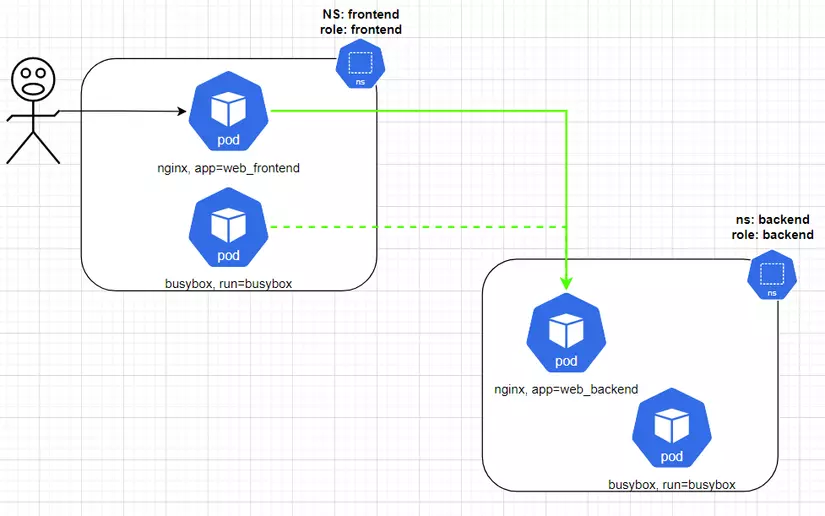
> wget nginx Hello World Phần 4: Pod gọi nhau sử dụng Networkpolicies Deny all - khác NameSpace
Xóa ns để tạo lại môi trường giả lập
kubectl delete ns frontend
kubectl delete ns backend kubectl create ns frontend
kubectl label namespaces frontend role=frontend --overwrite=true
kubectl -n frontend run --image=nginx --labels="app=web_frontend" nginx
kubectl -n frontend expose pod nginx --port=80
kubectl -n frontend run busybox --image=busybox --restart=Never -- /bin/sh -c 'echo hello;sleep 36000' kubectl create ns backend
kubectl label namespaces backend role=backend --overwrite=true
kubectl -n backend run --image=nginx --labels="app=web_backend" nginx
kubectl -n backend expose pod nginx --port=80
kubectl -n backend run busybox --image=busybox --restart=Never -- /bin/sh -c 'echo hello;sleep 36000'
Sơ đồ
B1: Chặn Ingress/Exgress 2 NS
#vim 01.deny-frontend.yaml apiVersion: networking.k8s.io/v1
kind: NetworkPolicy
metadata: name: 01-default-deny-all-frontend namespace: frontend
spec: podSelector: {} policyTypes: - Ingress - Egress # vim 01.deny-backend.yaml apiVersion: networking.k8s.io/v1
kind: NetworkPolicy
metadata: name: 01-default-deny-all-backend namespace: backend
spec: podSelector: {} policyTypes: - Ingress - Egress
# kubectl apply -f 01.deny-backend.yaml # kubectl apply -f 01.deny-frontend.yaml
B2: Busybox frontend gọi nginx backend
(1, ====Vì busybox cần biết IP của service_backend là bao nhiêu, nên ta cần mở DNS 53====)
# vim 05.exgress-frontend-allow-dns.yaml
apiVersion: networking.k8s.io/v1
kind: NetworkPolicy
metadata: name: exgress-frontend-allow-dns namespace: frontend
spec: podSelector: matchLabels: run: busybox policyTypes: - Egress egress: - ports: - port: 53 protocol: UDP (====================2, Mở Egress cho Frontend ====================)
# vim 06.exgress-frontend-allow-http.yaml apiVersion: networking.k8s.io/v1
kind: NetworkPolicy
metadata: name: exgress-frontend-allow-http namespace: frontend
spec: podSelector: matchLabels: run: busybox policyTypes: - Egress egress: - to: - namespaceSelector: matchLabels: role: backend podSelector: matchLabels: app: web_backend (====================3, Mở Ingress cho Backend ====================)
07.ingress-backend-allow-http.yaml apiVersion: networking.k8s.io/v1
kind: NetworkPolicy
metadata: name: ingress-backend-allow-http namespace: backend
spec: podSelector: matchLabels: app: web_backend policyTypes: - Ingress ingress: - from: - namespaceSelector: matchLabels: role: frontend podSelector: matchLabels: run: busybox ports: - protocol: TCP port: 80 (====================Test ====================) kubectl -n frontend exec -it busybox -- sh
> wget nginx.backend HelloWorld
Tổng kết:
Nguồn tham khảo:
https://kubernetes.io/docs/concepts/services-networking/network-policies/
https://faun.pub/debugging-networkpolicy-part-1-249921cdba37
https://pauldally.medium.com/debugging-networkpolicy-part-2-2d5c42d8465c
https://docs.giantswarm.io/getting-started/network-policies/