Giới thiệu
Trong bài viết này mình và các bạn sẽ thực hành tạo một ứng dụng Todo List đơn giản với NuxtJS và Vuex. Về cơ bản ứng dụng của ta sẽ có chức năng như: thêm, sửa, xóa một công việc, thống kê và lọc ra những công việc chưa hoàn thành, đã hoàn thành. Toàn bộ source code mình đã đưa lên git các bạn có thể vào để xem và dễ dàng theo dõi ở đây.

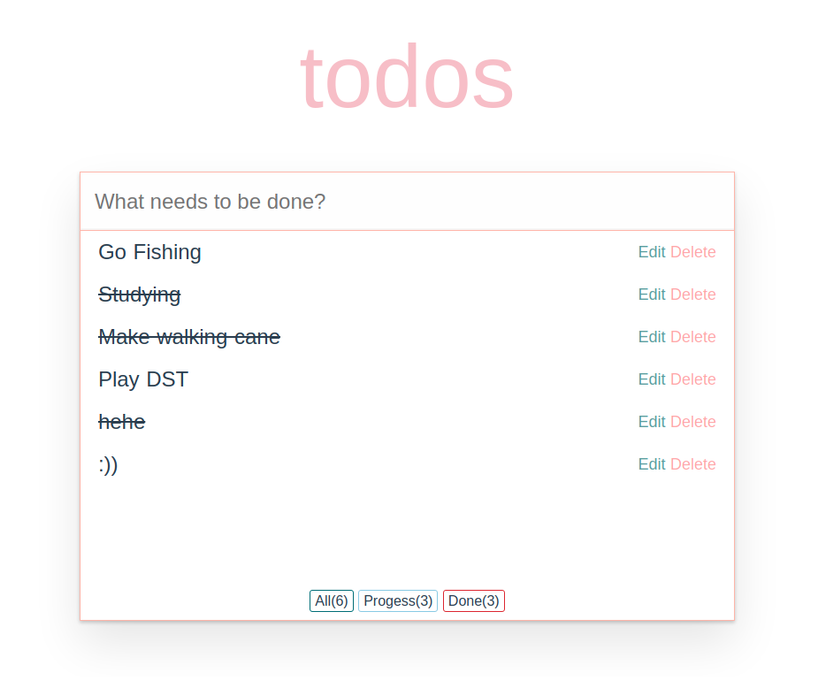
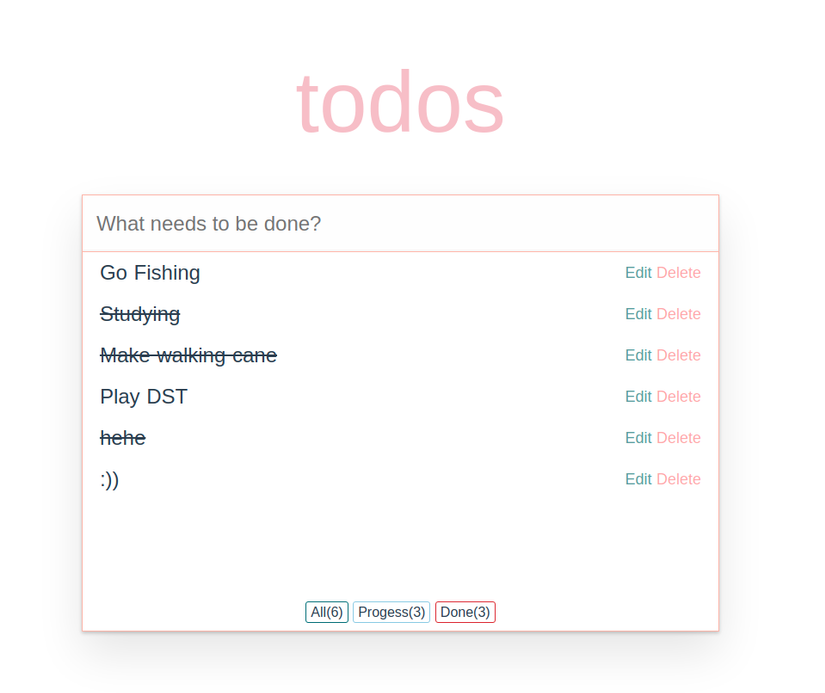
Todo App sẽ có giao diện như hình bên dưới:
Cài đặt
Để nhanh chóng có một project NuxtJS ta sẽ sử dụng câu lệnh create-nuxt-app. Chắc chắn rằng máy tính của bạn đã được cài đặt node. Để kiểm tra máy tính đã cài đặt node chưa ta ta thực hiện kiểm tra trong terminal.
node -v
v10.23.2
Ở máy của mình thì nó hiện bản v10.23.2. Nếu máy các bạn không báo version của node thì các bạn có thể lên đầy để cài đặt node.
Tiếp theo ta sẽ tiến hành tạo NuxtJS project.
npx create-nuxt-app todoapp create-nuxt-app v3.5.2
✨ Generating Nuxt.js project in todoapp
// Đoạn này là nó hỏi bạn đặt tên cho project bạn chỉ cần nhấn Enter
? Project name: (todoapp) // Đoạn này nó hỏi bạn xem code ngôn ngữ nào. Ở đây mình chọn JS nên chỉ cần nhấn Enter
? Programming language: (Use arrow keys)
❯ JavaScript TypeScript // Đoạn hỏi xem bạn muốn quản lý package ntn. Ở đây mình chọn npm (các bạn có thể chọn tùy ý)
? Package manager: (Use arrow keys)
❯ Yarn Npm // Ở đây nó thông kê các UI framework chon bạn chọn để dùng trong dự án. Ở đây mình sẽ chọn None.
? UI framework: (Use arrow keys)
❯ None Ant Design Vue BalmUI Bootstrap Vue Buefy Chakra UI Element Framevuerk iView Tachyons Tailwind CSS Vuesax Vuetify.js Oruga // Module trong NuxtJS bạn dùng ở đây mình dùng Axios -> Enter
? Nuxt.js modules: (Press <space> to select, <a> to toggle all, <i> to invert se
lection)
❯◯ Axios - Promise based HTTP client ◯ Progressive Web App (PWA) ◯ Content - Git-based headless CMS // Một số tools để format ở đây mình chọn ESLint và Prettier -> Enter
? Linting tools: ◉ ESLint
❯◉ Prettier ◯ Lint staged files ◯ StyleLint ◯ Commitlint // Testing framework mình chọn None
? Testing framework: (Use arrow keys)
❯ None Jest AVA WebdriverIO Nightwatch // Rendering mode mình chọn Univesal (SSR / SSG)
? Rendering mode: (Use arrow keys)
❯ Universal (SSR / SSG) Single Page App // Deployment target mình chọn Server (Node.js hoisting) -> Enter
? Deployment target: (Use arrow keys)
❯ Server (Node.js hosting) Static (Static/JAMStack hosting) // Chỗ này mình chọn theo recommended -> Enter
? Development tools: (Press <space> to select, <a> to toggle all, <i> to invert selection)
❯◯ jsconfig.json (Recommended for VS Code if you're not using typescript) ◯ Semantic Pull Requests ◯ Dependabot (For auto-updating dependencies, GitHub only) // Về phần CI mình chọn None -> Enter
? Continuous integration: (Use arrow keys)
❯ None GitHub Actions (GitHub only) // VCS mình chọn Git
? Version control system: (Use arrow keys)
❯ Git None
Sau khi đợi chạy xong bạn chạy npm run dev để chạy server ta sẽ được.
Route
Trong thư mục pages của project ta tạo thêm 1 file todos.vue. File nó sẽ trông như thế này:
<template> <div class="container"> <h1>todos</h1> </div>
</template> <script>
export default { }
</script> <style scoped>
// Về phần CSS của giao diện các bạn có thể lấy toàn bộ code trên github repo của mình
</style>
Sau khi tạo xong trong thư mục pages. các bạn truy cập vào địa chỉ http://localhost:<your-port>/todos. Ta sẽ có giao diện tương tự bên dưới:
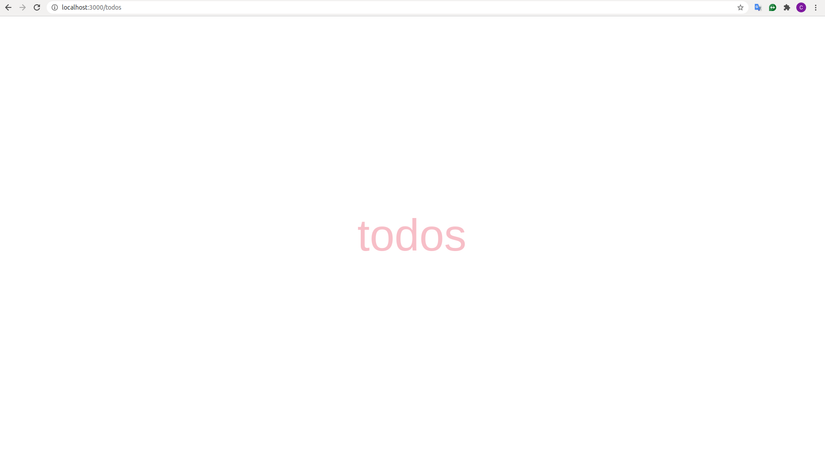
Giao diện
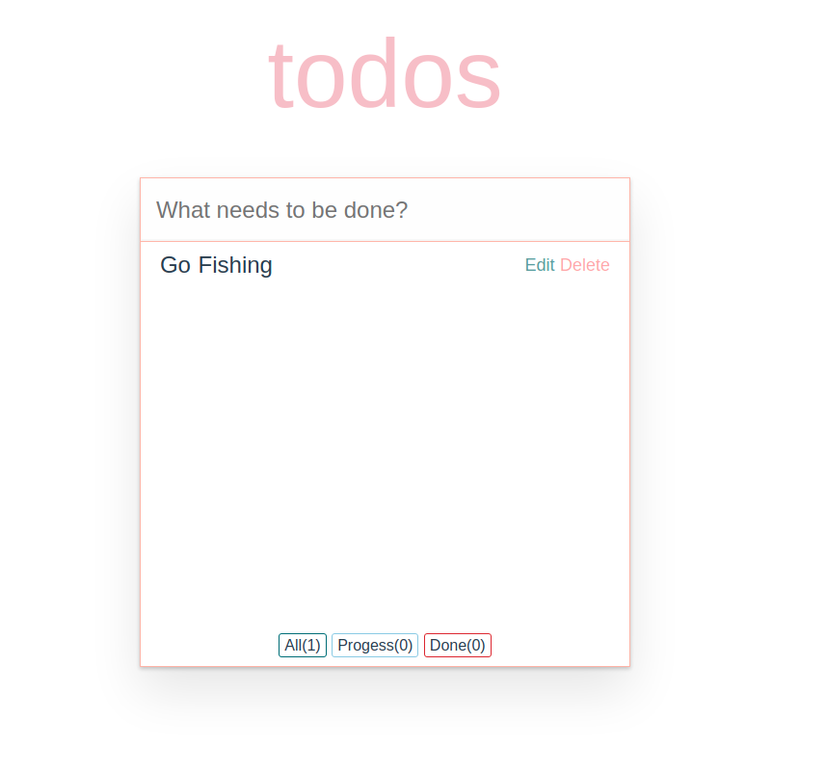
Trong template ta sẽ có code như sau:
<template> <div class="container"> <h1>todos</h1> <div class="main-content"> <input class="todo-input" placeholder="What needs to be done?" @keyup.enter="addTodo" /> <ul> <li v-for="(todo, index) in filterTodos" :key="index" @click.self="toggle(todo)" > <span :class="{ done: todo.isComplete, hide: isEdit === todo.id }" @click.self="toggle(todo)" >{{ todo.content }}</span > <input v-if="isEdit === todo.id" v-model="content" class="input-edit" type="text" @keydown.enter.stop="editTodo(todo)" /> <div> <span class="edit-text" @click.stop="clickEdit(todo)">Edit</span> <span class="delete-text" @click.stop="deleteTodo(todo)" >Delete</span > </div> </li> </ul> <div class="filter"> <span class="all-border" @click="clickAll">All({{ total }})</span> <span class="progress-border" @click="clickProgress" >Progess({{ countProgress }})</span > <span class="done-border" @click="clickDone" >Done({{ countDone }})</span > </div> </div> </div>
</template>
Ta sẽ có giao diện tương tự như bên dưới.
API
Ở đây cho nhanh gọn mình sẽ setup một API đơn giản với mockAPI. Ta truy cập: https://www.mockapi.io/ tiến hành tạo một API với dữ liệu đơn giản như sau.
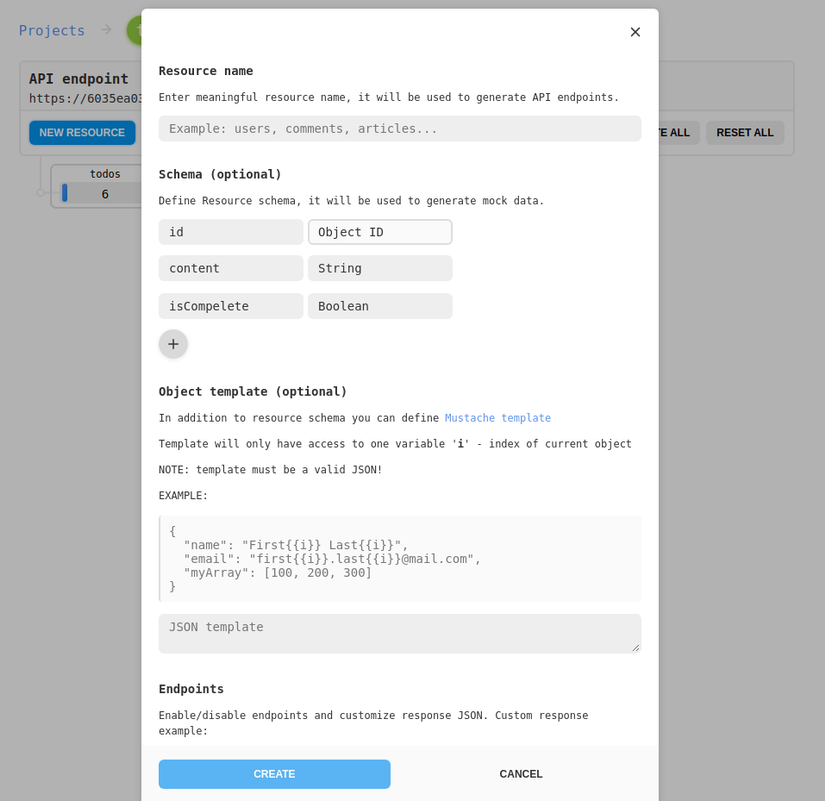
Về cơ bản nó sẽ trông như thế này:

Vậy là đã xong giao diện và database rồi. Giờ ta bắt đầu tiến hành code các chức năng chính thôi !!!.
Các chức năng chính
Lấy dữ liệu todo
Về phần thao tác với dữ liệu mình sẽ dùng Vuex. Trong thư mục store các bạn tạo một file todos.js có state như sau. Ta tạo thêm một actions để call API và mutations để thao tác với state. Mình sẽ dùng axios module để thao tác.
store/todos.js export const state = () => ({ todoList: [],
}) export const getters = { all(state) { return state.todoList }, progress(state) { return state.todoList.filter(function (item) { return !item.isComplete }) }, done(state) { return state.todoList.filter(function (item) { return item.isComplete }) },
} export const mutations = { store(state, data) { state.todoList = data },
} export const actions = { getTodoList(vuexContext) { return this.$axios .$get('https://****************.mockapi.io/todos') .then((res) => { vuexContext.commit('store', res) }) },
}
Hàm store nhận vào một tham số mặc định đầu tiên là state và tham số thứ 2 là data trả về từ API.
Hàm getTodoList có tham số mặc định đầu tiên là vuexContext. Trong hàm này ta dùng axios để call đến API ta đã tạo ở mục trước để lấy dữ liệu. Sau khi thành công ta dùng phương thức commit để gọi đến hàm store trong mutations -> Đưa dữ liệu vào state. Trong gettters ta có 3 hàm phục vụ cho mục đích filter dữ liệu. Hàm all lấy toàn bộ dữ liệu từ state, hàm progress và doneta dùng hàm filter của mảng để lọc ra nhưng todo theo trường isCompelete của đối tượng.
Tiếp theo đến file todos.vue.
<template> <div class="container"> <h1>todos</h1> <div class="main-content"> <input class="todo-input" placeholder="What needs to be done?"/> <ul> <li v-for="(todo, index) in filterTodos" :key="index" > <span :class="{ done: todo.isComplete, hide: isEdit === todo.id }" > {{ todo.content }} </span> <div> <span class="edit-text">Edit</span> <span class="delete-text">Delete</span> </div> </li> </ul> <div class="filter"> <span class="all-border">All(1)</span> <span class="progress-border">Progress(0)</span> <span class="done-border">Done(0)</span> </div> </div> </div>
</template> <script>
export default { data() { return { todoList: [], filter: 'all', isEdit: -1, content: '', } }, computed: { filterTodos() { return this.$store.getters[`todos/${this.filter}`] }, },
}
</script>
Ta sẽ tạo một computed là filterTodos để lấy dữ liệu để render và một data là filter để khi ta lọc dữ liệu theo 3 trạng thái là all, progress, done. Hàm filterTodos ta có gọi đến getters của Vuex. Ở đây mình gọi đến hàm của getters theo biến filter trong data. Các trường còn lại trong data mình sẽ từ từ giải thích ở dưới. Trong thẻ li mình lặp qua computed filterTodos để render dữ liệu ra view. Ở đây mình có check trường isCompelete để kiểm tra xem nếu todo đó đã hoàn thành thì mình sẽ thêm line-through cho nó.
Sau khi code ta sẽ có view gần như hoàn chỉnh rồi. Giờ ta chỉ cần thêm các sự kiện cho nó thôi.
Thêm mới một todo item
Để làm chúc năng này ta cần thêm một số hàm như sau:
// store/todos.js // Hàm này được thêm vào mutations
add(state, content) { state.todoList.push(content)
} // Hàm này được thêm vào actions
addTodo(vuexContext, content) {
return this.$axios .$post('https://6035ea036496b9001749f8ee.mockapi.io/todos', { content, isComplete: false, }) .then(function (res) { vuexContext.commit('add', res) }) .catch(function (err) { alert(err) })
}
Trong file todos.js ta thêm hàm add(state, content) vào mutations để đẩy phần tử mớ vào todoList trong state. Hàm addTodo(vuexContext, content) mình dùng axios để gửi một post request lên API sau khi thành công ta sẽ dùng commit để gọi hàm add trong mutations để thêm phần tử mới vào mảng -> computed thay đổi -> re-render.
// pages/todos.vue // Hàm này được thêm vào methods
addTodo(e) { if (e.target.value.length) { this.$store.dispatch('todos/addTodo', e.target.value) e.target.value = '' }
}
Trong todos.vue ta gắn sự kiện khi người dùng nhấn enter sẽ kích hoạt hàm addTodo(e) trong methods. Hàm này sẽ dispatch đến hàm addTodo trong actions của Vuex.
Sửa một todo item
// pages/todos.vue // Hàm này được thêm vào methods
clickEdit(todo) { this.isEdit = todo.id this.content = todo.content
}
editTodo(todo) { if (this.content.length) { this.$store.dispatch('todos/editTodo', { todo, content: this.content }) this.isEdit = -1 this.content = '' }
},
Ta sẽ gắn sự kiện click vào thẻ span edit ở template. Khi người dùng click sẽ kích hoạt hàm clickEdit(todo). Hàm này sẽ thay đổi isEdit và content của data trong component. Tại sao lại phải làm vậy? Mình làm vậy là vì khi mình click edit thì mình phải biết là todo nào đang được edit và phải hiện ra một ô input có value là content của todo và ẩn thẻ span đang hiển thị content của todo đang được sửa đi. Hàm editTodo(todo) sẽ dispatch đến actions trong Vuex và sau khi sửa xong thì ta sẽ đổi lại isEdit, content về như cũ.
// store/todos.js // Hàm này được thêm vào actions
editTodo(vuexContext, data) { return this.$axios .$put( `https://6035ea036496b9001749f8ee.mockapi.io/todos/${data.todo.id}`, { content: data.content, } ) .then(function (res) { vuexContext.commit('edit', res) }) .catch(function (err) { alert(err) })
} // Hàm này được thêm vào mutations
edit(state, todo) { const index = state.todoList.findIndex( (todoItem) => todoItem.id === todo.id ) state.todoList[index].content = todo.content
},
Hàm editTodo trong actions tương tự như hàm addTodo ở trên và trigger đến hàm edit trong mutations.
Cập nhật trạng thái một todo item
// pages/todos.vue // Hàm này được thêm vào methods
toggle(todo) { this.$store.dispatch('todos/toggleTodo', todo)
},
Ta sẽ gắn sự kiện click.self vào thẻ li của mỗi todoItem. Khi người dùng nhấn vào một todo nào đó ta sẽ chuyển trạng thái thành hoàn thành hoặc chưa hoàn thành. Khi hoàn thành rồi thì todo đó sẽ bị gạch ngang. Hàm toggle này còn dispatch đến hàm toggleTodo trong store vủa Vuex.
// store/todos.js // Hàm này được thêm vào actions
toggleTodo(vuexContext, todo) { return this.$axios .$put(`https://6035ea036496b9001749f8ee.mockapi.io/todos/${todo.id}`, { isComplete: !todo.isComplete, }) .then(function (res) { vuexContext.commit('toggle', res) }) .catch(function (err) { alert(err) })
}, // Hàm này được thêm vào mutations
remove(state, todo) { const index = state.todoList.findIndex( (todoItem) => todoItem.id === todo.id ) state.todoList.splice(index, 1)
},
Hàm toggleTodo trong actions tương tự như hàm editTodo ở trên và trigger đến hàm toggle trong mutations. Cụ thể thì ta sẽ thay đổi dữ liệu trên API và state của Vuex.
Xóa một todo item
// pages/todos.vue // Hàm này được thêm vào methods
deleteTodo(todo) { this.$store.dispatch('todos/deleteTodo', todo)
},
Ta sẽ gắn sự kiện click.stop vào thẻ span delete của mỗi todoItem.
// store/todos.js // Hàm này được thêm vào actions
deleteTodo(vuexContext, todo) { return this.$axios .$delete(`https://6035ea036496b9001749f8ee.mockapi.io/todos/${todo.id}`) .then(function (res) { vuexContext.commit('remove', res) }) .catch(function (err) { alert(err) })
}, // Hàm này được thêm vào mutations
remove(state, todo) { const index = state.todoList.findIndex( (todoItem) => todoItem.id === todo.id ) state.todoList.splice(index, 1)
},
Hàm deleteTodo trong actions trigger đến hàm remove trong mutations. Công dụng cũng tương tự như các chức năng ở trên.
Bộ lọc
Vậy là ta đã xong các chức năng cơ bản như: Thêm, sửa ,xóa rồi. Giờ ta sẽ tiến hành tạo ra bộ lọc để xem các công việc đã hoàn thành, chưa hoàn thành, hay tất cả các công việc.
// pages/todos.vue data() { return { filter: 'all', isEdit: -1, content: '', }
}, computed: { filterTodos() { return this.$store.getters[`todos/${this.filter}`] }, total() { return this.$store.state.todos.todoList.length }, countProgress() { return this.$store.state.todos.todoList.filter(function (item) { return !item.isComplete }).length }, countDone() { return this.total - this.countProgress },
},
// Các hàm sau được thêm vào methods clickAll() { this.filter = 'all' }, clickProgress() { this.filter = 'progress' }, clickDone() { this.filter = 'done' },
Trong data mình thêm filter để biết xem ta đang filter dữ liệu như thế nào, mặc định sẽ là all. Các methods sẽ tương ứng với các sự kiên khi người dùng bấm all, progress và done. Trong computed ta sẽ tính toán về số lượng các todo để hiểu thị và todoList ta render theo filter. Ở hàm filterTodos ta sẽ gọi đến getter của Vuex.
// store/todos.js export const getters = { all(state) { return state.todoList }, progress(state) { return state.todoList.filter(function (item) { return !item.isComplete }) }, done(state) { return state.todoList.filter(function (item) { return item.isComplete }) },
}
Trong file store/todos.js. Ta sẽ có các getters tương ứng với các bộ lọc.
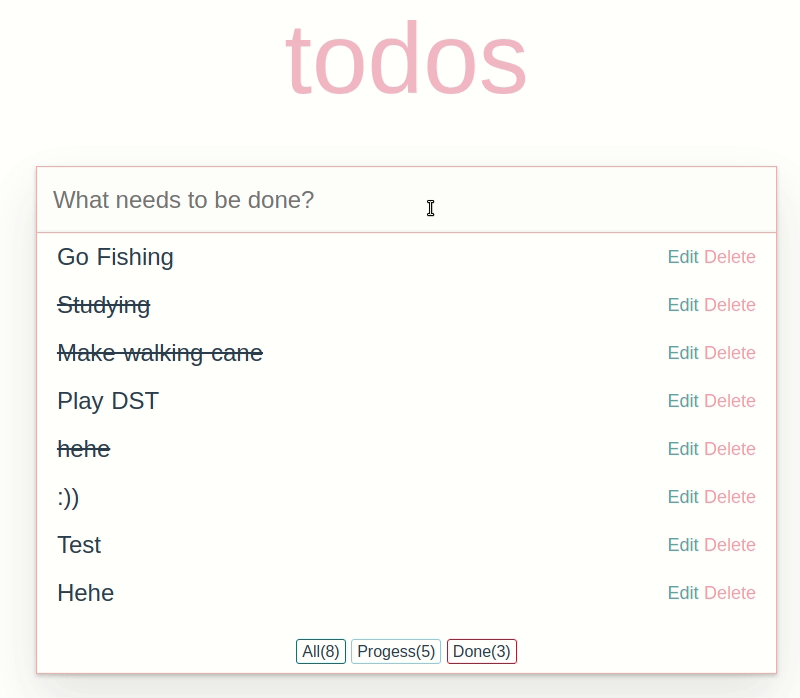
Sau khi đã làm xong bộ lọc thì ta sẽ demo một chút về app:
Tổng kết
Vậy ta đã hoàn thành một todo app đơn giản với NuxtJS và Vuex. Todo App này đơn giản chỉ giúp chúng ta làm quen và thực hành thao tác với Vuex, một chút về NuxtJS. Hy vọng các bạn sẽ có thêm kiến thức và áp dụng hiểu quả cho dự án của mình. Hẹn gặp lại các bạn ở những bài chia sẻ khác  .
.