Firebase là một trong những nền tảng cung cấp giải pháp hàng đầu để xây dựng Severless apps. Nó cung cấp cho ta những cách đơn giản để xây dựng và phát triển các ứng dụng mà không cần phải lo lắng đến chi phí thiết lập và bảo trì máy chủ trong thời gian dài kể từ khi bắt đầu. Firebase cũng cung cấp khả năng tích hợp với các dịch vụ khác của google như Google analytics, firestore db...một cách dễ đàng
Trong bài viết này chúng ta sẽ đi xây dựng REST API với firebase cloud functions, firestore, expressjs. Để dễ dàng tìm hiểu thì ta cần có một ít kiến thức về Express.js dể xây dựng Demo app. Demo app của chúng ta gồm các chức năng CRUD cơ bản.
Nào Les't goo.
1. Setting up firebase
Đầu tiên ta cần phải cài Firebase CLI:
npm install -g firebase-tools
Sau khi cài đặt thành công, ta đăng nhập vào Firebase console để tạo project.
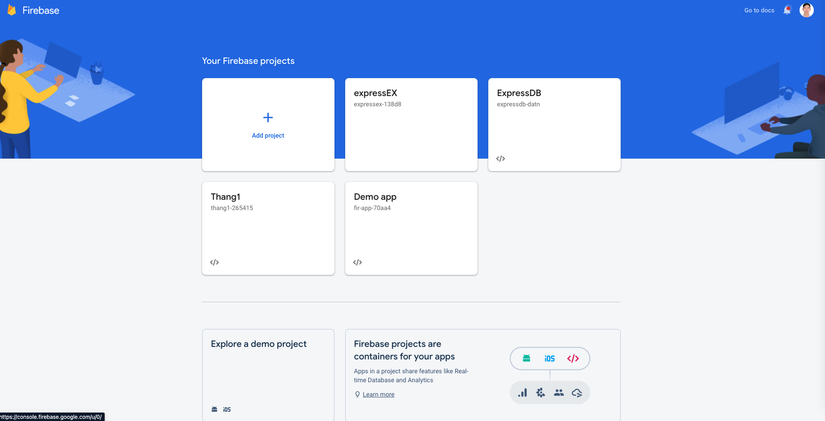
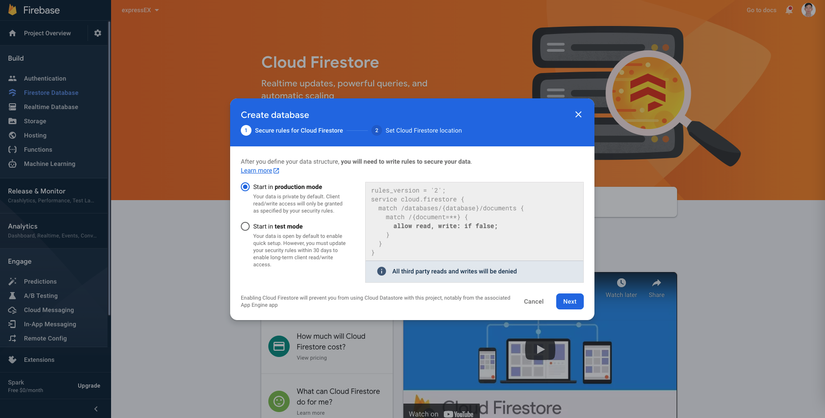
Sau khi tạo project thành công ta tiếp tục tạo Cloud firestore. Ta di chuyển tới firestore option ở thanh công cụ bên trái, sau đó click vào Create database.

Chúng ta sẽ sử dụng production option mode cho demo này.
2. Viết cloud function đầu tiên
Đầu tiên chúng ta mở terminal và login vào tài khoản firebase bằng command:
firebase login
Sau khi chạy command trên thì nó sẽ đưa ta đi trến trang xác thực ở trình duyệt. Sau khi xác thực thành công ta sẽ tạo 1 demo app.
Ta chạy command :
firebase init functions
 Ta chọn option sử dụng existing project rồi chọn project đã tạo ở bước đầu tiên.
Tiếp đến chọn option Language: JS hoặc TS. Và cuối cùng là chọn chấp nhận để cài npm dependencies.
Sau khi tạo thành công ta sẽ thấy cấu trúc thư mục
├── .firebaserc
├── .gitignore
├── .firebase.json
└── functions ├── package.json ├── tsconfig.json ├── .gitignore └── index.js
Khi mở file index.js, ta sẽ thấy:
const functions = require("firebase-functions");
// // Start writing Firebase Functions
// // https://firebase.google.com/docs/functions/typescript
//
// export const helloWorld = functions.https.onRequest((request, response) => {
// functions.logger.info("Hello logs!", {structuredData: true});
// response.send("Hello from Firebase!");
// });
Uncomment helloWord function ta sẽ được cloud function đầu tiên.
const functions = require("firebase-functions"); export const helloWorld = functions.https.onRequest((request, response) => { functions.logger.info("Hello logs!", {structuredData: true}); response.send("Hello from Firebase!");
});
Để chạy cloud functions ở local ta chạy command:
npm run serve
 Mở Url ở temirnal (ở đây là : http://localhost:5001/fir-app-70aa4/us-central1/helloWorld). Trên trình duyệt ta sẽ nhận được response :
 Hello from Firebase!
3. Kết hợp Express để xây dựng REST API
Cài đặt Express
npm i -s express
Sau khi cài đặt xong ta mở file index.js và tiến hành thiết lập cơ bản.
const functions = require("firebase-functions");
const express = require("express"); const app = express();
app.get("/", (req, res) => res.status(200).send("Hey there!"));
exports.app = functions.https.onRequest(app);
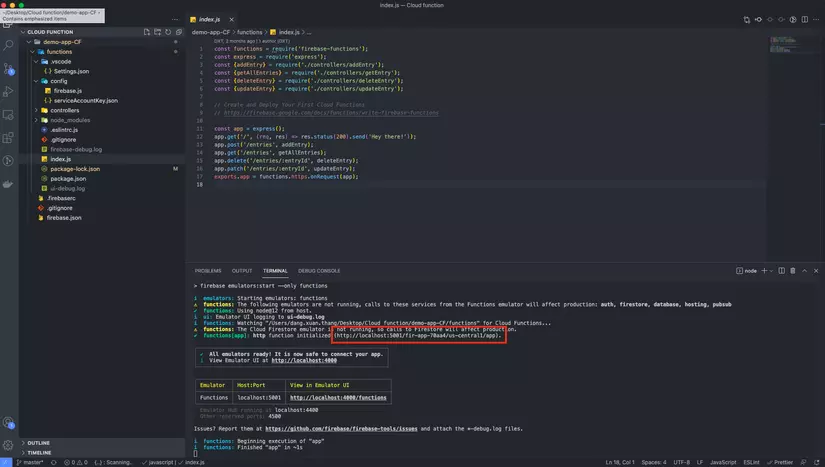
Sau khi chạy lại functions ta được:
 Ta mở url ở terminal: (http://localhost:5001/fir-app-70aa4/us-central1/app) sẽ nhận được response tương ứng là
 Hey there!
3.1 Tạo account service cho app
Để truy cập vào Firestore và admin tool từ app, ta cần phải tạo 1 service account. Ta click vào Project Overview ở thanh bên trái.
 Chuyển qua tab
 Service accounts chọn Nodejs và Generate new private key Chúng ta sẽ có 1 file JSON dạng :
{ "type": "service_account", "project_id": "journal-rest-api", "private_key_id": "private_key_id", "private_key": "private_key", "client_email": "client_email", "client_id": "client_id", "auth_uri": "auth_url", "token_uri": "token_url", "auth_provider_x509_cert_url": "auth_provider_x509_cert_url", "client_x509_cert_url": "client_x509_cert_url"
}
3.2 Cấu hình firebase admin.
└── functions └── config ├── firebase.js ├── serviceAccountKey.json
serviceAccountKey.json đây là file ta vừa tải ở bước trên, để làm nhanh thì mình import vào dùng trực tiếp mà không cho vào .env. 
Trong file firebase.js
const admin = require('firebase-admin');
const serviceAccount = require('./serviceAccountKey.json'); admin.initializeApp({ credential: admin.credential.cert(serviceAccount), databaseURL: `https://${serviceAccount.project_id}.firebaseio.com`,
}); const db = admin.firestore(); module.exports = {admin, db};
3.3 Xây dựng controller để nhận http request, thao tác với firestore
Add entry controller
└── functions └── controller ├── addEntry.js
Trong file addEntry.js: Nhận payload từ request body để lưu vàofirestore
const {db} = require('../config/firebase');
module.exports.addEntry = async (req, res) => { const {title, text} = req.body; try { const entry = db.collection('entries').doc(); const entryObject = { id: entry.id, title, text, }; entry.set(entryObject); res.status(200).send({ status: 'success', message: 'entry added successfully', data: entryObject, }); } catch (error) { res.status(500).json(error.message); }
}
Ở fileindex.js ta tiến hành tạo APIadd-entry
const functions = require('firebase-functions');
const express = require('express');
const {addEntry} = require('./controllers/addEntry'); const app = express();
app.get('/', (req, res) => res.status(200).send('Hey there!')); app.post('/add-entry', addEntry);
exports.app = functions.https.onRequest(app);
Tiếp theo là test thử thành quả nào
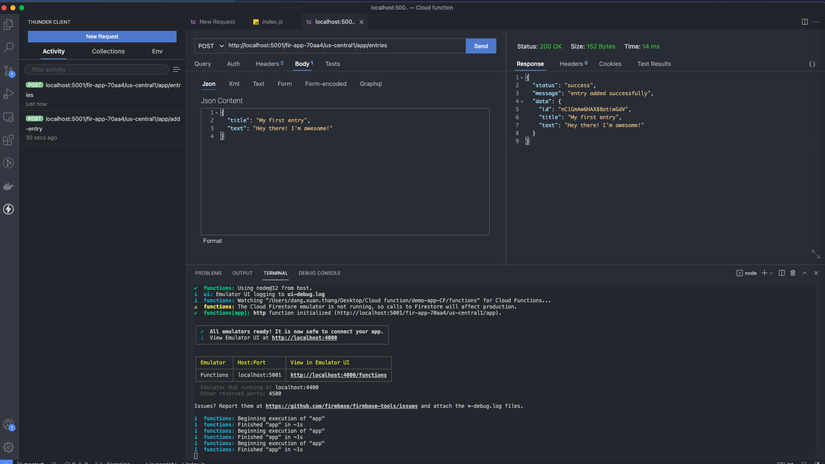
Ở đây mình dùng THUNDER CLIENT extension để gửi request :
API POST: http://localhost:5001/fir-app-70aa4/us-central1/app/entries
Body:
{ "title": "My first entry", "text": "Hey there! I'm awesome!"
}
Sau khi gửi ta nhận được phản hồi: entry added successfull
Kiểm tra trong firestore:
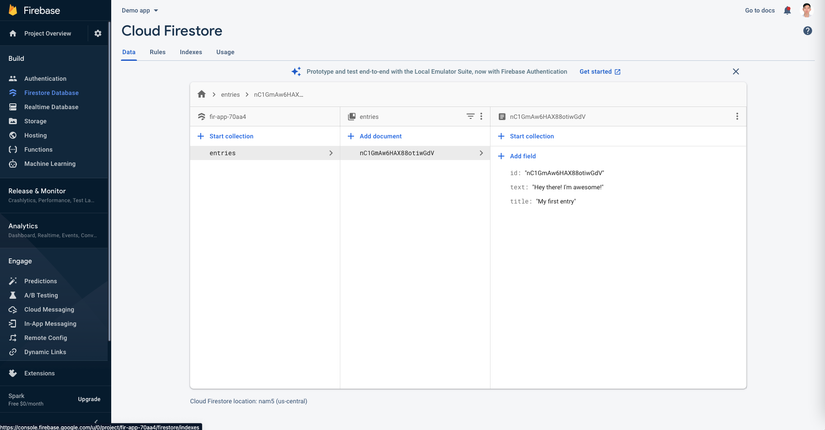
Như vậy là ta đã add thành công rồi.
Update entry controller
└── functions └── controller ├── updateEntry.js
Trong file updateEntry.js: Nhận id param từ url và payload từ request body để lưu vàofirestore :
const {db} = require('../config/firebase'); module.exports.updateEntry = async (req, res) => { const {body: {text, title}, params: {entryId}} = req; try { const entry = db.collection('entries').doc(entryId); const currentData = (await entry.get()).data() || {}; const entryObject = { title: title || currentData.title, text: text || currentData.text, }; await entry.set(entryObject).catch((error) => { return res.status(400).json({ status: 'error', message: error.message, }); }); return res.status(200).json({ status: 'success', message: 'entry updated successfully', data: entryObject, }); } catch (error) { return res.status(500).json(error.message); }
};
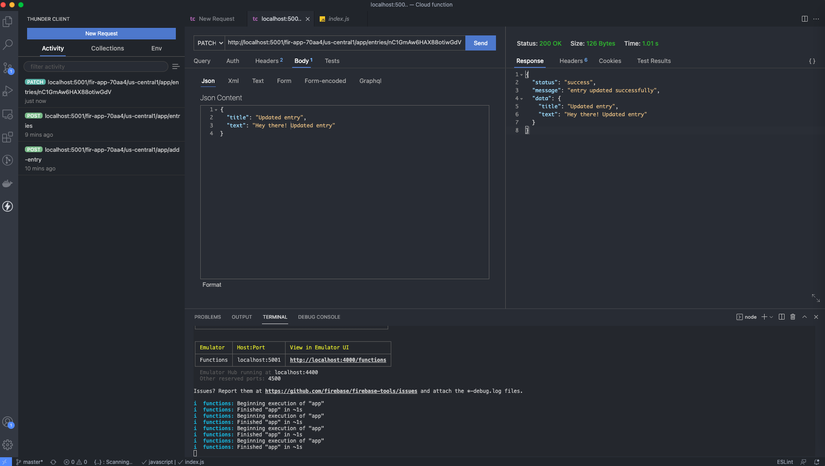
API PATCH: http://localhost:5001/fir-app-70aa4/us-central1/app/entries/:entryId
Body:
{ "title": "Updated entry", "text": "Hey there! Updated entry! "
}
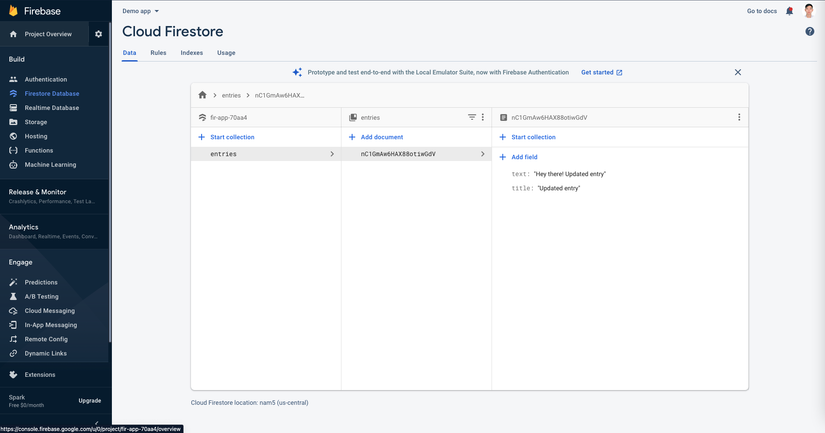
Kiểm tra trong firestore:
Delete entry controller
└── functions └── controller ├── deleteEntry.js
Trong file deleteEntry.js: Nhận id entry từ url để xoá entry trong firestore :
const {db} = require('../config/firebase'); module.exports.deleteEntry = async (req, res) =>{ const {entryId} = req.params; try { const entry = db.collection('entries').doc(entryId); await entry.delete().catch((error) => { return res.status(400).json({ status: 'error', message: error.message, }); }); return res.status(200).json({ status: 'success', message: 'entry deleted successfully', }); } catch (error) { return res.status(500).json(error.message); }
};
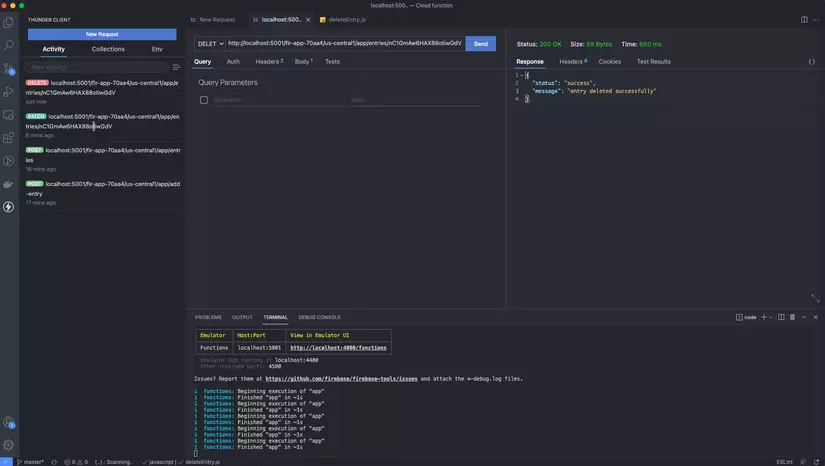
API PATCH: http://localhost:5001/fir-app-70aa4/us-central1/app/entries/:entryId
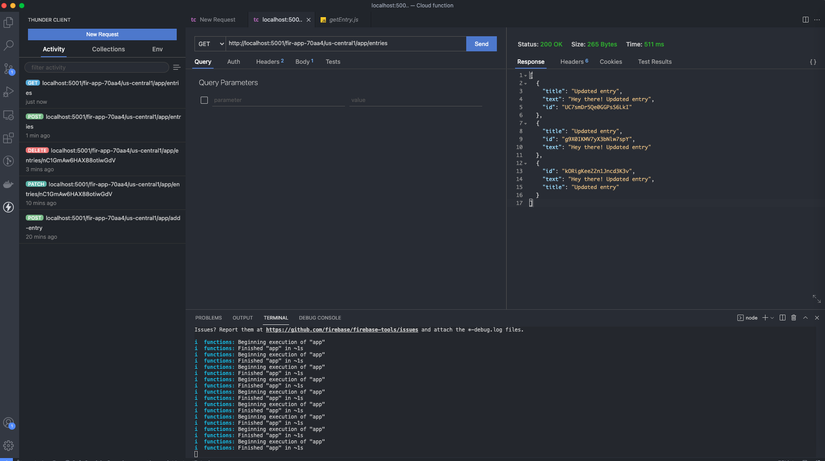
Get entry controller
const {db} = require('../config/firebase'); module.exports.getAllEntries = async (req, res) => { try { const allEntries = []; const querySnapshot = await db.collection('entries').get(); querySnapshot.forEach( (doc) => allEntries.push(doc.data())); return res.status(200).json(allEntries); } catch (error) { return res.status(500).json(error.message); }
};
`API GET `: `http://localhost:5001/fir-app-70aa4/us-central1/app/entries`
KẾT
link source: https://github.com/dangxuanthangqt/demo-app-CF
Vậy là chúng ta đã cùng nhau hoàn thiện demo app sử dụng expressJS + cloud function.
Bài viết hi vọng sẽ giúp ích cho các bạn.
Xin Chào và hẹn gặp lại ở bài viết tiếp theo.
Tài liệu tham khảo: