Mở đầu
Đây sẽ là một series bài viết bao gồm:
- Phần 1: Tạo một web apps bằng Blazor hiển thị giá cổ phiếu VinFast real time.
- Phần 2: Truyền phát dữ liệu real time cho một nhóm clients chỉ định.
- Phần 3: Bảo mật kết hợp xác thực với function key và azure authentication bằng access token sau khi deploy lên azure.
Thật sự thì mình cũng không có nhiều thời gian. Nhưng trong quá trình phát triển một dự án, teams của mình đã gặp khá nhiều khó khăn do tài liệu của microsoft về Azure SignalR Service đặc biệt là với serverless mode quá nghèo nàn. Nên mình quyết định sẽ viết series này và mình hi vọng là nó có ích.
Nhưng tại sao lại là serverless mode? Với Serverless mode của Azure SignalR Service, cũng giống như với Azure Functions chúng ta không cần phải quản lý các máy chủ để triển khai dịch vụ SignalR. Chúng ta chỉ cần tập trung vào việc phát triển ứng dụng của mình, mà không cần phải lo lắng về việc quản lý cơ sở hạ tầng máy chủ. Azure SignalR Service sẽ tự động mở rộng và quản lý cơ sở hạ tầng, đơn giản hóa việc triển khai và mở rộng dịch vụ SignalR.
Demo

Về công nghệ sẽ sử dụng
- Azure SignalR Service (serverless mode)
- Azure Functions (c#)
- Blazor WebAssembly
Tạo Azure SignalR Service
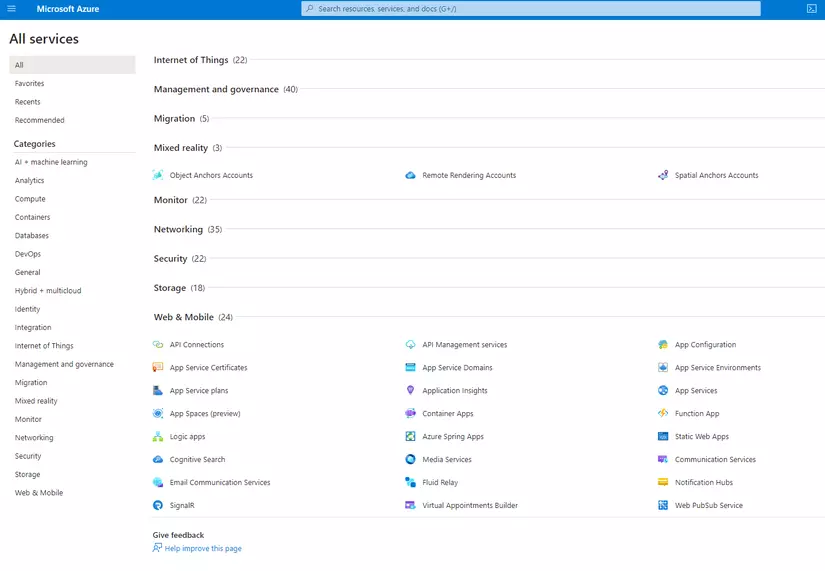
Truy cập https://portal.azure.com và nhấn vào Create a Resource.

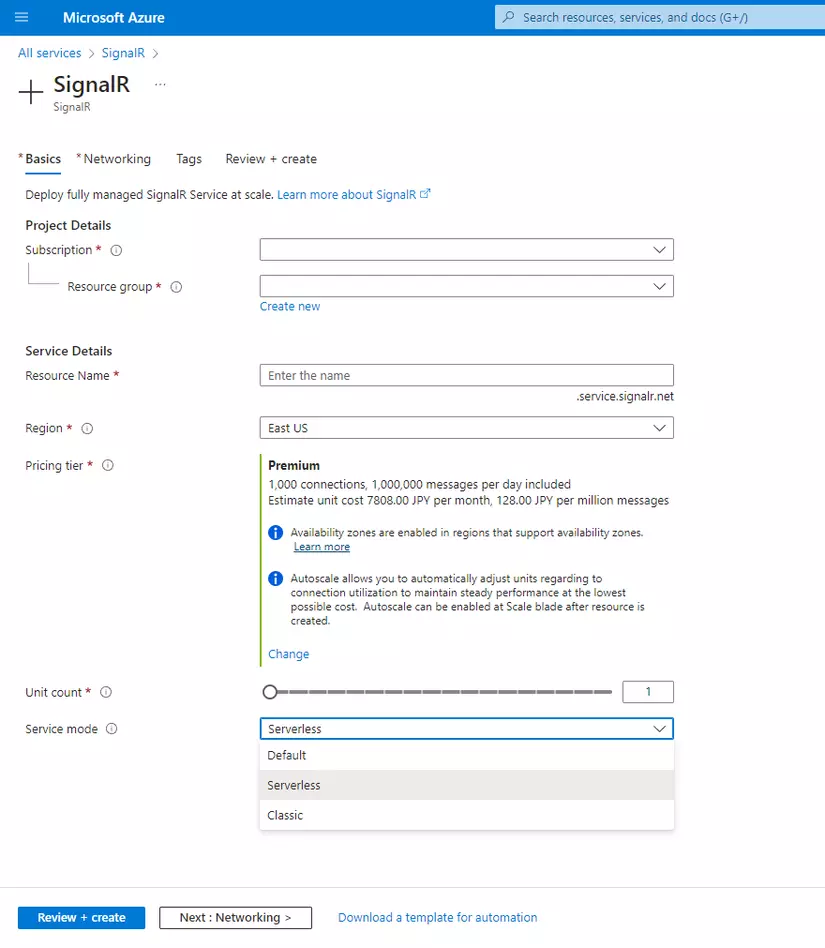
Tạo SignalR, nhớ chọn Serverless ở mục Service mode:

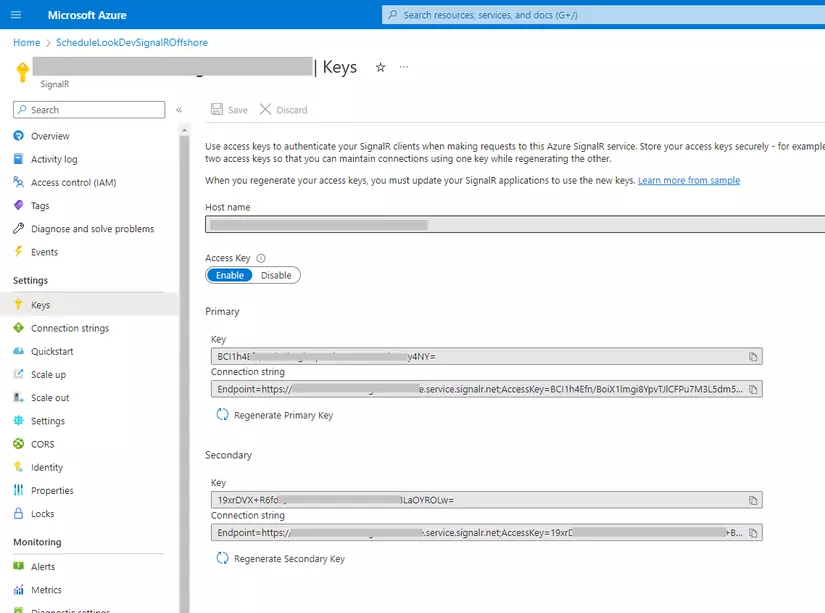
Sau cùng, chọn Review + create. Sau khi hoàn tất, hãy chuyển đến dịch vụ. Copy Connection string và ghi chú nó cho phần tiếp theo.

Tạo Azure Functions với Visual Studio

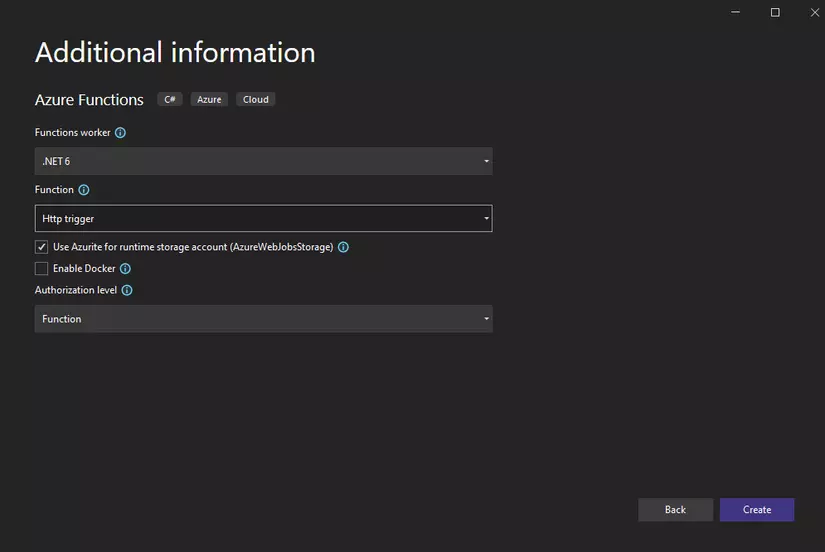
Chọn Functions worker .NET 6

Mở file local.settings.json và thay thế như sau, cũng như đảm bảo rằng Connection string vừa lấy ở trên cũng được thêm vào.
{ "IsEncrypted": false, "Values": { "AzureWebJobsStorage": "", "FUNCTIONS_WORKER_RUNTIME": "dotnet", "AzureSignalRConnectionString": "<YOUR CONNECTION STRING>" }, "Host": { "LocalHttpPort": 7071, "CORS": "*", "CORSCredentials": false }
}
Chúng ta sẽ cần thêm NuGet Package Microsoft.Azure.WebJobs.Extensions.SignalRService vào project.
dotnet add package Microsoft.Azure.WebJobs.Extensions.SignalRService --version 1.1.0
Tiếp theo, tạo Functions.cs ở thư mục gốc của Azure Functions. Ở đây chúng ta dùng AuthorizationLevel.Function, khi chạy ở môi trường local thì sẽ vẫn vượt được xác thực thoải mái. Nhưng khi deploy lên Azure thì ở phía client chúng ta sẽ phải config thêm. Cũng như, chúng ta sẽ thêm xác thực "Authentication" cho Azure Functions ở phần 3 của series bài viết nhé.
using Microsoft.AspNetCore.Http;
using Microsoft.Azure.WebJobs;
using Microsoft.Azure.WebJobs.Extensions.Http;
using Microsoft.Azure.WebJobs.Extensions.SignalRService;
using Newtonsoft.Json.Linq;
using System;
using System.Net.Http;
using System.Threading.Tasks; namespace StockPriceDemo;
public static class Functions
{ // This will manage connections to SignalR [FunctionName("negotiate")] public static SignalRConnectionInfo GetSignalRInfo( [HttpTrigger(AuthorizationLevel.Function, "post")] HttpRequest req, [SignalRConnectionInfo(HubName = "stockHub")] SignalRConnectionInfo connectionInfo) { return connectionInfo; } /// <summary> /// Get stock prices of VinFast every 10 seconds /// </summary> /// <param name="myTimer"></param> /// <param name="signalRMessage"></param> [FunctionName("auto_getstockprice_vfs_periodically")] public static async Task GetStockPriceOfVFSPeriodically( [TimerTrigger("*/10 * * * * *")] TimerInfo myTimer, [SignalR(HubName = "stockHub")] IAsyncCollector<SignalRMessage> signalRMessage) { string apiKey = "7KJVS7FK2BTK1A1W"; string symbol = "VFS"; StockPrice stockPrice = null; using HttpClient client = new HttpClient(); string url = $"https://www.alphavantage.co/query?function=GLOBAL_QUOTE" + $"&symbol={symbol}" + $"&apikey={apiKey}"; try { HttpResponseMessage response = await client.GetAsync(url); if (response.IsSuccessStatusCode) { string jsonString = await response.Content.ReadAsStringAsync(); JObject stockInfoRes = JObject.Parse(jsonString); if (stockInfoRes["Global Quote"] is null) throw new Exception(); stockPrice = new StockPrice { Name = "VFS", Price = stockInfoRes["Global Quote"]["05. price"].ToString() }; } } catch (Exception) { stockPrice = new StockPrice { Name = "VFS", Price = "Err" }; } await signalRMessage.AddAsync( new SignalRMessage { Target = "stockPrice", Arguments = new[] { stockPrice } }); } /// <summary> /// Send stock prices of VinFast to all clients in hub /// </summary> /// <param name="myTimer"></param> /// <param name="signalRMessage"></param> [FunctionName("post-stockprice_vfs")] public static async Task PostStockPriceOfTM( [HttpTrigger(AuthorizationLevel.Function, "post")] StockPrice stockPriceVFS, [SignalR(HubName = "stockHub")] IAsyncCollector<SignalRMessage> signalRMessage, HttpRequest req) { // Send the stock price to the SignalR Hub and it will be distributed to connected clients via SignalR await signalRMessage.AddAsync( new SignalRMessage { Target = "stockPrice", Arguments = new[] { stockPriceVFS } }); } } public class StockPrice
{ public string Name { get; set; } public string Price { get; set; }
}
Tạo client với Blazor WASM
Nhấn chuột phải vào Solution -> Add -> New Project...

Thêm NuGet Package Microsoft.AspNetCore.SignalR.Client vào project.
dotnet add package Microsoft.AspNetCore.SignalR.Client --version 3.1.4
Mở Index.razor trong folder Pages và thay thế toàn bộ bằng đoạn code bên dưới.
@page "/" @using Microsoft.AspNetCore.SignalR.Client <h1>Connection: @hubConnection.State</h1>
<hr>
<h3>Gia co phieu VinFast: @stockPrice.Price <span style="color:seagreen">(Update-count: @countNumber)</span></h3> @code { private HubConnection hubConnection; // For connecting to SignalR private StockPrice stockPrice = new StockPrice(); // Stock price to display private int countNumber = 0; private readonly string functionAppBaseUri = "http://localhost:7071/api"; // URL for function app protected override async Task OnInitializedAsync() { // Create a hub connection to the function app as we'll go via the function for everything SignalR hubConnection = new HubConnectionBuilder() .WithUrl(functionAppBaseUri) .Build(); // Registers handler that will be invoked when the hub method with the specified method name is invoked hubConnection.On<StockPrice>("stockPrice", (stockPriceRes) => { stockPrice = stockPriceRes; countNumber++; StateHasChanged(); }); await hubConnection.StartAsync(); // Start connection } // Check we're connected public bool IsConnected => hubConnection.State == HubConnectionState.Connected; public class StockPrice { public string Name { get; set; } public string Price { get; set; } }
}
Nhấn chuột phải vào Solution -> properties -> Common Properties -> Multiple startup projects để chạy cùng lúc cả hai Azure Functions và Blazor Client. Thành quả sẽ như ở demo phía trên.
Kết luận
Bài cũng đã khá dài nên mình sẽ không giải thích cụ thể ý nghĩa của từng dòng code, nhưng nếu có vấn đề gì không hiểu hoặc sai sót của mình thì các bạn cứ comment phía dưới nhé. Mình rất sẵn lòng. Happy coding!