1. Giới thiệu:
Tài liệu hướng dẫn API (API Documentation) là một phần quan trọng trong việc xây dựng REST APIs. Trong bài này, mình sẽ xem cách sử dụng Springdoc, một công cụ rất tiện lợi khi tự động hóa tạo tài liệu API dựa trên quy chuẩn OpenAPI 3.
Trong bài này, mình sẽ sử dụng những công nghệ sau đây:
- Java 8
- Spring Boot 2: Spring Web MVC, Spring Data JPA
- MySQL
- Maven
- Springdoc
2. Một API có sẵn
Để bắt đầu thì các bạn có thể download source code Rest API có sẵn CRUD tại Github.
Vào file src/main/resources/application.properties để chỉnh sửa username và password tương ứng với database MySQL của bạn. Tạo một database testdb trong MySQL.
Ứng dựng của chúng ta đã cung cấp các API để quản lý Book (Sách) dưới đây:
| Giao thức | Urls | Hành động |
|---|---|---|
| POST | /api/books | tạo một Book mới |
| GET | /api/books | lấy về hết tất cả các Book |
| GET | /api/books/:id | lấy về một Book bằng :id |
| PUT | /api/books/:id | cập nhật một Book bằng :id |
| DELETE | /api/books/:id | xóa một Book bằng :id |
Và file controller như thế này:
@CrossOrigin
@RestController
@RequestMapping("/api/books")
public class BookController { @Autowired BookRepository bookRepository; @PostMapping("/") public ResponseEntity<Book> createBook(@RequestBody Book book) { try { Book _book = bookRepository .save(new Book(book.getTitle(), book.getAuthor(), book.getDescription())); return new ResponseEntity<>(_book, HttpStatus.CREATED); } catch (Exception e) { return new ResponseEntity<>(null, HttpStatus.INTERNAL_SERVER_ERROR); } } @GetMapping("/") public ResponseEntity<List<Book>> getAllBooks() { try { List<Book> books = new ArrayList<Book>(); bookRepository.findAll().forEach(books::add); if (books.isEmpty()) { return new ResponseEntity<>(HttpStatus.NO_CONTENT); } return new ResponseEntity<>(books, HttpStatus.OK); } catch (Exception e) { return new ResponseEntity<>(null, HttpStatus.INTERNAL_SERVER_ERROR); } } @GetMapping("/{id}") public ResponseEntity<Book> getBookById(@PathVariable("id") long id) { Optional<Book> bookData = bookRepository.findById(id); if (bookData.isPresent()) { return new ResponseEntity<>(bookData.get(), HttpStatus.OK); } else { return new ResponseEntity<>(HttpStatus.NOT_FOUND); } } @PutMapping("/{id}") public ResponseEntity<Book> updateBook(@PathVariable("id") long id, @RequestBody Book book) { Optional<Book> bookData = bookRepository.findById(id); if (bookData.isPresent()) { Book _book = bookData.get(); _book.setTitle(book.getTitle()); _book.setAuthor(book.getAuthor()); _book.setDescription(book.getDescription()); return new ResponseEntity<>(bookRepository.save(_book), HttpStatus.OK); } else { return new ResponseEntity<>(HttpStatus.NOT_FOUND); } } @DeleteMapping("/{id}") public ResponseEntity<HttpStatus> deleteBook(@PathVariable("id") long id) { try { bookRepository.deleteById(id); return new ResponseEntity<>(HttpStatus.NO_CONTENT); } catch (Exception e) { return new ResponseEntity<>(HttpStatus.INTERNAL_SERVER_ERROR); } }
}
3. Bắt đầu với springdoc-openapi
Rất đơn giản chỉ cần cho thêm springdoc-openapi-ui dependency vào pom.xml:
<dependency> <groupId>org.springdoc</groupId> <artifactId>springdoc-openapi-ui</artifactId> <version>1.5.8</version>
</dependency>
Khi chạy ứng dụng, file OpenAPI json sẽ có sẵn tại /v3/api-docs
http://localhost:8080/v3/api-docs/
Swagger UI, tài liệu API của chúng ta sẽ có thể truy cập tại:
http://localhost:8080/swagger-ui/index.html?configUrl=/v3/api-docs/swagger-config#/
Springdoc sẽ quét các package được cho phép và tự viết tài liệu API theo các chuẩn cấu trúc của Spring. Với file controller BookController.java ở trên thì Swagger UI sẽ hiện như sau:
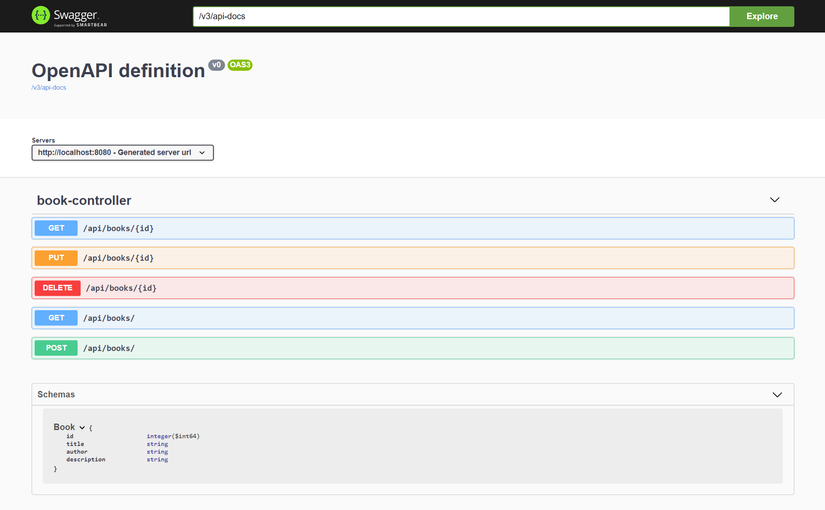
Chúng ta có thể thấy tất cả các endpoint của ứng dụng và Schema của Book. Khi mở ra xem endpoint /api/book/{id}, chúng ta có thể xem các chi tiết HTTP Request và Response:
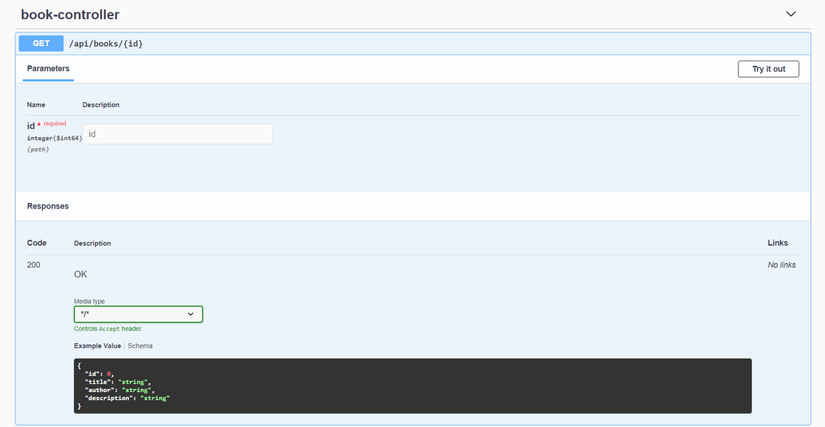
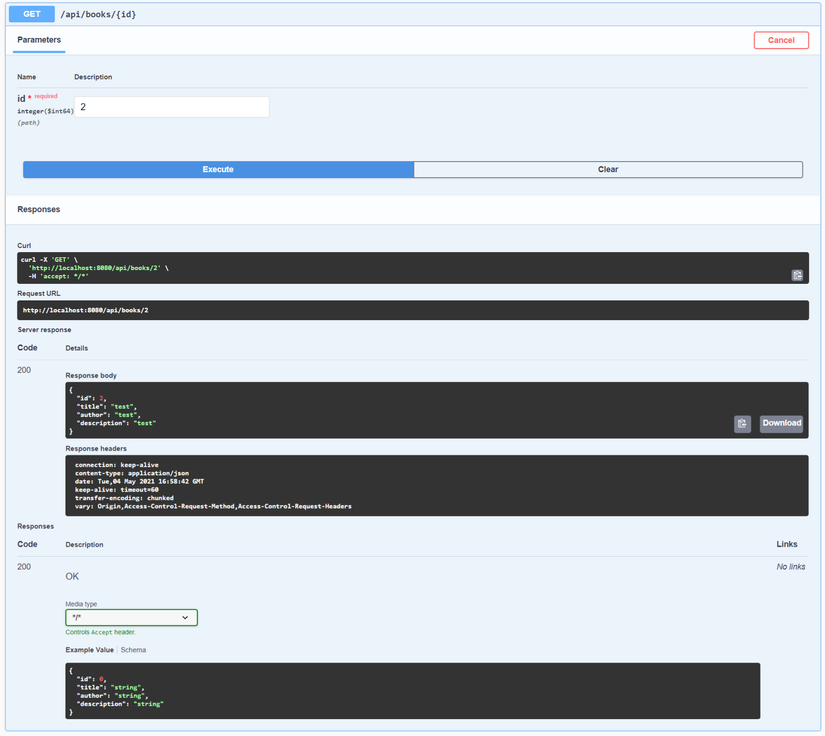
Cùng với phần Try It Out hoàn toàn sử dụng được:
4. Tạo tài liệu sử dụng @Operation và @ApiResponses
Tiếp theo, thì chúng ta nên miêu tả rõ hơn API của mình. Bắt đầu, chúng ta có thể chú giải cho endpoint /api/book/{id} bằng @Operation và @ApiResponses
@Operation(summary = "Find book by ID", description = "Returns a single book", tags = { "book" }) @ApiResponses(value = { @ApiResponse(responseCode = "200", description = "successful operation", content = @Content(schema = @Schema(implementation = Book.class))), @ApiResponse(responseCode = "400", description = "Invalid ID supplied", content = @Content), @ApiResponse(responseCode = "404", description = "Book not found", content = @Content) }) @GetMapping("/{id}") public ResponseEntity<Book> getBookById(@PathVariable("id") long id) { Optional<Book> bookData = bookRepository.findById(id); if (bookData.isPresent()) { return new ResponseEntity<>(bookData.get(), HttpStatus.OK); } else { return new ResponseEntity<>(HttpStatus.NOT_FOUND); } }
Hiệu quả có thể thấy rõ:
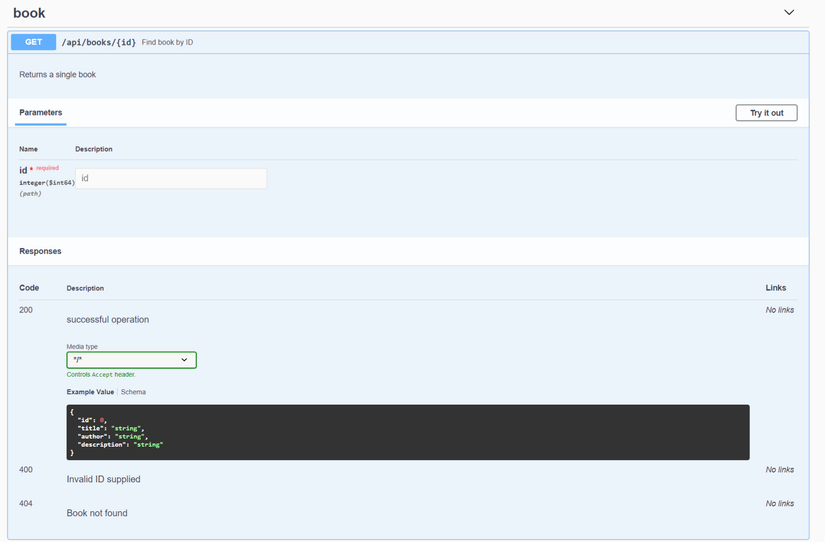
Và sau khi thêm chú giải vào tất cả các endpoint chúng ta có thể có một trang Tài liệu API sạch, đẹp và dễ hiểu:

Mọi source code các bạn có thể tìm ở đây.
5. Xác thực JWT với Springdoc
@Operation còn có một tính năng khác như security có thể hỗ trợ các endpoint cần xác thực mới có thể truy cập. Một ví dụ như jwt bearer token ta có thể sử dụng:
@Operation(summary = "Get user by ID", description = "This can only be done by admin.", security = { @SecurityRequirement(name = "bearer-key") }, tags = { "user" })
@ApiResponses(value = { @ApiResponse(responseCode = "200", description = "successful operation", content = @Content(schema = @Schema(implementation = User.class))), @ApiResponse(responseCode = "400", description = "Invalid ID supplied", content = @Content), @ApiResponse(responseCode = "404", description = "User not found", content = @Content) })
đồng thời thêm phần customOpenAPI vào để kích hoạt nút Xác thực (Authorize):
@Bean public OpenAPI customOpenAPI(@Value("1.5.8") String appVersion) { var securitySchemeName = "bearer-key"; return new OpenAPI() .components(new Components().addSecuritySchemes(securitySchemeName, new SecurityScheme() .name(securitySchemeName) .type(SecurityScheme.Type.HTTP) .scheme("bearer") .bearerFormat("JWT"))) .info(new Info().title("Your API").version(appVersion) .license(new License().name("Apache 2.0").url("http://springdoc.org"))); }
Nếu bạn có sử dụng SpringSecurity thì hãy cho phép có thể truy cấp các URL liên quan tới Springdoc mà không cần xác thực người dùng.
class SecurityConfiguration(val jwtTokenProvider: JwtTokenProvider) : WebSecurityConfigurerAdapter() { override fun configure(http: HttpSecurity) { http .authorizeRequests() .antMatchers("/v3/api-docs/**", "/swagger-ui/**", "/swagger-ui.html").permitAll() .anyRequest().authenticated() }
}