Chào các bạn. Ở phần 1 mình có giới thiệu về xác thực 2 bước đối với google authenticator cơ bản. Ở phần 2 này mình sẽ giới thiệu với các bạn làm config code làm sao để có thể xác thực bước thứ 2 bằng mã otp từ google authenticator
Ở phần trước chúng ta đã tạo được mã QR và thực hiện verify rồi, bây giờ chúng ta tiếp tục tạo mã backup codes sau khi verify
Backup Codes
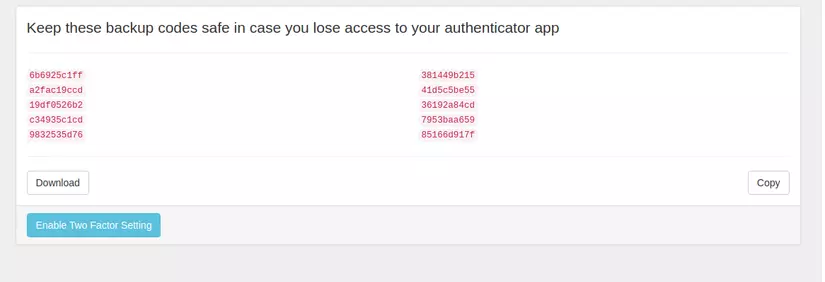 Chúng ta tạo ra 10 mã backup codes, dùng trong trường hợp người dùng mất điện thoại, hoặc lỡ tay xóa ứng dụng google authenticator
Mã backup code được tạo ra như thế nào
backup_codes = current_user.generate_otp_backup_codes!
current_user.save!
Câu lệnh trên sẽ tạo mã backup codes và thực hiện lưu vào database của mình theo kiểu array. Mỗi khi userdùng 1 mã backup codes để thực hiện verify thì trong database sẽ tự động remove đi 1 mã. Cho nên với 10 mã, chúng ta được sử dụng 10 lần thay mã otp google authenticator 10 lần.
Sau khi thực hiên scan và verify otp, thì chúng ta sẽ chuyển qua trang backup codes này. Để thuận tiện cho hiển thị và sử dụng chức năng download, thì chúng ta nên lưu mã backup code này vào session để còn sử dụng lại. Nguyên nhân, vì mã backup code nếu đã được lưu vào database rồi, thì nó sẽ tiến hành mã hóa luôn, và không thể giải mã được. Nên cần lưu vào session để tiện sử dụng ở những chỗ khác. Khi enable chức năng two factor thành công thì chúng ta sẽ xóa session này đi
Download and Copy backup codes
Download
Hành động này sẽ tải về 1 file txt chưa mã backup code
def download send_data params[:two_fa][:codes], filename: "backup_codes.txt"
end
<%= form_tag(download_two_factor_settings_path, method: :post, class: "form-horizontal form-label-left download-two-factor") do %> <textarea name="two_fa[codes]" class="list-backup-codes hide"></textarea> <button type="button" class="btn btn-default btn-two-factor-download"> <i class="fa fa-download"></i> Download </button> <button type="button" class="btn btn-default btn-two-factor-copy"> <i class="fa fa-clipboard"></i> Copy </button> <% end %>
Code javascript khi thực hiện click vào button download
$(document).on('click', '.btn-two-factor-download', function() { $('.list-backup-codes').val(getOtpBackupCodes()); $('.download-two-factor').submit(); $('.btn-enable-two-factor').removeAttr('disabled'); });
Copy
$(document).on('click', '.btn-two-factor-copy', function() { $('.list-backup-codes').val(getOtpBackupCodes()); $('.list-backup-codes').removeClass('hide'); $('.list-backup-codes').select(); document.execCommand('copy'); $('.list-backup-codes').addClass('hide'); $('.copy_message').removeClass('hide'); $('.btn-enable-two-factor').removeAttr('disabled');
});
Chỉ đơn là chạy command thực hiện việc copy đống backup codes thôi. Rồi có thể paste vào bất cứ đâu để lưu lại
Disable two factor setting
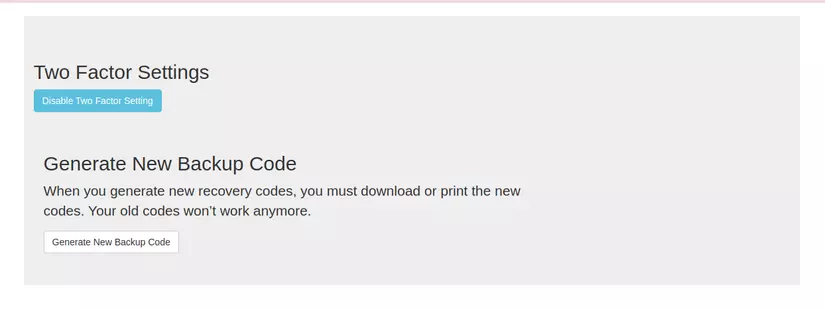 Sau khi config two factor thành công, thì còn lại là disable chức năng two factor setting, và 1 chức năng nữa đó là tạo lại mã backup codes mới
Chức năng tạo mã backup code mới cho những user đã enable two factor, về cơ bản là giống với việc tạo mã backup code khi bạn thực hiện scan qrcode
Require password
Để thực hiện việc bảo mật, mỗi khi user truy cập vào trang setting two factor này thì chúng ta sẽ yêu cầu họ nhập mật khẩu hiện tại của user. Nhập đúng thì mới chuyển hướng đến trang setting two factor setting.
Tạo function require password
def required_password return if session[:password_token] == current_user.encrypted_password render "two_factor_settings/required_password" end
Hàm này chỉ đơn giản là hiển thị form nhập mật khẩu thôi
before_action :required_password, only: [:new, :edit]
Chúng ta sẽ cho nó hiển thị form nhập password trước khi chuyển đến trang scan qrcode hoặc trang dissable two factor
def confirm_password unless current_user.valid_password? enable_2fa_params_password[:password] flash.now[:danger] = "Current password not valid. Please try again" return render "two_factor_settings/required_password" end session[:password_token] = current_user.encrypted_password redirect_to new_two_factor_settings_path end
Hàm này thực hiện kiểm tra mật khẩu nhập vào có đúng không và chuyển hướng đến trang config two factor
Mục đích để tránh có người không phải bản thân user thực hiện action. Hạn chế rủi ro về bảo mật tài khoản cho user
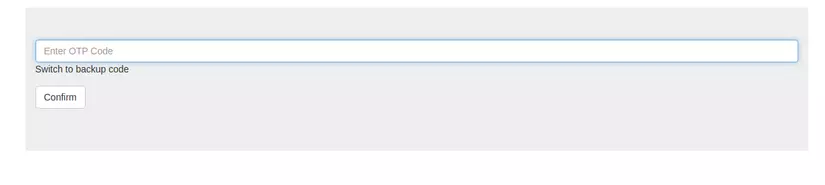
Nhập OTP, backup code sau khi login
Để có thể kiểm tra dược otp, backup code người dùng đúng hay không, chúng ta tạo ra module AuthenticateWithOtpTwoFactor để tiến hành xác thực
module AuthenticateWithOtpTwoFactor extend ActiveSupport::Concern def authenticate_with_otp_two_factor user = self.resource = find_user return prompt_for_two_factor(user) if session[:otp_user_id].blank? authenticate_user_with_backup_code_two_factor(user) if params[:code_type] == "backup_code" authenticate_user_with_otp_two_factor(user) unless params[:code_type] == "backup_code" end private def prompt_for_two_factor user return unless session[:otp_user_id] || user&.valid_password?(user_params[:password]) @user = user session[:otp_user_id] = user.id render "devise/sessions/two_factor" end def authenticate_user_with_otp_two_factor user if user_params[:otp_attempt].blank? flash.now[:danger] = "OTP Code not blank" prompt_for_two_factor user return end if user.current_otp == user_params[:otp_attempt] && user&.validate_and_consume_otp!(user_params[:otp_attempt]) session.delete :otp_user_id sign_in user else flash.now[:danger] = "OTP Code invalid. Please try again" prompt_for_two_factor user end rescue StandardError => e flash.now[:danger] = e.message prompt_for_two_factor user end def authenticate_user_with_backup_code_two_factor user if user_params[:backup_code_attempt].blank? flash.now[:danger] = "Backup Code not blank. Please try again" prompt_for_two_factor user return end if user&.invalidate_otp_backup_code!(user_params[:backup_code_attempt]) session.delete :otp_user_id sign_in user else flash.now[:danger] = "Backup code invalid" prompt_for_two_factor user end rescue StandardError => e flash.now[:danger] = e.message prompt_for_two_factor admin end def user_params params.require(:user).permit(:email, :password, :otp_attempt, :backup_code_attempt) end def find_user if user_params[:email] User.find_by email: user_params[:email] elsif session[:otp_user_id] User.find_by id: session[:otp_user_id] end end def otp_two_factor_enabled? find_user&.otp_required_for_login? end
end
Để nó có thể chạy vào module check, thì chúng ta phải làm cho trước khi vào vào session create của devise thì chúng ta sẽ gọi đến hàm check trong module
include AuthenticateWithOtpTwoFactor prepend_before_action :authenticate_with_otp_two_factor, if: -> {action_name == "create" && otp_two_factor_enabled?}
Mã HTML dùng để nhập OTP và password
<div class="container jumbotron"> <body class="login"> <div> <div class="login_wrapper"> <div class="animate form login_form"> <section class="login_content"> <% flash.each do |key, value| %> <% unless value.is_a? Hash%> <div class="alert alert-<%= key == "notice" ? "info" : "danger"%>"> <span class="close" data-dismiss="alert" aria-label="close">×</span> <%= value %> </div> <% end %> <% end %> <%= form_for(resource, as: resource_name, url: session_path(resource_name), method: :post) do |f| %> <div class="otp_code <%= "hide" if params[:code_type] == "backup_code" %>"> <div> <%= f.text_field :otp_attempt, class: "form-control", placeholder: "Enter OTP Code", autofocus: "autofocus" %> </div> <div class="form-group"> <span class="recover_code_link">Switch to backup code</span> </div> </div> <div class="backup_code <%= "hide" if params[:code_type] != "backup_code" %>"> <div> <%= f.text_field :backup_code_attempt, class: "form-control", placeholder: "Enter backup code", autofocus: "autofocus" %> </div> <div class="form-group"> <span class="otp_code_link">Switch to otp code</span> </div> </div> <div class="form-group"> <input type="hidden" name="code_type" id="admin_code_type" value="<%= params[:code_type]%>" /> <%= f.button :submit, class: "btn btn-default submit" do %> <span class="text">Confirm</span> <% end %> </div> <div class="clearfix"></div> <% end %> </section> </div> </div> </div> </body>
</div>
Kết
Đến đây chúng ta đã hoàn thành chức năng xác thực 2 bước sử dụng google authenticator rồi.
Source code hoàn chỉnh các bạn có thể xem tại đây
Source này mình có up lên heroku, muốn trải nghiệm thử các bạn vào đây để đăng ký 1 tài khoản. Sau đó login để trải nghiệm nhé.
Cảm ơn các bạn đã theo dõi.