Android Bottom Navigation ở cuối màn hình cung cấp điều hướng giữa các chế độ views ở top-level trong ứng dụng. Điều này được giới thiệu trongdesign support library với khả năng tương thích ngược. Bottom Navigation được sử dụng khi ứng dụng có từ ba đến năm top-level điều hướng.
Bài viết này giải thích các khái niệm cơ bản của Bottom Navigation, kết hợp nó với Fragments. Chúng ta cũng sẽ tìm hiểu cách tải fragment đầu tiên với dữ liệu lưới (sử dụng RecyclerView) bằng cách tìm nạp JSON thông qua cuộc gọi HTTP.
1. Bottom Navigation
Bottom Navigation có thể dễ dàng thêm bằng cách sử dụng thành phần BottomNavigationView. Bạn phải sử dụng gravitation hoặc các thuộc tính tương đối để làm cho nó xuất hiện ở dưới cùng của màn hình.
<?xml version="1.0" encoding="utf-8"?>
<android.support.design.widget.CoordinatorLayout xmlns:android="http://schemas.android.com/apk/res/android" xmlns:app="http://schemas.android.com/apk/res-auto" xmlns:tools="http://schemas.android.com/tools"> <FrameLayout android:id="@+id/frame_container" android:layout_width="match_parent" android:layout_height="match_parent" app:layout_behavior="@string/appbar_scrolling_view_behavior" /> <android.support.design.widget.BottomNavigationView android:id="@+id/navigation" android:layout_width="match_parent" android:layout_height="wrap_content" android:layout_gravity="bottom" android:background="?android:attr/windowBackground" app:itemBackground="@color/bgBottomNavigation" android:foreground="?attr/selectableItemBackground" app:itemIconTint="@android:color/white" app:itemTextColor="@android:color/white" app:menu="@menu/navigation" /> </android.support.design.widget.CoordinatorLayout>
Ở đây vài thuộc tính quan trọng phải ghi lại.
app:menu — File menu resource để hiển thị các mục điều hướng cùng với icon và text. app:itemBackground — Áp dụng background color cho bottom navigation. app:itemTextColor — Màu text của bottom navigation item. app:itemIconTint — Màu icon của bottom navigation item.
Khi nào sử dụng Điều hướng dưới cùng? Theo như design specs, các navigations bên dưới nên được sử dụng tùy thuộc vào criteria.
Ngăn điều hướng - Sử dụng khi điều hướng cấp cao nhất có hơn sáu điểm đến.
Tab - Sử dụng khi có hai điểm đến điều hướng.
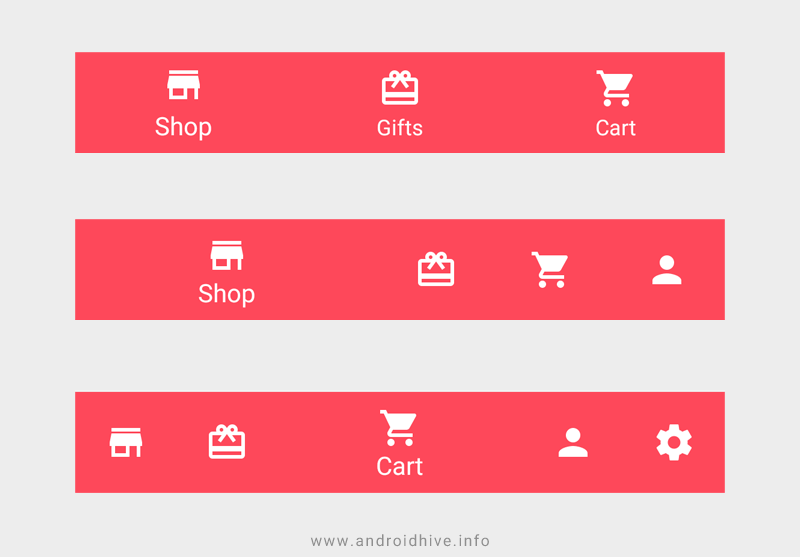
Điều hướng dưới cùng - Sử dụng khi có từ ba đến năm điểm đến cấp cao nhất.
Trước khi tiếp tục, hãy xem nhanh các đặc tả design spec của Bottom Navigation.
2. Creating New Project
Bước 1.
Tạo project mới trong Android Studio: File ⇒ New Project và chọn Basic Activity từ templates.
Bước 2.
Download thư mục res và thêm drawables vào thư mục res của project. Thư mục này có chứa drawables cần thiết cho bottom navigation items.
Bước 3.
Đảm bảo rằng đã thêm thư viện support design trong build.gradle.
build.gradle
dependencies { implementation 'com.android.support:design:26.1.0'
}
Bước 4.
Thêm giá trị color, string ở dưới vào trong file colors.xml và strings.xml.
colors.xml
<?xml version="1.0" encoding="utf-8"?>
<resources> <color name="colorPrimary">#7b4bff</color> <color name="colorPrimaryDark">#6539ba</color> <color name="colorAccent">#FF4081</color> <color name="bgBottomNavigation">#fe485a</color>
</resources>
strings.xml
<resources> <string name="app_name">Bottom Navigation</string> <string name="title_shop">Shop</string> <string name="title_gifts">Gifts</string> <string name="title_cart">Cart</string> <string name="title_profile">Profile</string>
</resources>
Bước 5.
Bottom Navigation items được rendered bằng cách sử dụng 1 menu file, hãy tạo một xml mới có tên navigation.xml trong thư mục res/folder.
navigation.xml
<?xml version="1.0" encoding="utf-8"?>
<menu xmlns:android="http://schemas.android.com/apk/res/android"> <item android:id="@+id/navigation_shop" android:icon="@drawable/ic_store_white_24dp" android:title="@string/title_shop" /> <item android:id="@+id/navigation_gifts" android:icon="@drawable/ic_card_giftcard_white_24dp" android:title="@string/title_gifts" /> <item android:id="@+id/navigation_cart" android:icon="@drawable/ic_shopping_cart_white_24dp" android:title="@string/title_cart" /> <item android:id="@+id/navigation_profile" android:icon="@drawable/ic_person_white_24dp" android:title="@string/title_profile" /> </menu>
Bước 6.
Mở file activity_main.xml và thêm BottomNavigationView widget. Ở đây chúng ta sẽ thêm FrameLayout để load Fragments khi navigation item đc chọn.
activity_main.xml
<?xml version="1.0" encoding="utf-8"?>
<android.support.design.widget.CoordinatorLayout xmlns:android="http://schemas.android.com/apk/res/android" xmlns:app="http://schemas.android.com/apk/res-auto" xmlns:tools="http://schemas.android.com/tools" android:id="@+id/container" android:layout_width="match_parent" android:layout_height="match_parent" tools:context="info.androidhive.bottomnavigation.MainActivity"> <FrameLayout android:id="@+id/frame_container" android:layout_width="match_parent" android:layout_height="match_parent" app:layout_behavior="@string/appbar_scrolling_view_behavior" /> <android.support.design.widget.BottomNavigationView android:id="@+id/navigation" android:layout_width="match_parent" android:layout_height="wrap_content" android:layout_gravity="bottom" android:background="?android:attr/windowBackground" app:itemBackground="@color/bgBottomNavigation" android:foreground="?attr/selectableItemBackground" app:itemIconTint="@android:color/white" app:itemTextColor="@android:color/white" app:menu="@menu/navigation" /> </android.support.design.widget.CoordinatorLayout>
Bước 7.
Mở file MainActivity.java and chỉ sửa như bên dưới
OnNavigationItemSelectedListener sẽ được gọi khi bottom navigation item được chọn. Hiện tại, chúng ta chỉ thay đổi tiêu đề toolbar khi chọn navigation item.
MainActivity.java
package info.androidhive.bottomnavigation; import android.os.Bundle;
import android.support.annotation.NonNull;
import android.support.design.widget.BottomNavigationView;
import android.support.design.widget.CoordinatorLayout;
import android.support.v4.app.Fragment;
import android.support.v4.app.FragmentTransaction;
import android.support.v7.app.ActionBar;
import android.support.v7.app.AppCompatActivity;
import android.view.MenuItem; import info.androidhive.bottomnavigation.fragment.CartFragment;
import info.androidhive.bottomnavigation.fragment.GiftsFragment;
import info.androidhive.bottomnavigation.fragment.ProfileFragment;
import info.androidhive.bottomnavigation.fragment.StoreFragment;
import info.androidhive.bottomnavigation.helper.BottomNavigationBehavior; public class MainActivity extends AppCompatActivity { private ActionBar toolbar; @Override protected void onCreate(Bundle savedInstanceState) { super.onCreate(savedInstanceState); setContentView(R.layout.activity_main); toolbar = getSupportActionBar(); BottomNavigationView navigation = (BottomNavigationView) findViewById(R.id.navigation); navigation.setOnNavigationItemSelectedListener(mOnNavigationItemSelectedListener); toolbar.setTitle("Shop"); } private BottomNavigationView.OnNavigationItemSelectedListener mOnNavigationItemSelectedListener = new BottomNavigationView.OnNavigationItemSelectedListener() { @Override public boolean onNavigationItemSelected(@NonNull MenuItem item) { Fragment fragment; switch (item.getItemId()) { case R.id.navigation_shop: toolbar.setTitle("Shop"); return true; case R.id.navigation_gifts: toolbar.setTitle("My Gifts"); return true; case R.id.navigation_cart: toolbar.setTitle("Cart"); return true; case R.id.navigation_profile: toolbar.setTitle("Profile"); return true; } return false; } };
}
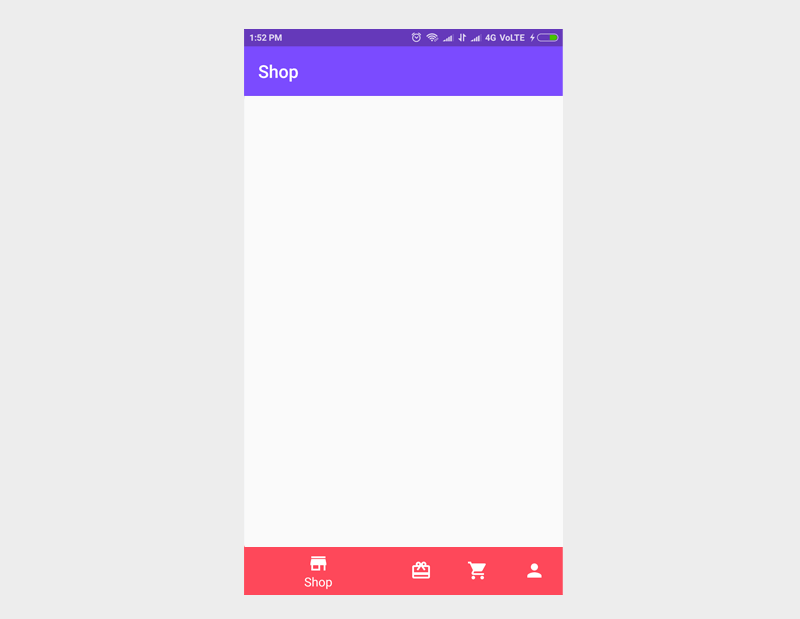
Chạy thử app, bạn có thể thấy bottom navigation được hiển thị như ở bên dưới
3. Adding Fragments
Lưu ý: Không nên sử dụng ViewPager khi sử dụng Bottom Navigation cùng theo thông số kỹ thuật thiết kế (Tránh sử dụng chuyển động ngang để chuyển đổi giữa các chế độ xem)
Chúng ta tạo ra bốn fragment có tên là StoreFragment, GiftsFragment, CartFragment và ProfileFragment.
Bước 8.
Tạo fragment mới: File ⇒ New ⇒ Fragment ⇒ Fragment (Blank) với tên là StoreFragment.java. Tương tự như vậy tạo ra ba mảnh khác nhau.
Bước 9.
Mở file MainActivity.java và sửa bottom navigation listener như ở dưới để load fragments vào trong FrameLayout
loadFragment() – load fragment vào trong FrameLayout. Phương thức tương tự được gọi trong OnNavigationItemSelectedListener bằng cách passing instance fragment thích hợp. Logic cần thiết cho module chi tiết vào Fragment thích hợp giữ cho MainActivity sạch.
MainActivity.java
package info.androidhive.bottomnavigation; import android.os.Bundle;
import android.support.annotation.NonNull;
import android.support.design.widget.BottomNavigationView;
import android.support.design.widget.CoordinatorLayout;
import android.support.v4.app.Fragment;
import android.support.v4.app.FragmentTransaction;
import android.support.v7.app.ActionBar;
import android.support.v7.app.AppCompatActivity;
import android.view.MenuItem; import info.androidhive.bottomnavigation.fragment.CartFragment;
import info.androidhive.bottomnavigation.fragment.GiftsFragment;
import info.androidhive.bottomnavigation.fragment.ProfileFragment;
import info.androidhive.bottomnavigation.fragment.StoreFragment;
import info.androidhive.bottomnavigation.helper.BottomNavigationBehavior; public class MainActivity extends AppCompatActivity { private ActionBar toolbar; @Override protected void onCreate(Bundle savedInstanceState) { super.onCreate(savedInstanceState); setContentView(R.layout.activity_main); toolbar = getSupportActionBar(); // load the store fragment by default toolbar.setTitle("Shop"); loadFragment(new StoreFragment()); } private BottomNavigationView.OnNavigationItemSelectedListener mOnNavigationItemSelectedListener = new BottomNavigationView.OnNavigationItemSelectedListener() { @Override public boolean onNavigationItemSelected(@NonNull MenuItem item) { Fragment fragment; switch (item.getItemId()) { case R.id.navigation_shop: toolbar.setTitle("Shop"); fragment = new StoreFragment(); loadFragment(fragment); return true; case R.id.navigation_gifts: toolbar.setTitle("My Gifts"); fragment = new GiftsFragment(); loadFragment(fragment); return true; case R.id.navigation_cart: toolbar.setTitle("Cart"); fragment = new CartFragment(); loadFragment(fragment); return true; case R.id.navigation_profile: toolbar.setTitle("Profile"); fragment = new ProfileFragment(); loadFragment(fragment); return true; } return false; } }; private void loadFragment(Fragment fragment) { // load fragment FragmentTransaction transaction = getSupportFragmentManager().beginTransaction(); transaction.replace(R.id.frame_container, fragment); transaction.addToBackStack(null); transaction.commit(); } }
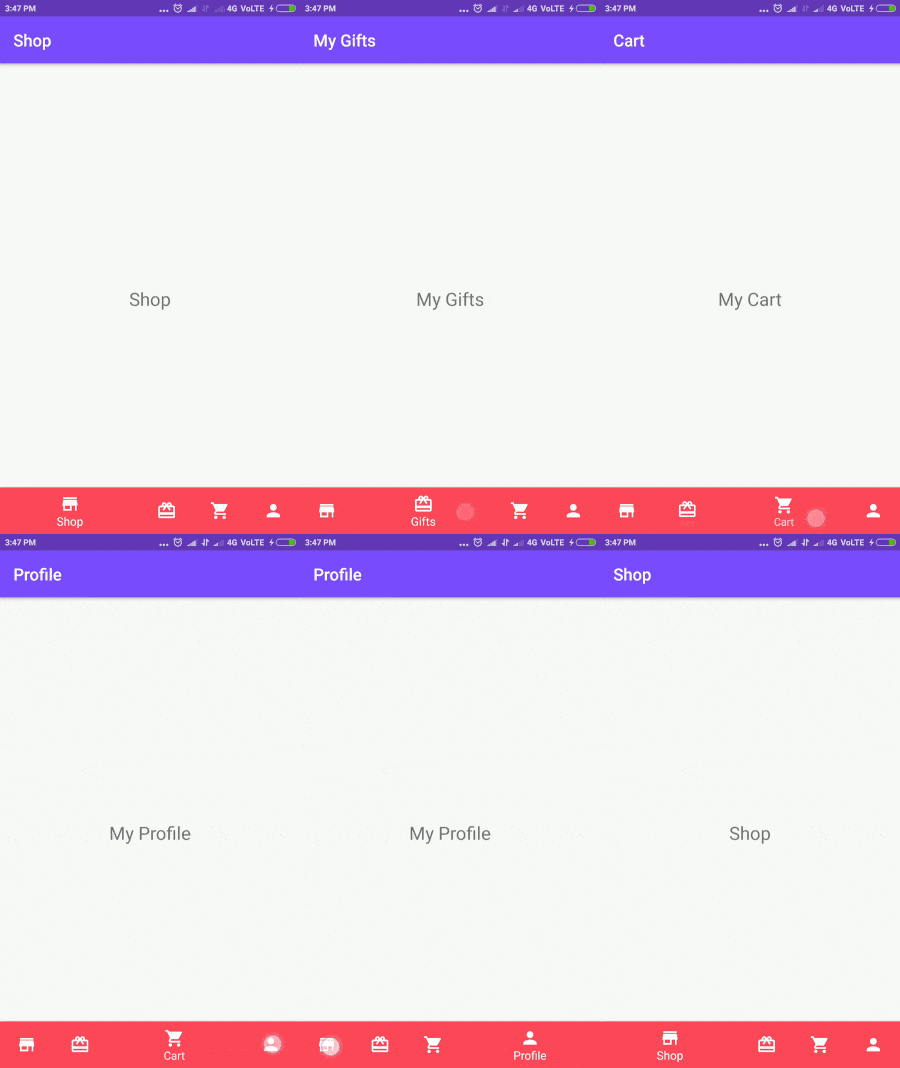
Chạy thử project và có thể nhìn thấy fragments được load khi navigation được chọn.
4. Implementing ShopFragment – Displaying Items in Grid
Bây giờ chúng ta sẽ xem cách triển khai fragment đầu tiên, ví dụ như ShopFragment, hiển thị các mục cửa hàng theo kiểu Grid. Để chạy thử, chúng ta đã tạo một mẫu json chứa vài phim để bán. Để thực hiện điều này, tất cả những gì chúng ta phải làm là fetch json và hiển thị dữ liệu trong RecyclerView theo định dạng lưới.
https://api.androidhive.info/json/movies_2017.json
Bước 10.
Mở build.gradle và thêm dependencies RecyclerView, CardView, Volley và Glide.
build.gradle
dependencies { // RecyclerView compile 'com.android.support:recyclerview-v7:26.1.0' // CardView compile 'com.android.support:cardview-v7:26.1.0' // volley http library implementation 'com.android.volley:volley:1.0.0' implementation 'com.google.code.gson:gson:2.6.2' // glide image library implementation 'com.github.bumptech.glide:glide:4.3.1'
}
Bước 11.
Tạo 1 class với tên MyApplication.java implement Application. Đây là 1 class singleton và khởi tạo thư viện volley ở trong
MyApplication.java
package info.androidhive.bottomnavigation.app; import android.app.Application;
import android.text.TextUtils; import com.android.volley.Request;
import com.android.volley.RequestQueue;
import com.android.volley.toolbox.Volley; public class MyApplication extends Application { public static final String TAG = MyApplication.class .getSimpleName(); private RequestQueue mRequestQueue; private static MyApplication mInstance; @Override public void onCreate() { super.onCreate(); mInstance = this; } public static synchronized MyApplication getInstance() { return mInstance; } public RequestQueue getRequestQueue() { if (mRequestQueue == null) { mRequestQueue = Volley.newRequestQueue(getApplicationContext()); } return mRequestQueue; } public <T> void addToRequestQueue(Request<T> req, String tag) { // set the default tag if tag is empty req.setTag(TextUtils.isEmpty(tag) ? TAG : tag); getRequestQueue().add(req); } public <T> void addToRequestQueue(Request<T> req) { req.setTag(TAG); getRequestQueue().add(req); } public void cancelPendingRequests(Object tag) { if (mRequestQueue != null) { mRequestQueue.cancelAll(tag); } }
}
Bước 12.
Mở file AndroidManifest.xml và thêm tag <application> trong MyApplication. Chúng ta cũng nên thêm permission INTERNET
AndroidManifest.xml
<?xml version="1.0" encoding="utf-8"?>
<manifest xmlns:android="http://schemas.android.com/apk/res/android" package="info.androidhive.bottomnavigation"> <uses-permission android:name="android.permission.INTERNET"/> <application android:name=".app.MyApplication" android:allowBackup="true" android:icon="@mipmap/ic_launcher" android:label="@string/app_name" android:roundIcon="@mipmap/ic_launcher_round" android:supportsRtl="true" android:theme="@style/AppTheme"> <activity android:name=".MainActivity" android:label="@string/app_name"> <intent-filter> <action android:name="android.intent.action.MAIN" /> <category android:name="android.intent.category.LAUNCHER" /> </intent-filter> </activity> </application>
</manifest>
Bước 13.
Mở file layout fragment_store.xml và thêm đoạn code ở dưới. Ở dưới chúng ta cũng thêm RecyclerView.
fragment_store.xml
<android.support.v4.widget.NestedScrollView xmlns:android="http://schemas.android.com/apk/res/android" xmlns:tools="http://schemas.android.com/tools" android:layout_width="match_parent" android:layout_height="match_parent" android:background="#f1f5f7" tools:context="info.androidhive.bottomnavigation.fragment.StoreFragment"> <LinearLayout android:layout_width="match_parent" android:layout_height="match_parent" android:orientation="vertical"> <TextView android:layout_width="match_parent" android:layout_height="wrap_content" android:paddingLeft="@dimen/activity_horizontal_margin" android:paddingTop="10dp" android:text="New Release Films" android:textColor="#111" android:textSize="16dp" /> <android.support.v7.widget.RecyclerView android:id="@+id/recycler_view" android:layout_width="match_parent" android:layout_height="wrap_content" android:clipToPadding="false" android:scrollbars="vertical" /> </LinearLayout>
</android.support.v4.widget.NestedScrollView>
Bước 14.
Tạo file layout với tên store_item_row.xml. File này sẽ dược sử dụng trong class RecyclerView adapter class để render single item.
store_item_row.xml
<LinearLayout xmlns:android="http://schemas.android.com/apk/res/android" xmlns:card_view="http://schemas.android.com/apk/res-auto" android:layout_width="match_parent" android:layout_height="wrap_content"> <android.support.v7.widget.CardView android:id="@+id/card_view" android:layout_width="match_parent" android:layout_height="match_parent" android:layout_gravity="center" android:layout_margin="@dimen/card_margin" android:clickable="true" android:elevation="3dp" android:foreground="?attr/selectableItemBackground" card_view:cardCornerRadius="@dimen/card_album_radius"> <RelativeLayout android:layout_width="match_parent" android:layout_height="match_parent"> <ImageView android:id="@+id/thumbnail" android:layout_width="match_parent" android:layout_height="@dimen/album_cover_height" android:background="?attr/selectableItemBackgroundBorderless" android:clickable="true" android:scaleType="fitXY" /> <TextView android:id="@+id/title" android:layout_width="match_parent" android:layout_height="wrap_content" android:layout_below="@id/thumbnail" android:lines="2" android:paddingLeft="@dimen/album_title_padding" android:paddingRight="@dimen/album_title_padding" android:paddingTop="@dimen/album_title_padding" android:textColor="#111" android:textSize="11dp" /> <TextView android:id="@+id/price" android:layout_width="match_parent" android:layout_height="wrap_content" android:layout_below="@id/title" android:layout_marginRight="10dp" android:gravity="right" android:paddingBottom="@dimen/songs_count_padding_bottom" android:textColor="@color/colorAccent" android:textSize="11dp" /> </RelativeLayout> </android.support.v7.widget.CardView>
</LinearLayout>
Bước 15.
Tạo class với tên Movie.java. Lớp POJO này sẽ hữu ích trong khi phân tích cú pháp json.
Movie.java
package info.androidhive.bottomnavigation; public class Movie { String title; String image; String price; public String getTitle() { return title; } public void setTitle(String title) { this.title = title; } public String getImage() { return image; } public void setImage(String image) { this.image = image; } public String getPrice() { return price; } public void setPrice(String price) { this.price = price; }
}
Bước 16.
Bây giờ mở file StoreFragment.java và thêm đoạn code ở bên dưới. Để đơn giản, class StoreAdapter có trong cùng một fragment.
fetchStoreItems() Phương thức lấy các movie json sử dụng Volley và serializes nó sử dụng Gson.
SClass toreAdapter renders các bộ phim ở trong RecyclerView.
StoreFragment.java
package info.androidhive.bottomnavigation.fragment; import android.content.Context;
import android.content.res.Resources;
import android.graphics.Rect;
import android.os.Bundle;
import android.support.v4.app.Fragment;
import android.support.v7.widget.DefaultItemAnimator;
import android.support.v7.widget.GridLayoutManager;
import android.support.v7.widget.RecyclerView;
import android.util.Log;
import android.util.TypedValue;
import android.view.LayoutInflater;
import android.view.View;
import android.view.ViewGroup;
import android.widget.ImageView;
import android.widget.TextView;
import android.widget.Toast; import com.android.volley.Response;
import com.android.volley.VolleyError;
import com.android.volley.toolbox.JsonArrayRequest;
import com.bumptech.glide.Glide;
import com.google.gson.Gson;
import com.google.gson.reflect.TypeToken; import org.json.JSONArray; import java.util.ArrayList;
import java.util.List; import info.androidhive.bottomnavigation.Movie;
import info.androidhive.bottomnavigation.app.MyApplication;
import info.androidhive.bottomnavigation.R; public class StoreFragment extends Fragment { private static final String TAG = StoreFragment.class.getSimpleName(); private static final String URL = "https://api.androidhive.info/json/movies_2017.json"; private RecyclerView recyclerView; private List<Movie> movieList; private StoreAdapter mAdapter; public StoreFragment() { // Required empty public constructor } public static StoreFragment newInstance(String param1, String param2) { StoreFragment fragment = new StoreFragment(); Bundle args = new Bundle(); fragment.setArguments(args); return fragment; } @Override public void onCreate(Bundle savedInstanceState) { super.onCreate(savedInstanceState); } @Override public View onCreateView(LayoutInflater inflater, ViewGroup container, Bundle savedInstanceState) { // Inflate the layout for this fragment View view = inflater.inflate(R.layout.fragment_store, container, false); recyclerView = view.findViewById(R.id.recycler_view); movieList = new ArrayList<>(); mAdapter = new StoreAdapter(getActivity(), movieList); RecyclerView.LayoutManager mLayoutManager = new GridLayoutManager(getActivity(), 3); recyclerView.setLayoutManager(mLayoutManager); recyclerView.addItemDecoration(new GridSpacingItemDecoration(2, dpToPx(8), true)); recyclerView.setItemAnimator(new DefaultItemAnimator()); recyclerView.setAdapter(mAdapter); recyclerView.setNestedScrollingEnabled(false); fetchStoreItems(); return view; } private void fetchStoreItems() { JsonArrayRequest request = new JsonArrayRequest(URL, new Response.Listener<JSONArray>() { @Override public void onResponse(JSONArray response) { if (response == null) { Toast.makeText(getActivity(), "Couldn't fetch the store items! Pleas try again.", Toast.LENGTH_LONG).show(); return; } List<Movie> items = new Gson().fromJson(response.toString(), new TypeToken<List<Movie>>() { }.getType()); movieList.clear(); movieList.addAll(items); // refreshing recycler view mAdapter.notifyDataSetChanged(); } }, new Response.ErrorListener() { @Override public void onErrorResponse(VolleyError error) { // error in getting json Log.e(TAG, "Error: " + error.getMessage()); Toast.makeText(getActivity(), "Error: " + error.getMessage(), Toast.LENGTH_SHORT).show(); } }); MyApplication.getInstance().addToRequestQueue(request); } public class GridSpacingItemDecoration extends RecyclerView.ItemDecoration { private int spanCount; private int spacing; private boolean includeEdge; public GridSpacingItemDecoration(int spanCount, int spacing, boolean includeEdge) { this.spanCount = spanCount; this.spacing = spacing; this.includeEdge = includeEdge; } @Override public void getItemOffsets(Rect outRect, View view, RecyclerView parent, RecyclerView.State state) { int position = parent.getChildAdapterPosition(view); // item position int column = position % spanCount; // item column if (includeEdge) { outRect.left = spacing - column * spacing / spanCount; // spacing - column * ((1f / spanCount) * spacing) outRect.right = (column + 1) * spacing / spanCount; // (column + 1) * ((1f / spanCount) * spacing) if (position < spanCount) { // top edge outRect.top = spacing; } outRect.bottom = spacing; // item bottom } else { outRect.left = column * spacing / spanCount; // column * ((1f / spanCount) * spacing) outRect.right = spacing - (column + 1) * spacing / spanCount; // spacing - (column + 1) * ((1f / spanCount) * spacing) if (position >= spanCount) { outRect.top = spacing; // item top } } } } /** * Converting dp to pixel */ private int dpToPx(int dp) { Resources r = getResources(); return Math.round(TypedValue.applyDimension(TypedValue.COMPLEX_UNIT_DIP, dp, r.getDisplayMetrics())); } class StoreAdapter extends RecyclerView.Adapter<StoreAdapter.MyViewHolder> { private Context context; private List<Movie> movieList; public class MyViewHolder extends RecyclerView.ViewHolder { public TextView name, price; public ImageView thumbnail; public MyViewHolder(View view) { super(view); name = view.findViewById(R.id.title); price = view.findViewById(R.id.price); thumbnail = view.findViewById(R.id.thumbnail); } } public StoreAdapter(Context context, List<Movie> movieList) { this.context = context; this.movieList = movieList; } @Override public MyViewHolder onCreateViewHolder(ViewGroup parent, int viewType) { View itemView = LayoutInflater.from(parent.getContext()) .inflate(R.layout.store_item_row, parent, false); return new MyViewHolder(itemView); } @Override public void onBindViewHolder(MyViewHolder holder, final int position) { final Movie movie = movieList.get(position); holder.name.setText(movie.getTitle()); holder.price.setText(movie.getPrice()); Glide.with(context) .load(movie.getImage()) .into(holder.thumbnail); } @Override public int getItemCount() { return movieList.size(); } }
}
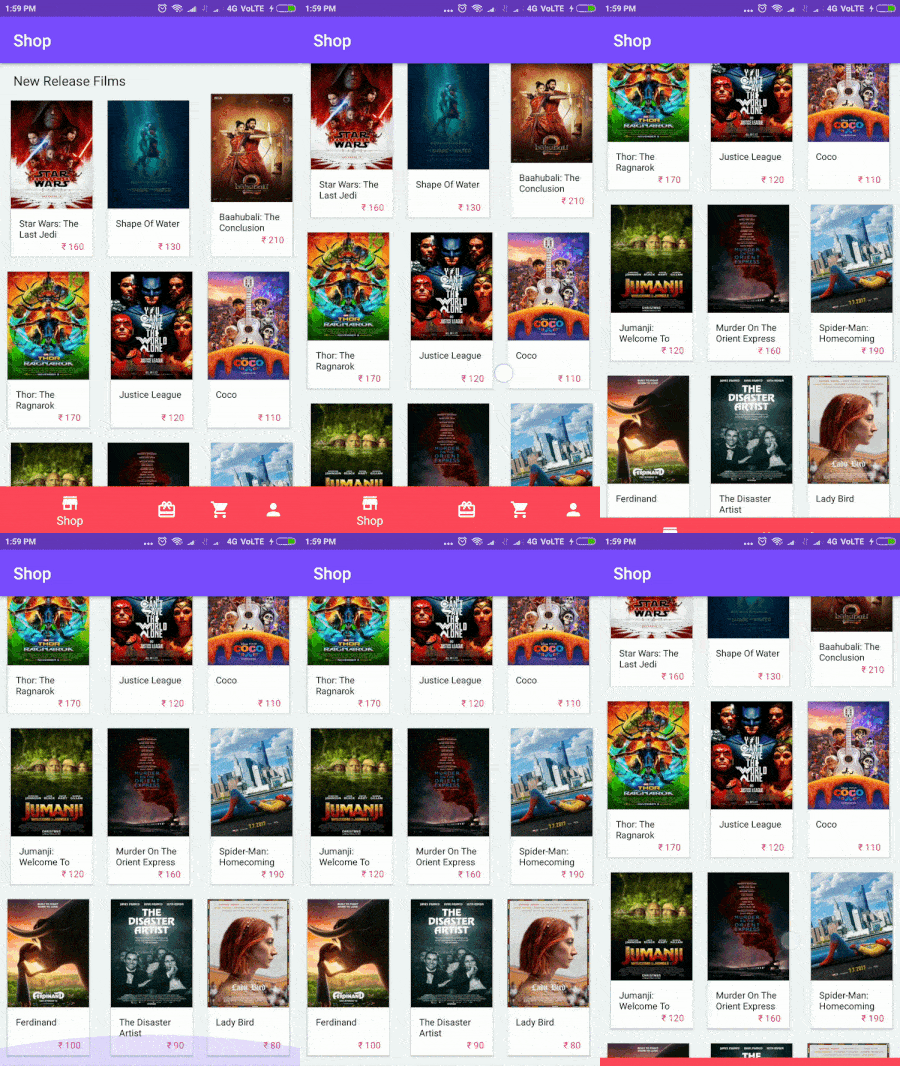
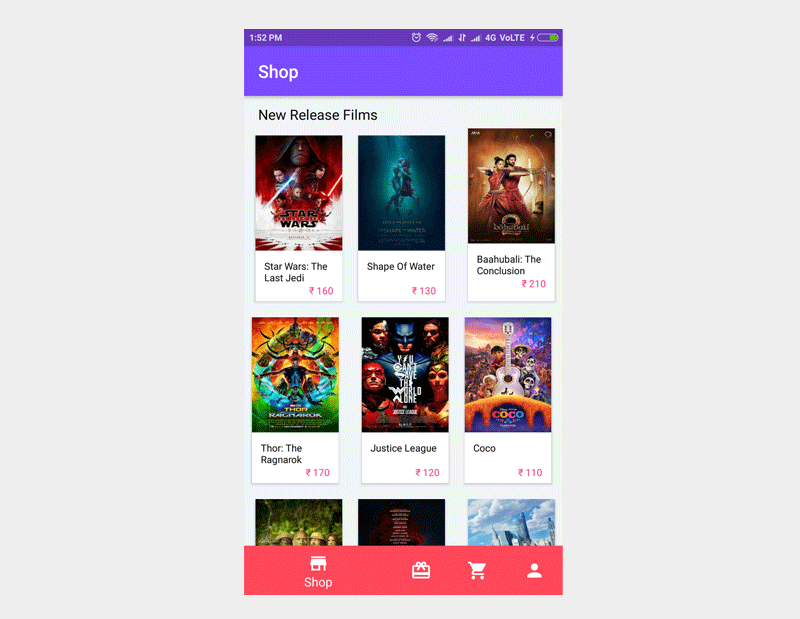
Chạy thử project, chúng ta có thể nhìn thấy ShopFragment đang hiển thị những bộ phim theo dạng grid. Tương tự, chúng ta cũng có thể thực hiện các fragment khác.
5. Hiding Bottom Navigation on Scroll
Theo specs thiết kế, Bottom Navigation phải được ẩn khi nội dung được cuộn để cung cấp thêm chỗ cho nội dung trên màn hình. Để đạt được điều này, chúng ta cần đính kèm BottomNavigationBehavior vào Bottom Navigation.
Bước 17.
Create class với tên BottomNavigationBehavior.java cùng với đoạn code ở dưới
BottomNavigationBehavior.java
package info.androidhive.bottomnavigation.helper; import android.content.Context;
import android.support.design.widget.BottomNavigationView;
import android.support.design.widget.CoordinatorLayout;
import android.support.v4.view.ViewCompat;
import android.util.AttributeSet;
import android.view.View;
import android.widget.FrameLayout; public class BottomNavigationBehavior extends CoordinatorLayout.Behavior<BottomNavigationView> { public BottomNavigationBehavior() { super(); } public BottomNavigationBehavior(Context context, AttributeSet attrs) { super(context, attrs); } @Override public boolean layoutDependsOn(CoordinatorLayout parent, BottomNavigationView child, View dependency) { boolean dependsOn = dependency instanceof FrameLayout; return dependsOn; } @Override public boolean onStartNestedScroll(CoordinatorLayout coordinatorLayout, BottomNavigationView child, View directTargetChild, View target, int nestedScrollAxes) { return nestedScrollAxes == ViewCompat.SCROLL_AXIS_VERTICAL; } @Override public void onNestedPreScroll(CoordinatorLayout coordinatorLayout, BottomNavigationView child, View target, int dx, int dy, int[] consumed) { if (dy < 0) { showBottomNavigationView(child); } else if (dy > 0) { hideBottomNavigationView(child); } } private void hideBottomNavigationView(BottomNavigationView view) { view.animate().translationY(view.getHeight()); } private void showBottomNavigationView(BottomNavigationView view) { view.animate().translationY(0); }
}
Bước 18.
Add BottomNavigationBehavior sử dụng setBehavior() ở trong MainActivity.java như ở bên dưới.
MainActivity.java
public class MainActivity extends AppCompatActivity { private ActionBar toolbar; @Override protected void onCreate(Bundle savedInstanceState) { super.onCreate(savedInstanceState); setContentView(R.layout.activity_main); BottomNavigationView navigation = (BottomNavigationView) findViewById(R.id.navigation); navigation.setOnNavigationItemSelectedListener(mOnNavigationItemSelectedListener); // attaching bottom sheet behaviour - hide / show on scroll CoordinatorLayout.LayoutParams layoutParams = (CoordinatorLayout.LayoutParams) navigation.getLayoutParams(); layoutParams.setBehavior(new BottomNavigationBehavior()); // load the store fragment by default // .. }
}
Bây giờ run app, chúng ta có thể nhìn thấy Bottom Navigation ở dưới khi nội dung app được hiển thị.
