Chào mọi người hôm này mình sẽ viết một bài về Push Notification trong một app mobile Flutter. Trước khi đi vào hướng dẫn mình sẽ nhắc lại một chút về Push Notification để gợi nhớ cho mọi người nhớ lại  .
.

Push Notification là gì?
Push notification là những tin nhắn do server đẩy xuống client thông qua một cổng cloud message nào đó rồi từ cổng này sẽ thông báo xuống máy chúng ta là có thông báo mới và hiển thị chúng. Chính vì vậy nên phải có internet thì mới push notification được.
Tại sao sử dụng Push Notification
- Thông thường một thông báo là được tự động kích hoạt nhằm thông báo tới người dùng là ứng dụng đó đã hoàn thành một công việc nào đó. Hoặc bạn có thể gửi thông tin khuyến mãi tới cho khách hàng của bạn, mời khách hàng tham gia một sự kiện nào đó... -
- Khi xây dựng ứng dụng di động, việc push notification là một chức năng hẳn không thể bỏ qua, nó sẽ là cho ứng dụng của bạn trở nên (ngon) hơn.
Sơ qua là như vậy tiếp đến là phần chính của bài viết này, mọi người cùng tìm hiểu nhé.
Cài đặt Push Notification
Vì Flutter là một framework cross-platform nên ta sẽ phải cấu hình trên cả 2 file Android và iOS và ở đây mình chỉ cấu hình trên mobile thôi nhé.
Trước khi cài đặt Push Notification thì mọi người phải liến kết đến Firebase thì mới làm được phần này nhé.
Link tham khảo: https://viblo.asia/p/lien-ket-firebase-den-app-flutter-cho-android-va-ios-RnB5p6zdZPG
Cài đặt chung
Mọi người vào file pubspect.yaml thêm vào đoạn code bên dưới
dependencies: flutter: sdk: flutter # The following adds the Cupertino Icons font to your application. # Use with the CupertinoIcons class for iOS style icons. cupertino_icons: ^0.1.2 firebase_analytics: any firebase_messaging: 6.0.9 firebase_core: ^0.4.0
Sau đó gõ vào command line packages get để sync lại file config.
Cài đặt trên Android
Các bạn vào file android/build.gradle thêm vào đoạn sau:
dependencies { classpath 'com.android.tools.build:gradle:3.5.0' classpath 'com.google.gms:google-services:4.3.3' }
Trong đường dẫn android/app/build.gradle apply plugin bên dưới
apply plugin: 'com.google.gms.google-services'
Để có thể xử lý message nền thì google đề nghị phải implement thêm theo phiên bản mới.
dependencies { testImplementation 'junit:junit:4.12' androidTestImplementation 'androidx.test:runner:1.1.1' androidTestImplementation 'androidx.test.espresso:espresso-core:3.1.1' implementation 'com.google.firebase:firebase-messaging:20.1.0'
}
Vào trong AndroidManifest.xml và add vào một intent như sau:
<application ...> <activity android:name=".MainActivity" ...> ... <intent-filter> <action android:name="FLUTTER_NOTIFICATION_CLICK" /> <category android:name="android.intent.category.DEFAULT" /> </intent-filter> </activity> ... </application>
Tạo thêm một class Application.java hoặc Application.kt(nếu mọi người dùng Kotlin nhé) trong thư mục có chứa MainActivity với nội dung sau:
public class Application extends FlutterApplication implements PluginRegistrantCallback { @Override public void onCreate() { super.onCreate(); FlutterFirebaseMessagingService.setPluginRegistrant(this); } @Override public void registerWith(PluginRegistry registry) { FirebaseCloudMessagingPluginRegistrant.registerWith(registry); }
}
Tạo thêm một class FirebaseCloudMessagingPluginRegistrant trong cùng thư mục với Application.java với nội dung sau.
import io.flutter.plugin.common.PluginRegistry;
import io.flutter.plugins.firebasemessaging.FirebaseMessagingPlugin; public final class FirebaseCloudMessagingPluginRegistrant{ public static void registerWith(PluginRegistry registry) { if (alreadyRegisteredWith(registry)) { return; } FirebaseMessagingPlugin.registerWith(registry.registrarFor("io.flutter.plugins.firebasemessaging.FirebaseMessagingPlugin")); } private static boolean alreadyRegisteredWith(PluginRegistry registry) { final String key = FirebaseCloudMessagingPluginRegistrant.class.getCanonicalName(); if (registry.hasPlugin(key)) { return true; } registry.registrarFor(key); return false; }
}
Trong file MainActivity.java hãy comment nội dung của nó lại.
package com.djamware.myflutter; //import androidx.annotation.NonNull;
import io.flutter.embedding.android.FlutterActivity;
//import io.flutter.embedding.engine.FlutterEngine;
//import io.flutter.plugins.GeneratedPluginRegistrant; public class MainActivity extends FlutterActivity {
/* @Override public void configureFlutterEngine(@NonNull FlutterEngine flutterEngine) { GeneratedPluginRegistrant.registerWith(flutterEngine); }
}
*/
Cuối cùng là vào AndroidManifest.xml và đổi name của thẻ <application> như sau
<application android:name=".Application" ...
</application>
Thế là xong các bước cài đặt cho Android, bây giờ hãy sang iOS nào.
Cài đặt trên iOS
Mở file ios/Runner/AppDelegate.m hoặc ios/Runner/AppDelegate.swift và thêm dòng bên dưới vào bên trong (BOOL)application:(UIApplication *)application
didFinishLaunchingWithOptions:(NSDictionary *)launchOptions method.
if #available(iOS 10.0, *) { UNUserNotificationCenter.current().delegate = self as? UNUserNotificationCenterDelegate }
Code Demo
Để cho dễ dàng thì mình sẽ code trên file main.dart
Mình sẽ tạo một phương thức để có thể nhận notification khi app chạy dưới background.
import 'dart:async'; import 'package:firebase_messaging/firebase_messaging.dart';
import 'package:flutter/material.dart'; Future<dynamic> myBackgroundMessageHandler(Map<String, dynamic> message) { if (message.containsKey('data')) { final dynamic data = message['data']; } if (message.containsKey('notification')) { final dynamic notification = message['notification']; } }
Tiếp theo tạo một Map<String, Items>để có thể map với chuỗi JSON mà FCM trả về cho mình.
final Map<String, Item> _items = <String, Item>{};
Item _itemForMessage(Map<String, dynamic> message) { final dynamic data = message['data'] ?? message; final String itemId = data['id']; final Item item = _items.putIfAbsent(itemId, () => Item(itemId: itemId)) .._matchteam = data['matchteam'] .._score = data['score']; return item;
}
Tạo một Widget để hiển thị chi tiết message nhận được
class DetailPage extends StatefulWidget { DetailPage(this.itemId); final String itemId; @override _DetailPageState createState() => _DetailPageState();
} class _DetailPageState extends State<DetailPage> { Item _item; StreamSubscription<Item> _subscription; @override void initState() { super.initState(); _item = _items[widget.itemId]; _subscription = _item.onChanged.listen((Item item) { if (!mounted) { _subscription.cancel(); } else { setState(() { _item = item; }); } }); } @override Widget build(BuildContext context) { // This method is rerun every time setState is called, for instance as done // by the _incrementCounter method above. // // The Flutter framework has been optimized to make rerunning build methods // fast, so that you can just rebuild anything that needs updating rather // than having to individually change instances of widgets. return Scaffold( appBar: AppBar( // Here we take the value from the MyHomePage object that was created by // the App.build method, and use it to set our appbar title. title: Text("Match ID ${_item.itemId}"), ), body: SingleChildScrollView( child: Container( padding: EdgeInsets.all(20.0), child: Card( child: Container( padding: EdgeInsets.all(10.0), child: Column( children: <Widget>[ Container( margin: EdgeInsets.fromLTRB(0, 0, 0, 10), child: Column( children: <Widget>[ Text('Today match:', style: TextStyle(color: Colors.black.withOpacity(0.8))), Text( _item.matchteam, style: Theme.of(context).textTheme.title) ], ), ), Container( margin: EdgeInsets.fromLTRB(0, 0, 0, 10), child: Column( children: <Widget>[ Text('Score:', style: TextStyle(color: Colors.black.withOpacity(0.8))), Text( _item.score, style: Theme.of(context).textTheme.title) ], ), ), ], ) ), ), ), ), // This trailing comma makes auto-formatting nicer for build methods. ); }
}
Chỉnh sửa một chút về Homepage
class MyApp extends StatelessWidget { // This widget is the root of your application. @override Widget build(BuildContext context) { return MaterialApp( title: 'Flutter Demo', theme: ThemeData( primarySwatch: Colors.blue, ), home: MyHomePage(title: 'Flutter Demo Home Page'), ); }
} class MyHomePage extends StatefulWidget { MyHomePage({Key key, this.title}) : super(key: key); final String title; @override _MyHomePageState createState() => _MyHomePageState();
} class _MyHomePageState extends State<MyHomePage> { bool _topicButtonsDisabled = false; final FirebaseMessaging _firebaseMessaging = FirebaseMessaging(); final TextEditingController _topicController = TextEditingController(text: 'topic'); Widget _buildDialog(BuildContext context, Item item) { return AlertDialog( content: Text("${item.matchteam} with score: ${item.score}"), actions: <Widget>[ FlatButton( child: const Text('CLOSE'), onPressed: () { Navigator.pop(context, false); }, ), FlatButton( child: const Text('SHOW'), onPressed: () { Navigator.pop(context, true); }, ), ], ); } void _showItemDialog(Map<String, dynamic> message) { showDialog<bool>( context: context, builder: (_) => _buildDialog(context, _itemForMessage(message)), ).then((bool shouldNavigate) { if (shouldNavigate == true) { _navigateToItemDetail(message); } }); } void _navigateToItemDetail(Map<String, dynamic> message) { final Item item = _itemForMessage(message); // Clear away dialogs Navigator.popUntil(context, (Route<dynamic> route) => route is PageRoute); if (!item.route.isCurrent) { Navigator.push(context, item.route); } } @override void initState() { super.initState(); _firebaseMessaging.configure( onMessage: (Map<String, dynamic> message) async { print("onMessage: $message"); _showItemDialog(message); }, onBackgroundMessage: myBackgroundMessageHandler, onLaunch: (Map<String, dynamic> message) async { print("onLaunch: $message"); _navigateToItemDetail(message); }, onResume: (Map<String, dynamic> message) async { print("onResume: $message"); _navigateToItemDetail(message); }, ); _firebaseMessaging.requestNotificationPermissions( const IosNotificationSettings( sound: true, badge: true, alert: true, provisional: true)); _firebaseMessaging.onIosSettingsRegistered .listen((IosNotificationSettings settings) { print("Settings registered: $settings"); }); _firebaseMessaging.getToken().then((String token) { assert(token != null); print("Push Messaging token: $token"); }); _firebaseMessaging.subscribeToTopic("matchscore"); } @override Widget build(BuildContext context) { return Scaffold( appBar: AppBar( title: const Text('My Flutter FCM'), ), body: SingleChildScrollView( child: Container( padding: EdgeInsets.all(20.0), child: Card( child: Container( padding: EdgeInsets.all(10.0), child: Column( children: <Widget>[ Container( margin: EdgeInsets.fromLTRB(0, 0, 0, 10), child: Column( children: <Widget>[ Text('Welcome to this Flutter App:', style: TextStyle(color: Colors.black.withOpacity(0.8))), Text('You already subscribe to the matchscore topic', style: Theme.of(context).textTheme.title) ], ), ), Container( margin: EdgeInsets.fromLTRB(0, 0, 0, 10), child: Column( children: <Widget>[ Text('Now you will receive the push notification from the matchscore topics', style: TextStyle(color: Colors.black.withOpacity(0.8))) ], ), ), ], ) ), ), ), ), ); }
}
Finally, modify the main method to be like this. void main() { runApp( MaterialApp( home: MyHomePage(), ), );
}
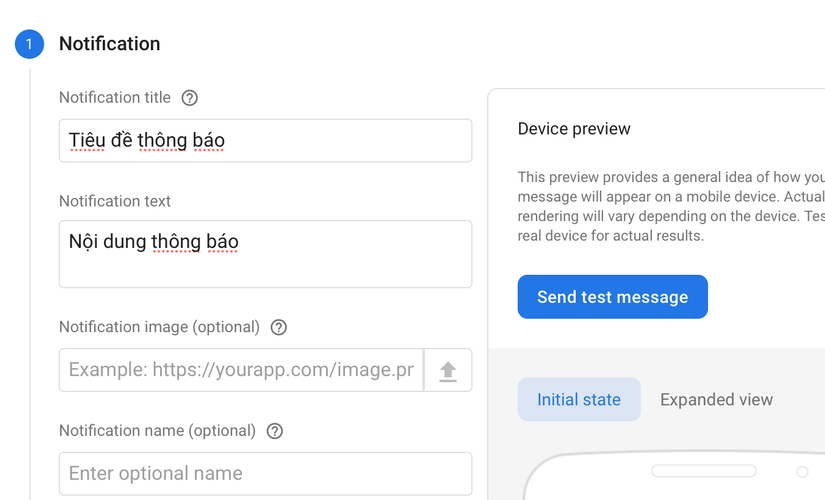
Tạo một thông báo mới:
Nhấn vào Send Message và thêm token vào:
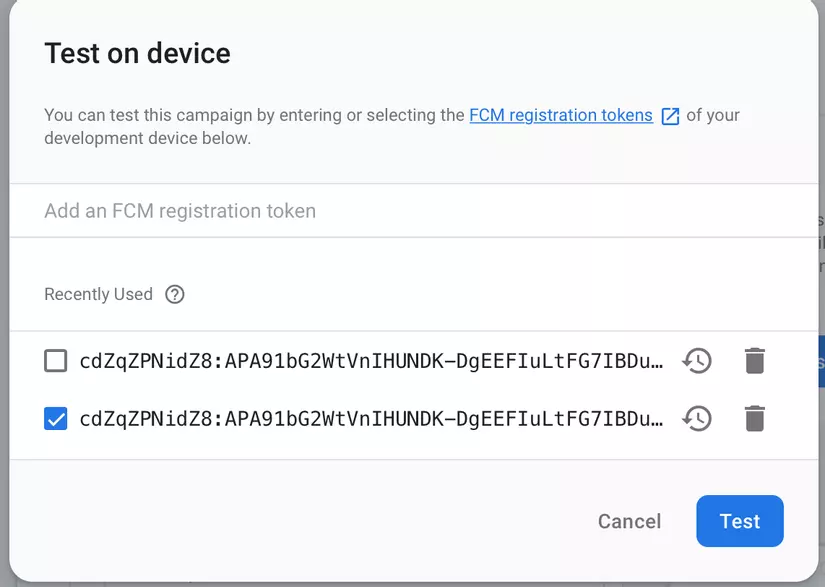
Cách để lấy token:
_firebaseMessaging.getToken().then((String token) { assert(token != null); print("Push Messaging token: $token"); });
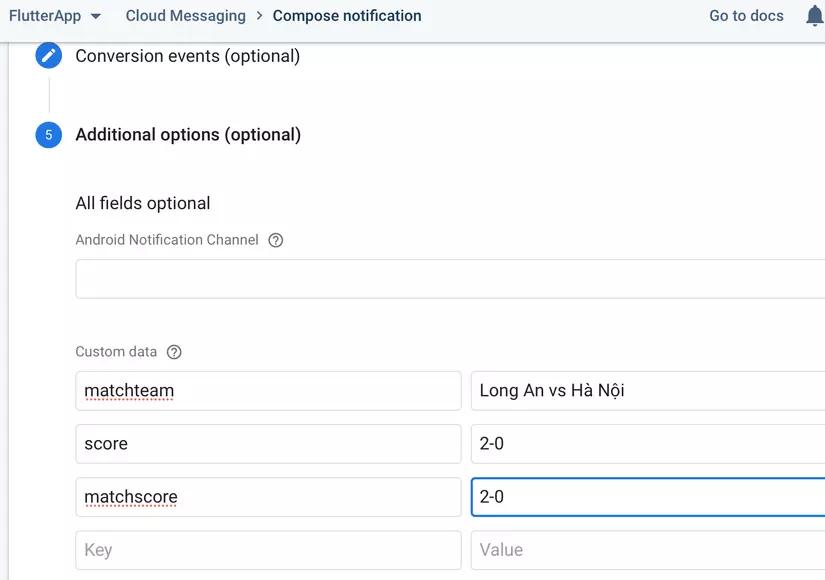
Thiết lập data trên Clound Messaging như sau:
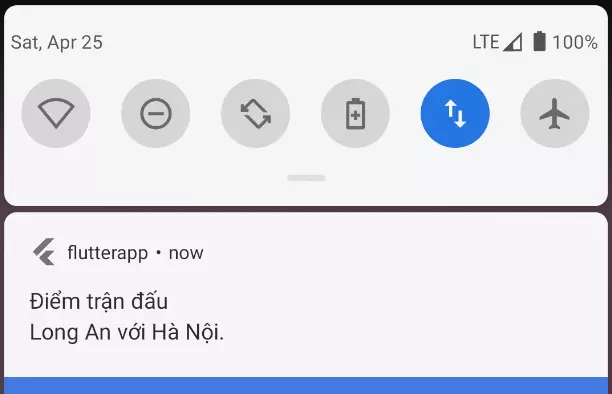
Tiến hành build và test. Ở màn hình Home sẽ như sau:

Khi nhận được dữ liệu sẽ hiển thị lên dialog.

Và khi app chạy dưới nền
Cảm ơn mọi người đã theo dõi.
Link tham khảo :
Github : https://github.com/didinj/flutter-firebase-cloud-messaging-fcm-push-notification-example.git