1. Cài đặt môi trường
- B1: Tạo một thư mục dự án
- B2: Tạo file package.json - là file quản lý các dependency được cài đặt nội bộ. Để tạo file package.json, chúng ta cần khởi tạo npm
npm init - B3: Cài đặt Express
- Express là một module thường được sử dụng kèm theo Node.js. Express chạy giữa server tạo bởi Node.js và các trang frontend của một ứng dụng web. Express cũng giải quyết định tuyến (routing) của ứng dụng, hướng người dùng đến đúng trang dựa trên sự tương tác của người dùng với ứng dụng.
- Mặc dù có nhiều lựa chọn khác ngoài express tuy nhiên Express là đơn giản nhất để tìm hiểu về sự tương tác giữa phần backend Node.js và frondend
- Cài đặt express
npm install express --save - B4 : Tạo file app.js ở trong thư mục dự án
// Call in installed dependencies const express = require('express'); // set up express app const app = express(); // set up port number const port = 5035; // set up home route app.get('/', (request, respond) => { respond.status(200).json({ message: 'Welcome to Project Support', }); }); app.listen(port, (request, respond) => { console.log(`Our server is live on ${port}. Yay!`); }); - B5: Start server
node app.js
2. Xây dựng ứng dụng
Trong bài viết này, chúng ta sẽ xây dựng một ứng dụng CRUD Course (thêm sửa xóa các Course)
1. Cấu trúc thư mục
-
Chắc hẳn bạn đã biết về mô hình MVC, ở ví dụ này chúng ta cũng sẽ xây dựng ứng dụng theo mô hình MVC bằng các tách cấu trúc thành các phần riêng biệt tùy theo chức năng của nó.
-
Chúng ta sẽ tạo ra 3 thư mục, models sẽ chứa code tương tác với database, thư mục controllsers chứa logic của ứng dụng xử lý các request từ client và response trả về, thư mục route giải quyết việc điều hướng.
// create new directory
mkdir server
// change to server directory
cd server
// add three more directories
mkdir controllers models routes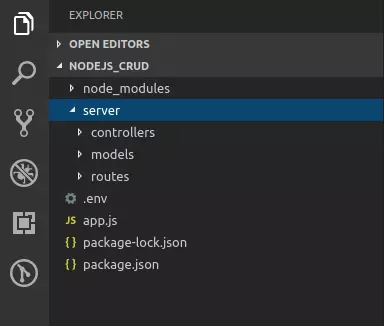
2. Cấu hình Application Entry Point (File app.js)
-
Cài đặt các dependency
// npm install the needed dependencies npm install body-parser morgan mongoose --save- body-parser: Để giải quyết những HTTP POST request trong express.js từ version 4 trở lên, chúng ta cần mudule middleware body-parser. Body parser trích xuất toàn bộ phần body của request gửi đến và hiển thị chúng trên req.body
- mongoose: là một thư viện ODM (Object Data Modeling) cho MongDB và Node.js, được sẻ dụng để chuyển các object (đối tượng) trong code thành những biểu diễn của những object này trong MongoDB.
- morgan: là mộtn công cụ logging tuyệt vời khi làm việc với HTTP server trong Node.js, là một middleware cho phép chúng ta dễ dàng log những request, error ra console.
-
Import và set up các dependency
// import dependencies import express from 'express'; import bodyParser from 'body-parser'; import mongoose from 'mongoose'; import logger from 'morgan'; // set up dependencies const app = express(); app.use(bodyParser.json()); app.use(bodyParser.urlencoded({ extended: false })); app.use(logger('dev')); -
Set up mongoose: Sử dụng JavaScript promise để set up mongoose và bắt lỗi.
// set up mongoose
mongoose.connect(<Your URI>, { useNewUrlParser: true, useUnifiedTopology: true }); .then(()=> { console.log('Database connected'); }) .catch((error)=> { console.log('Error connecting to database'); });
Lưu ý:
- Best practice là đặt URI ở .env và truy cập vào các biến môi trường trong file env với process.env.VAR_NAME
- Các bạn có thể cài đặt MongoDB về máy hoặc có thể sử dụng cloud MongoDB Atlas. Để thiết lập MongoDB Atlas và lấy URI cho Database của bạn, bạn có thể tham khảo hướng dẫn
-
Set up cổng, định nghĩa route home và lắng nghe cổng
// set up port const port = 5035; // set up route app.get('/', (req, res) => { res.status(200).json({ message: 'Welcome to Project with Nodejs Express and MongoDB', }); }); app.listen(port, () => { console.log(`Our server is running on port ${port}`); }); -
Start server: Mở terminal, ở thư mục project, chạy:
node app.jsKết quả khi kết nối database thành công và chạy ứng dụng ở cổng 5035:


3. Tạo Model
- Trước tiên chúng ta sẽ đi vào ví dụ tạo Caurse. Ứng dụng cho phép nhập tiêu đề và mô tả cho course và course được tạo sẽ được lưu trong MongoDB cho phép client có thể truy xuất khi cần. Model đầu tiên chúng ta tạo sẽ là course.js trong thư mục models.
- File course.js: Đầu tiên chúng ta import mongoose và định nghĩa một schema
import mongoose from 'mongoose'; mongoose.Promise = global.Promise; const courseSchema = new mongoose.Schema({ _id: mongoose.Schema.Types.ObjectId, title: { type: String, required: true, }, description: { type: String, required: true, },
}); export default mongoose.model('Course', courseSchema);
4. Tạo Controller
-
Tạo một file course.js trong thư mục controllers
-
Import mongoose và model course mà chúng ta export khi tạo model course.
import mongoose from 'mongoose'; import Course from '../models/course'; -
Tạo course: Đàu tiên chúng ta khởi tạo một Course với giá trị tương ứng với các key trong courseSchema. Sử dụng phương thức save() của mongoDB để lưu dữ liệu vào DB. Return một promise trả lại response cho client nếu save thành công và xử lý lỗi nếu có lỗi xảy ra.
// create new cause
export function createCourse (req, res) { const course = new Course({ _id: mongoose.Types.ObjectId(), title: req.body.title, description: req.body.description, }); return course .save() .then((newCourse) => { return res.status(201).json({ success: true, message: 'New cause created successfully', Course: newCourse, }); }) .catch((error) => { console.log(error); res.status(500).json({ success: false, message: 'Server error. Please try again.', error: error.message, }); });
}
5. Tạo route
-
Tạo file main.js ở trong thư mục routes.
import express from 'express';
import { createCourse } from '../controllers/course'; const router = express.Router();
router.post('/courses', createCourse); export default router;
Lưu ý : Import express và createCourse từ controller
-
Ở file app.js
Chúng ta import route từ file main.js trong thư mục route. Thiết lập route với prefix là api
// call in the installed dependencies
...
import logger from 'morgan';
import mainRoutes from './server/routes/main';
...
// set up route
app.use('/api/', mainRoutes);
...
6. Testing với Postman
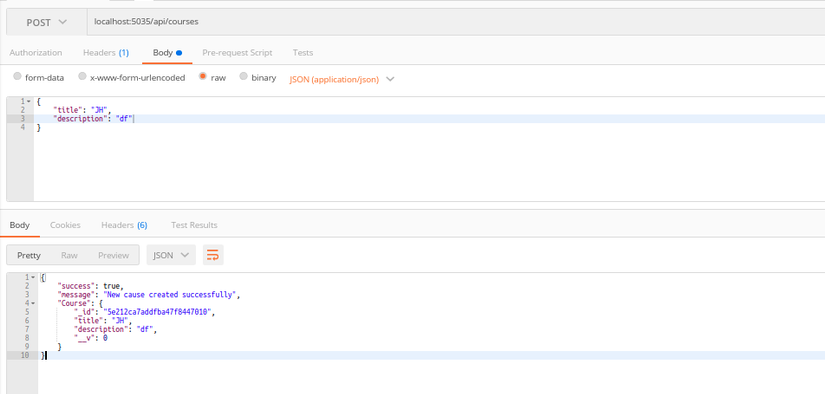 Như vậy là ta đã tạo thành công một course mới và đã lưu đc vào MongoDB.
7. Get list course
1. Controller
- File course.js trong thư mục controllers
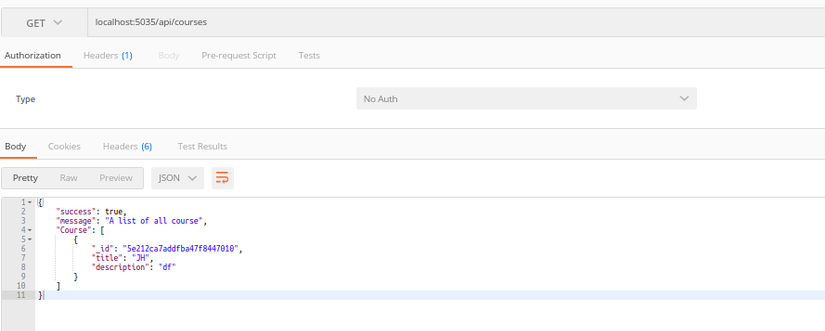
// Get all course
export function getAllCourse( req, res){ Course.find() .select('_id title description') .then((allCourse) => { return res.status(200).json({ success: true, message: 'A list of all course', Course: allCourse, }); }) .catch((err) => { res.status(500).json({ success: false, message: 'Server error. Please try again.', error: err.message, }); });
}
2. Route
- File main.js trong thư mục route
import { createCourse, getAllCourse } from '../controllers/course';
...
router.get('/courses', getAllCourse);
3. Kết quả
8. Get single course
1. Controller
- File course.js trong thư mục controllers
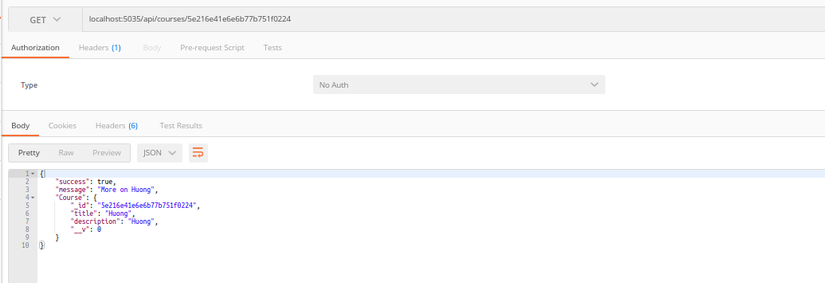
// get single course
export function getSingleCourse(req, res) { const id = req.params.courseId; Course.findById(id) .then((singleCourse) => { res.status(200).json({ success: true, message: `More on ${singleCourse.title}`, Course: singleCourse, }); }) .catch((err) => { res.status(500).json({ success: false, message: 'This course does not exist', error: err.message, }); });
}
2. Route
- File main.js trong thư mục route
import { createCourse, getAllCourse, getSingleCourse } from '../controllers/course';
...
router.get('/courses/:courseId', getSingleCourse);
3. Kết quả
9. Update course
1. Controller
- File course.js trong thư mục controllers
// update course export function updateCourse(req, res) { const id = req.params.courseId; const updateObject = req.body; Course.update({ _id:id }, { $set:updateObject }) .exec() .then(() => { res.status(200).json({ success: true, message: 'Course is updated', updateCourse: updateObject, }); }) .catch((err) => { res.status(500).json({ success: false, message: 'Server error. Please try again.' }); }); } - Lưu ý: Đối với update của mongoDB ta dùng toán tử $set
2. Route
- File main.js trong thư mục route
import { createCourse, getAllCourse, getSingleCourse, updateCourse } from '../controllers/course';
...
router.patch('/courses/:courseId', updateCourse);
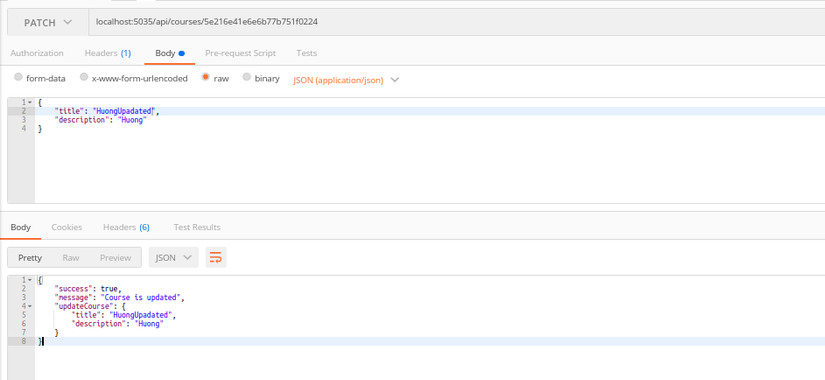
3. Kết quả
10. Delete course
1. Controller
- File course.js trong thư mục controllers
// delete a course export function deleteCourse(req, res) { const id = req.params.courseId; Course.findByIdAndRemove(id) .exec() .then(()=> res.status(204).json({ success: true, })) .catch((err) => res.status(500).json({ success: false, })); } - Lưu ý: Đối với update của mongoDB ta dùng toán tử $set
2. Route
- File main.js trong thư mục route
import { createCourse, getAllCourse, getSingleCourse, updateCourse, deleteCourse } from '../controllers/course';
...
router.delete('/courses/:courseId', deleteCourse);
Kết luận
- Qua bài viết này chúng ta đã xây dựng thành công một ứng dụng web CRUD với nodejs, express, mongoDB, qua đó đồng thời hiểu về luồng giữa bên server và client.Mong bài viết hữu ích với mọi người và hẹn gặp mọi người ở bài viết tiếp theo về nodejs.
- Luồng tham khảo: https://medium.com/fbdevclagos/developing-basic-crud-operations-with-node-express-and-mongodb-e754acb9cc15