In order to create and develop a Spring MVC application, we need some prerequisite software and tools. We will setup Java, configure Maven build tool, install Tomcat web server, configure the Spring Tool Suite, and create and run first Spring MVC project.
Setting up Java
Installing JDK
- Go to Java SE download page on Oracle website at here. And download Java SE Development Kit.
- You must choose which corresponds to your Windows operating system architecture; for instance, if your operating system is of type 32 bit,click on the download link that corresponds to Windows x86, if 64 bit, click on the download link that corresponds to Windows x64.
- Once the download is finished, go to the downloaded directory and double-click on the installer. This will open up a wizard window. Just click through the next buttons in the wizard, leaving the default options alone, and click on the Close button at the end of the wizard:
- Now you can see the installed JDK directory in the default location; in our case,
the default location is
C:\Program Files\Java\jdk_version (in this situtation, version = 1.8.0_60).
Setting up environment variables
- Navigate to Start Menu | Settings | System | About | System info | Advanced system settings.
- A System Properties window will appear; in this window, select the Advanced tab and click on the Environment Variables button to open the Environment Variables window.
- Now, click on the New button in the System variables panel and enter
JAVA_HOMEas the variable name and enter the installed JDK directory path as the variable value; in our case, this would beC:\ProgramFiles\Java\jdk1.8.0_91. If you do not have proper rights for the operating system, you will not be able to edit System variables; in that case, you can create theJAVA_HOMEvariable under the User variables panel. - Now, in the same System variables panel, double-click on the path variable entry; an Edit System Variable window will appear.
- Edit Variable value of Path by clicking the new button and enter the following text
%JAVA_HOME%\binas the value. If you are using a Windows operating system prior to version 10, edit the path variable carefully; you should only append the text at the end of an existing path value. Don't delete or disturb the existing values; make sure you haven't missed the ; (semi-colon) delimited mark as the first letter in the text that you append: - Now click on the OK button.
Check if install successful: if press java --version, we can see same as follow:
C:\Users\Amuthan>java -version
java version "1.8.0_91"
Java(TM) SE Runtime Environment (build 1.8.0_91-b15)
Java HotSpot(TM) 64-Bit Server VM (build 25.91-b15, mixed mode)
Installing the Maven build tool
Apache Tomcat is a popular Java web server and servlet container. Let's take a look at how we can install the Tomcat web server:
- Go to the Apache Tomcat home page at https://tomcat.apache.org/.
- Click on the download link of version you want.
- Click on 32-bit/64-bit Window Service Installer(pgp,md5,sha1) link; it will start downloading the installer.
- Once the download is finished, go to the downloaded directory and double-click on the installer; this will open up a wizard window.
- Just click through the Next buttons in the wizard, leaving the default options alone, and click on the Finish button at the end of the wizard. Note that before clicking on the Finish button, just ensure that you have unchecked Run Apache Tomcat checkbox. Installing Apache Tomcat with the default option works successfully only if you have installed Java in the default location. Otherwise, you have to correctly provide the JRE path according to the location of your Java installation during the installation of Tomcat, as shown in the following screenshot:
Configuring a development environment
We installed Java and Maven to compile and package our Java source code and installed Tomcat to deploy and run our application. So now we have to start write Spring MVC code so that we can compile, package, and run the code. An integrated development environment (IDE) can help us with these features to develop the code faster and error free. We are going to use Spring Tools 4 as our IDE.
- Go to https://spring.io/tools and download the corresponds version with your Window operating system architecture type (32 or 64-bit).
- Once the download is finished, go to the downloaded directory and extract the
.ziporjarfile into a convenient directory of your choice. - You can find
contents.zipin that folder you extracted. Extract it. You can find a directory calledsts-version.RELEASE. Here, you can find Spring tools suite appication.
We have almost installed all the tools and software required to develop a Spring MVC application; so now, we can create our Spring MVC project on STS. However, before jumping into creating a project, we need to perform the following two final configurations on our STS in order to use STS effectively: - Configuring Maven on STS
- Configuring Tomcat on STS
Configuring Maven on STS
- Open STS if it is not already open. When you open STS for the very first time after installing, it will ask you to provide a workspace location. This is because when you create a project on STS, all your project files will be created under this location only. Provide a workspace directory path as you wish and click on the OK button.
- Navigate to Window | Preferences | Maven | Installations.
- On the right-hand side, you can see the Add button to locate Maven's installation.
- Click on the Add button and choose our Maven's installed directory, and then click on the Finish button, as shown in the following screenshot:
- Now don't forget to select the newly added Maven installation as your default Maven installation by selecting the checkbox;
- Click on the Apply and Close button in the Preferences window and close it.
Configuring Tomcat on STS
- Open STS from the desktop icon, if it is not already open.
- Go to the menu bar and navigate to Window | Preferences | Server |Runtime Environments.
- You can see the available servers listed on the right panel. Now click on the Add button to add our Tomcat web server. You may also see Pivotal tc Server Developer Edition (Runtime) v3.1 listed under the available servers, which comes along with the STS installation. Although STS might come with an internal Pivotal tc Server, we chose to use the Tomcat web server as our server runtime environment because of its popularity.
- A wizard window will appear; type tomcat in the Select the type of runtime environment: text box, and a list of available Tomcat versions will be shown. Just select Tomcat v8.5 and SELECT the Create a new local server checkbox. Finally, click on the Next button, as shown in the following screenshot:
- In the next window, click on the Browse button and locate Tomcat's installed directory, and then click on the OK button. You can find Tomcat's installed directory under
C:\Program Files\Apache Software Foundation\Tomcat 8.5if you have installed Tomcat in the default location. Then, click on the Finish button, as shown in the following screenshot:
Creating our first Spring MVC project
- In STS, navigate to File | New | Other; a New Project wizard window will appear.
- Select Maven Project from the list and click on the Next button, as shown in the following screenshot:
- Now, a New Maven Project dialog window will appear; just select the checkbox that has the Create a simple project (skip archetype selection) caption and click on the Next button.
- The wizard will ask you to specify artifact-related information for your project; just enter Group Id as
com.packtand Artifact Id aswebstore. Then, select Packaging aswarand click on the Finish button, as shown in the following screenshot:
Adding Java version properties in pom.xml
- Open
pom.xml; you can findpom.xmlunder the root directory of the project itself. - You will see some tabs at the bottom of the
pom.xmlfile. Select the Overview tab. If you do not see these tabs, then right-click on pom.xml, select the Open With… option from the context menu, and choose Maven POM editor. - Expand the Properties accordingly and click on the Create button.
- Now, an Add property window will appear; enter Name as
maven.compiler.sourceand Value as1.8, as shown in the following screenshot: - Similarly, create one more property with Name as
maven.compiler.targetand Value as1.8. - Finally, save
pom.xml.
What happend?
We just created the basic project structure. Any Java project follows a certain directory
structure to organize its source code and resources. Instead of manually creating the whole directory hierarchy by ourselves, we just handed over that job to STS. By collecting some basic information about our project, such as Group Id, Artifact Id, and the Packaging style, from us, it is clear that STS is smart enough to create the whole project directory structure with the help of the Maven. Actually, what is happening behind the screen is that STS is internally using Maven to create the project structure.
We want our project to be deployable in any servlet container-based web server, such as
Tomcat or Jetty, and that's why we selected the Packaging style as war. Finally, you will see the project structure in Package Explorer, as shown in the following screenshot:

<build> <plugins> <plugin> <groupId>org.apache.maven.plugins</groupId> <artifactId>maven-war-plugin</artifactId> <version>2.6</version> <configuration> <failOnMissingWebXml>false</failOnMissingWebXml> </configuration> </plugin> </plugins>
</build>
But error in line 1 is no problem, later you can run project with this error.
Spring MVC dependencies
- Open
pom.xml; you can findpom.xmlunder the root directory of the project itself. - You will see some tabs at the bottom of the pom.xml file. Select the Dependencies tab.
- Click on the Add button in the Dependencies section. Don't get confused with the Add button of the Dependencies Management section. You should choose the Add button from the lefthand side of the panel.
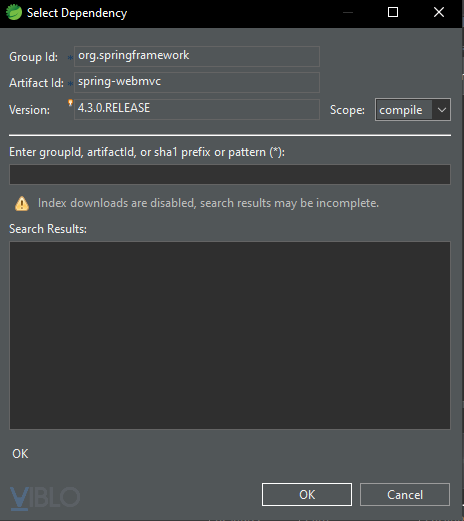
- A Select Dependency window will appear; enter Group Id as
org.springframework, Artifact Id asspring-webmvc, and Version as4.3.0.RELEASE. Select Scope ascompileand then click on the OK button, as shown in the following screenshot:
- Similarly, add the dependency for JavaServer Pages Standard Tag Library (JSTL) by clicking on the same Add button; this time, enter Group Id as
javax.servlet, Artifact Id asjstl, Version as1.2, and select Scope ascompile. - Finally, add one more dependency for servlet-api; repeat the same step with
Group Id as
javax.servlet, Artifact Id asjavax.servlet-api, and Version as3.1.0, but this time, select Scope asprovidedand then click on the OK button. - As a last step, don't forget to save the
pom.xmlfile.
Adding a welcome page
- Create a
webapp/WEB-INF/jsp/folder structure under thesrc/main/ folder; create a JSP file calledwelcome.jspunder thesrc/main/webapp/WEBINF/jsp/folder, and add the following code snippets into it and save it:
<%@ taglib prefix="c"
uri="http://java.sun.com/jsp/jstl/core"%> <!DOCTYPE html>
<html lang="en"> <head> <meta charset="utf-8"> <meta http-equiv="X-UA-Compatible" content="IE=edge"> <meta name="viewport" content="width=device-width, initial-scale=1"> <title>Welcome</title> <link rel="stylesheet" href="https://maxcdn.bootstrapcdn.com/bootstrap/3.3.5/css/bootstrap.min.css"> </head>
<body> <div class="jumbotron"> <h1> ${greeting} </h1> <p> ${tagline} </p> </div>
</body>
</html>
- Create a class called
HomeControllerunder thecom.packt.webstore.controllerpackage in the source directorysrc/main/javaand add the following code into it:
package com.packt.webstore.controller;
import org.springframework.stereotype.Controller;
import org.springframework.ui.Model;
import org.springframework.web.bind.annotation.RequestMapping;
@Controller
public class HomeController { @RequestMapping("/") public String welcome(Model model) { model.addAttribute("greeting", "Welcome to Web Store!"); model.addAttribute("tagline", "The one and only amazing web store"); return "welcome"; }
}
Configuring the Dispatcher servlet
- Create a class called WebApplicationContextConfig under the
com.packt.webstore.config packagein the source directorysrc/main/javaand add the following code into it:
package com.packt.webstore.config;
import org.springframework.context.annotation.Bean;
import org.springframework.context.annotation.ComponentScan;
import org.springframework.context.annotation.Configuration;
import org.springframework.web.servlet.config.annotation.DefaultServletHandlerConfigurer;
import org.springframework.web.servlet.config.annotation.EnableWebMvc;
import org.springframework.web.servlet.config.annotation.WebMvcConfigurerAdapter;
import org.springframework.web.servlet.view.InternalResourceViewResolver;
import org.springframework.web.servlet.view.JstlView; @Configuration
@EnableWebMvc
@ComponentScan("com.packt.webstore")
public class WebApplicationContextConfig extends WebMvcConfigurerAdapter { @Override public void configureDefaultServletHandling(DefaultServletHandlerConfigurer configurer) { configurer.enable(); } @Bean public InternalResourceViewResolver getInternalResourceViewResolver() { InternalResourceViewResolver resolver = new InternalResourceViewResolver(); resolver.setViewClass(JstlView.class); resolver.setPrefix("/WEB-INF/jsp/"); resolver.setSuffix(".jsp"); return resolver; }
}
- Create a class called DispatcherServletInitializer under the
com.packt.webstore.configpackage in the source directorysrc/main/javaand add the following code into it:
package com.packt.webstore.config; import org.springframework.web.servlet.support.AbstractAnnotationConfigDispatcherServletInitializer;
public class DispatcherServletInitializer extends AbstractAnnotationConfigDispatcherServletInitializer { @Override protected Class<?>[] getRootConfigClasses() { return null; } @Override protected Class<?>[] getServletConfigClasses() { return new Class[] { WebApplicationContextConfig.class }; } @Override protected String[] getServletMappings() { return new String[] { "/" }; }
}
Deploying our project
- Right-click on your project from Package Explorer and navigate to Run As | Run on Server.
- A server selection window will appear with all the available servers listed; just select the server that we have configured, Tomcat 8.5.
- At the bottom of the window, you can see a checkbox with the caption that says Always use this server when running this project; select this checkbox and enter the Finish button, as shown in the following screenshot:
- Now you will see a web page that will show you a welcome message.
😁😁😁😁😁😁