Table of content ( Mục lục )
- English - Tiếng Anh
- Vietnamese - Tiếng Việt
1. English (Tiếng Anh)
A. Introduction
As a student of artificial intelligence who has only been studying the field for 3 months, I am fascinated by OpenAI's ChatGPT, which is known as the world's most advanced chatbot. The use of the Transformer algorithm in ChatGPT makes it possible to process continuous data structures with ease, leading to easier training and usage. In my own personal project, called Corgiman, I have created a simple chatbot model that utilizes a classification model as its primary function. It is important to note that computers do not have the ability to understand natural language like humans do. Instead, they understand sequences of numbers and words. Therefore, a unique sequence of numbers must be created for every word in any language in order to facilitate communication. This process of converting words into vectors is called word-to-vec. In this post, I would like to share with you my experience in creating a simple chatbot model using Python and apply it in my project, Corgiman. These knowledge I have learned by myself and besides the enthusiastic help of Developer-AI Club. I believe that this will provide valuable insight into the process of creating a chatbot and the challenges that come with it.
B. Model overview with Flask and MongoDB
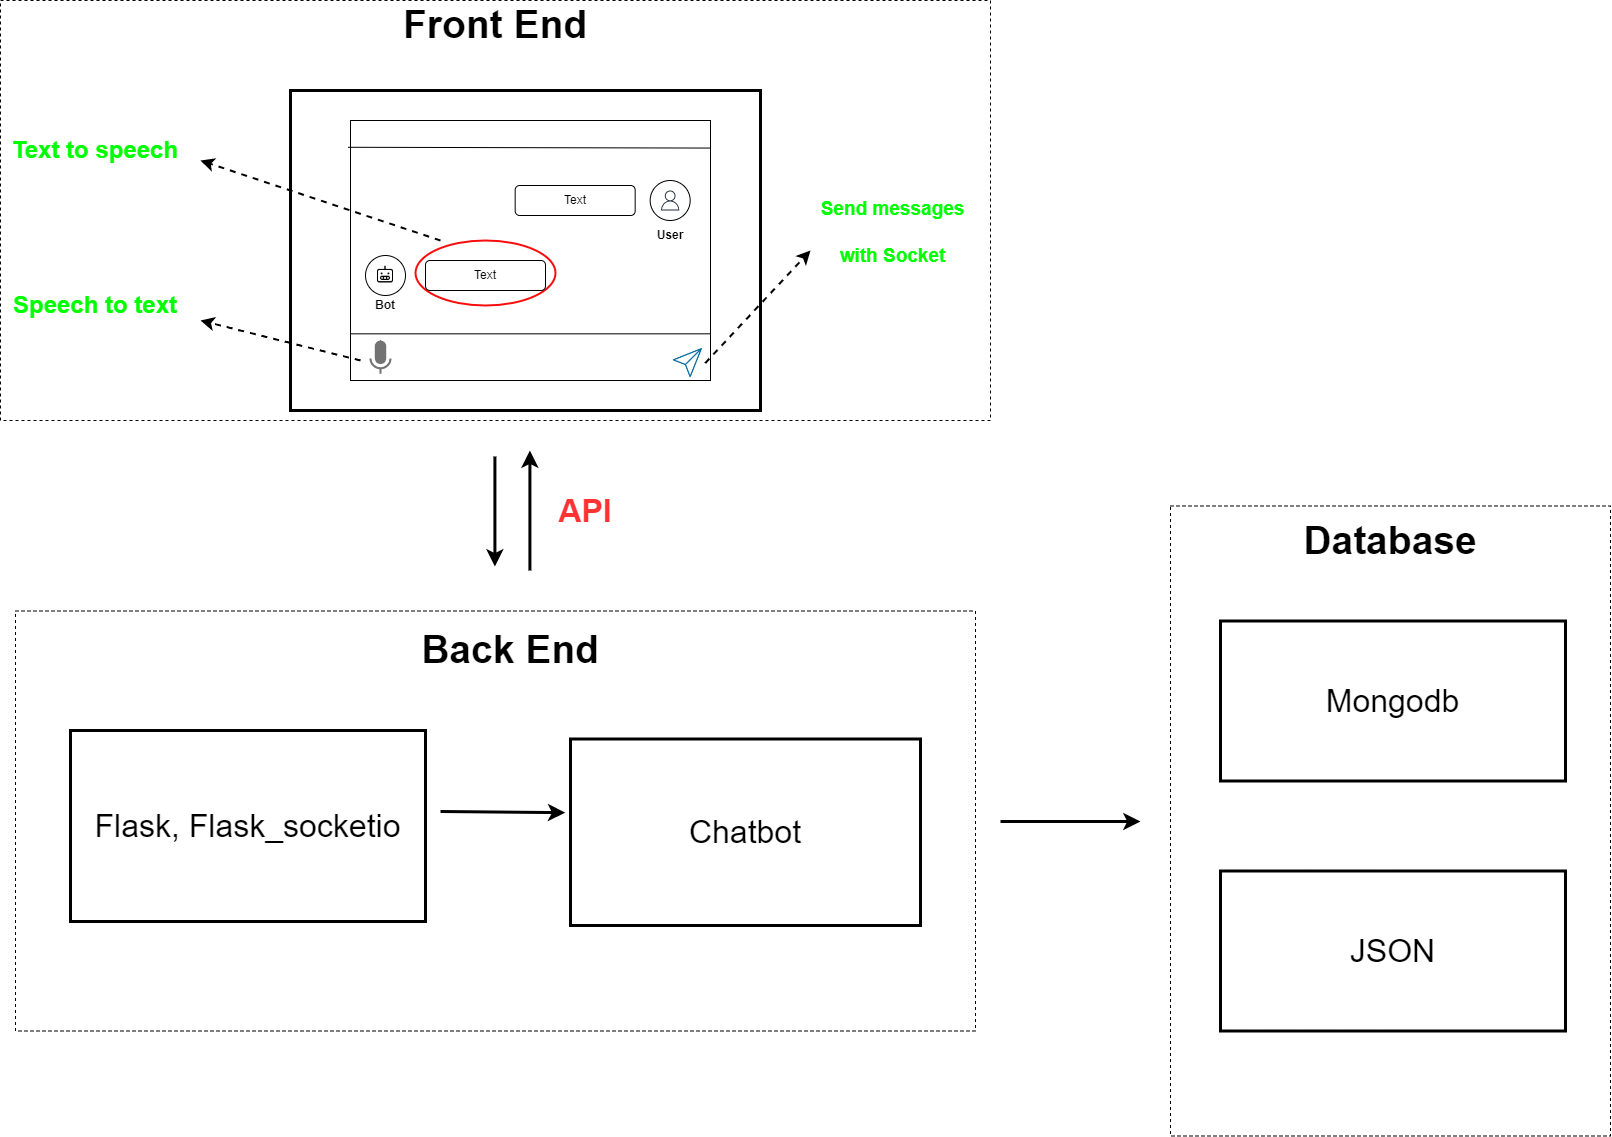
We will come to the actual example of this model. For the Corgiman project, we used Javascript for the Front-end and the Window's built-in speechSynthesis engine to convert chatbot responses into speech (text-to-speech). Additionally, we employed the SpeechRecognition API to transform voice into text and send it to the server. Javascript also integrates the socketio library to enable message-sending without traditional methods like GET or POST. For the Back-end, we utilized the Flask library, a widely-used framework for deploying apps to localhost. MongoDB was selected as the database due to its use of the JSON data format, making data storage and retrieval more efficient. Our focus here is not to delve deep into this model as it is straightforward. The purpose of this post is simply to provide an introduction to the chatbot model, so let's move on to the next section.
C. Chatbot model
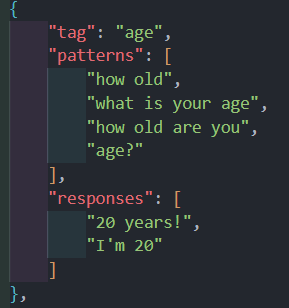
The training data will have the following structure:
C1. Training model
All steps
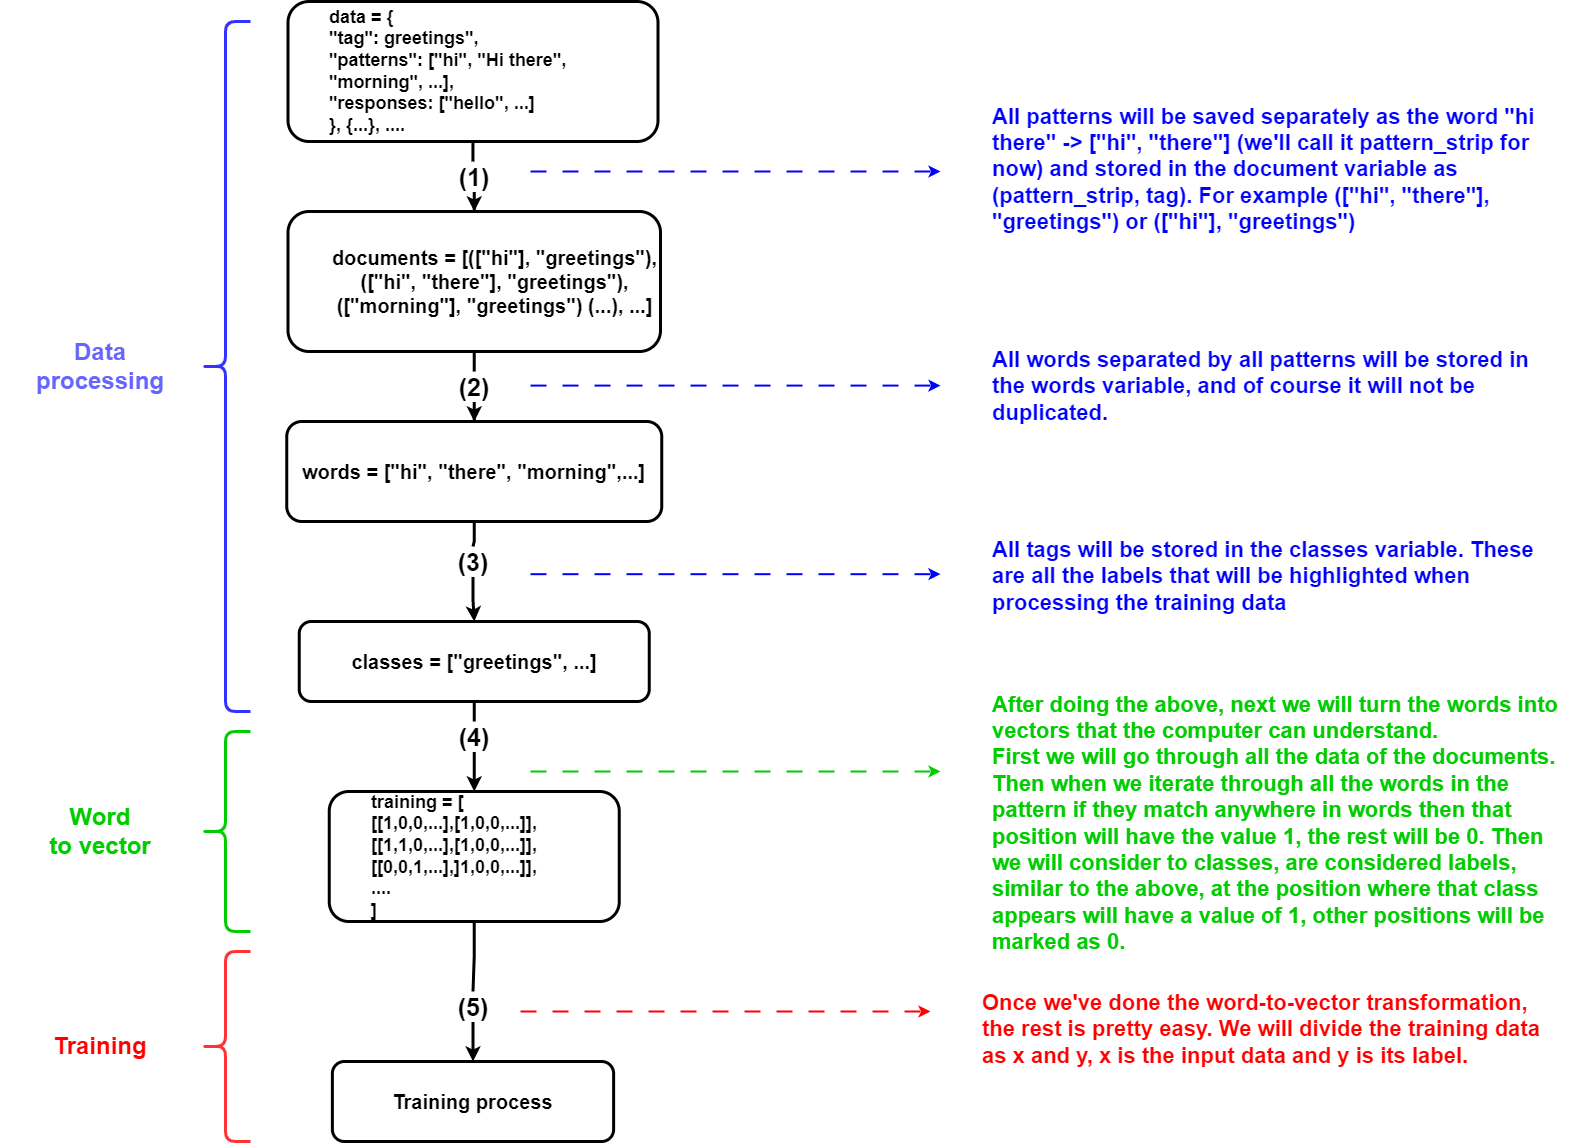
Prepare data for word-to-vector conversion
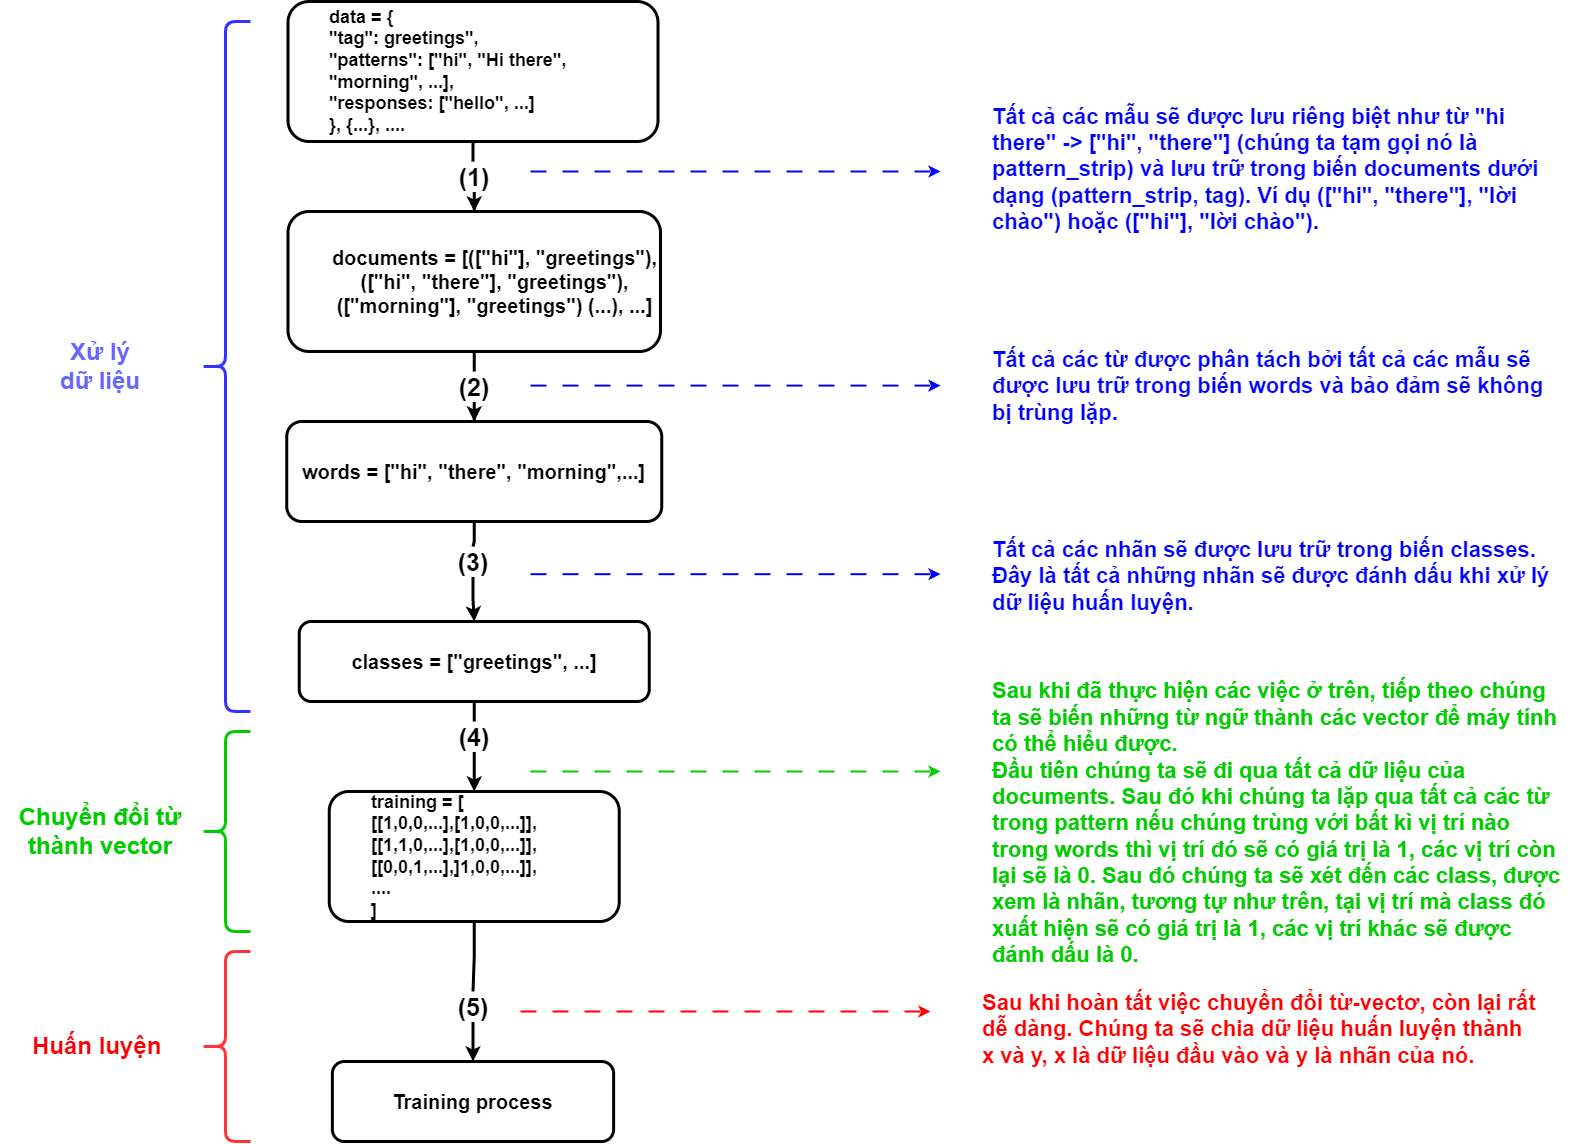
- Before we proceed, let's analyze the data. The data consists of an array of information written in JSON format with the structure "Name": "Value". There are three components to consider: "tag" - this represents the subject of each object, such as greeting, occupation, or age; "patterns" - this is where the questions or statements for the chatbot to recognize are stored; "responses" - this is where all the answers are stored.
- Next we will have a variable named documents. It will have data as an array of tuples, in the tuples will include all the patterns we have and its tags. Patterns will be split literal into array and remove special symbols then lowercase. For example we will have an element like (["hi", "there"], "greeting") or (["morning"], "greeting")
- Through the data that we have, we will separate all the patterns we have and put in the words variable. Of course it must be stripped of the previous special character and lowercase.
- Finally, all tags will also be saved into a variable called classes, after being cleaned
for intent in intents["intents"]: for pattern in intent['patterns']: word_list = nltk.word_tokenize(pattern) words.extend(word_list) documents.append((word_list, intent['tag'])) if intent['tag'] not in classes: classes.append(intent['tag']) Convert word to vector
- For computers to understand, we need to convert words into vectors. The crucial aspect of this model lies in this step, so it is imperative that we present it clearly and effectively.
- First we will iterate through all the elements in the documents.
- Next we will have a vector of 0 elements whose length is equal to the length of the words variable. In places where the words variable matches the words in the pattern, it will be changed to 1. For ease of understanding we will come to the example, we will have the words variable as ["hi", "morning", "there" ", "bye"] then we will first create a vector of [0,0,0,0], compare with pattern ["hi", "there"] then at index position 0 and 2 in words will coincide together, we will have a new vector is [1,0,1,0] (*)
- The same goes for tags, the tag is the label for each pattern that we give the machine to determine. Similar to the previous step, the position where the tag matches in the classes variable will have the value 1. For example, we have classes as ["greeting", "occupation", "age", "name"], so tag "age" will be vector [0,0,1,0] (**)
- So we have training data as vectors, it has a structure of two-dimensional array [[vector_pattern, vector_tag],...]. Where vector_pattern is the vector created at (*) and vector_tag is created at (**)
for document in documents: bag = [] word_patterns = document[0] word_patterns = [lemmatizer.lemmatize(word.lower()) for word in word_patterns] for word in words: bag.append(1) if word in word_patterns else bag.append(0) output_row = list(output_empty) output_row[classes.index(document[1])] = 1 training.append([bag, output_row])
Training
- After we have finished preparing the data and turning it into vectors, we will train the model. The type of training will depend on each model and individual requirements. For Corgiman, I use a Sequential model which consists of 4 layers, the first layer has 256 neurons, the next layer has 128 neurons, the third layer has 64 neurons and the last layer has the number of neurons equal to the length of the output.
model = Sequential()
model.add(Dense(256, input_shape=(len(train_x[0]),), activation='relu'))
model.add(Dropout(0.5)) model.add(Dense(128, activation='relu'))
model.add(Dropout(0.5)) model.add(Dense(64, activation='relu'))
model.add(Dropout(0.5)) model.add(Dense(len(train_y[0]), activation='softmax')) sgd = gradient_descent_v2.SGD(lr=0.01, decay=1e-6, momentum=0.9, nesterov=True)
model.compile(loss='categorical_crossentropy', optimizer=sgd, metrics=['accuracy'])
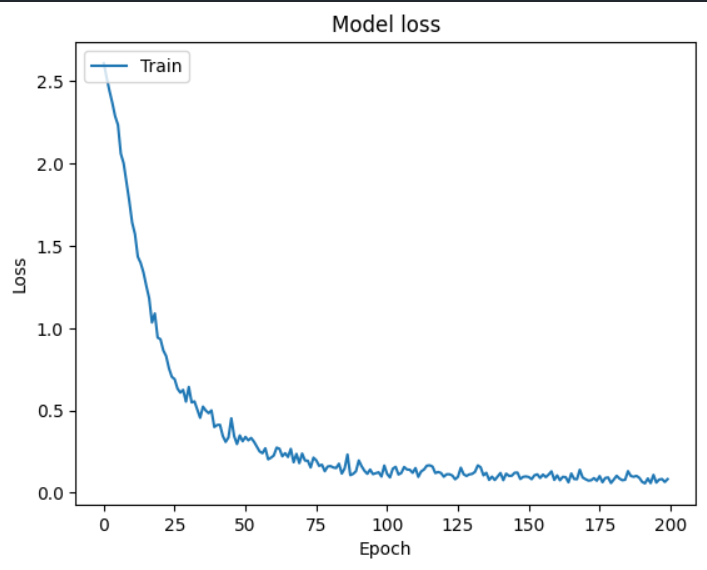
Evaluate
Result

Visual
C1. Prediction model
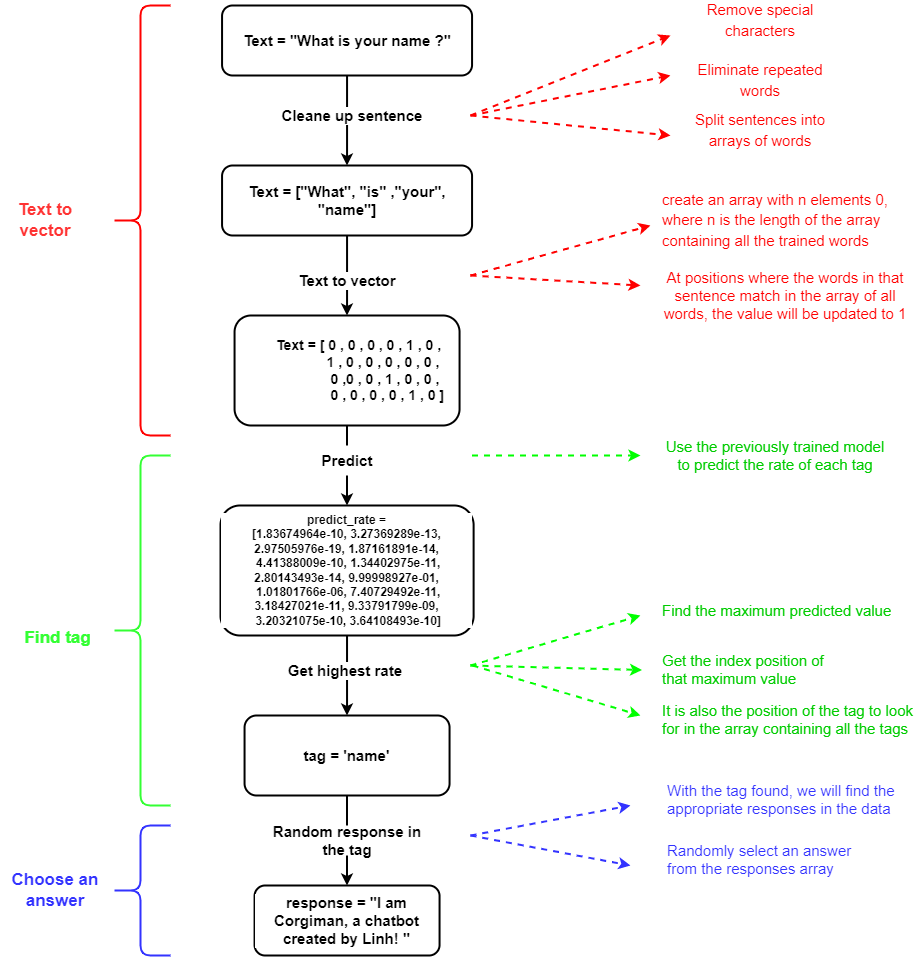
All steps
Clean up sentence
- Remove special characters (., !, @, #, ?, ...). For example, "how old are you ?" => "how old are you"
- Eliminate repeated words. For example, "he isn't a doctor, is he" => "he isn't a doctor, is"
- Split sentences into arrays of words. For example, "what is your name ?" => ["what", "is", "your", "name"]
def clean_up_sentence(sentence): sentence_words = nltk.word_tokenize(sentence) sentence_words = [lemmatizer.lemmatize(word) for word in sentence_words] return sentence_words Text to vector
- Create an array with n elements 0, where n is the length of the array containing all the trained words. For example, we have to 6 words trained, we will have an array like [0,0,0,0,0,0]
- At positions where the words in that sentence match in the array of all words, the value will be updated to 1. For example, the array will be [0,1,0,0,1,0]
def bag_of_word(sentence): sentence_words = clean_up_sentence(sentence) bag = [0] * len(words) for w in sentence_words: for i, word in enumerate(words): if word == w: bag[i] = 1 return np.array(bag)
Predict
- In the previous section we did the model training. Now we just need to take that model out to use
- We will have an array of values like the figure above, which is the exact proportion of the sentence in which tag
def predict_class(sentence): bow = bag_of_word(sentence) res = model.predict(np.array([bow]))[0]; ERROR_THRESHOLD = 0.25 results = [[i, r] for i,r in enumerate(res) if r > ERROR_THRESHOLD] # => result = the value > 0.25 results.sort(key = lambda x: x[1], reverse=True) # get the highest value [[2, 0.9970567]] return_list = [] # check meaningful sentences if len(results) == 0: return_list = [{'intent': 'no answer'}] elif results[0][1] < 0.6: return_list = [{'intent': 'no answer'}] else: for r in results: return_list.append({'intent': classes[r[0]], 'probability': str(r[1])}) # r[0] is index, r[1] is value. # example: [{'intent': 'greetings', 'probability': '0.9970567'}] return return_list Get response
- We will find a way to get the maximum value in that array, and its index
- Its index position is also the predicted tag position in the array containing all the tags, we will get the correct tag.
- With the tag found, we will find the appropriate responses in the data
- Randomly select an answer from the responses array
def get_response(intents_list, intents_json): # get the first value ( the value has probability highest) tag = intents_list[0]['intent'] for intent in intents_json: if intent['tag'] == tag: return random.choice(intent['responses']) return "I can't get it"
D. Advantages and Disadvantages
Advantages
- Flask provides a simple and clear model for building chatbots, making it easy for developers to understand and implement.
- The chatbot runs stably on i5 chip configuration or higher, ensuring good performance for your users.
- The training data is stored in JSON format, which is a plain text format that is easy to use and send to any server. JSON is also commonly used to exchange text data between the browser and the computer.
- The chatbot training process is efficient and doesn't take much time, allowing you to get your chatbot up and running quickly.
- As the chatbot is deployed on Flask, it's easy to extend and add new features or customizations.
- MongoDB, a NoSQL database, provides the flexibility and ease of storing data, allowing you to manage and organize your data in a way that meets your needs.
- MongoDB also offers robust security features to protect your data, ensuring that your chatbot and its data are safe and secure.
Disadvantages
- Lack of diverse and comprehensive training data
- Overloading the model with too much training data can decrease its accuracy
- Longer sentences for the chatbot to analyze and predict will negatively impact its response accuracy
- Chatbots built on Flask may require more resources and potentially impact system performance
- MongoDB, being a NoSQL database, offers flexible data storage but also requires careful data management and security measures
- As Flask is an open-source platform, there may be security vulnerabilities or missing features, requiring extra caution when implementing.
Conclusion
In this post, I hope to introduce you to a useful tool, a chatbot. I have built the chatbot in the simplest way possible to help you understand better. However, to achieve higher accuracy, each step needs to be optimized further. This is my first article and there may be mistakes or misunderstandings, I welcome feedback and corrections from all of you. Thank you very much for reading and providing feedback.
Corgiman is the project where I applied this model, You can find it here
If you are interested or have any questions about the article, please leave your comments below the comment section ^^. Thank you very much for your follow up.
2. Vietnamese (Tiếng Việt)
A. Giới thiệu
"Là một sinh viên học kiến thức về trí tuệ nhân tạo, tôi rất hứng thú với ChatGPT của OpenAI, được coi là chatbot tiên tiến nhất trên thế giới. Sử dụng thuật toán Transformer giúp ChatGPT xử lý dữ liệu liên tục một cách dễ dàng, giúp quá trình huấn luyện và sử dụng được đẩy nhanh. Trong dự án cá nhân của tôi, tên là Corgiman, tôi đã tạo ra một mô hình chatbot đơn giản sử dụng mô hình phân loại làm chủ yếu. Cần lưu ý rằng máy tính không có khả năng hiểu ngôn ngữ tự nhiên như con người. Thay vào đó, chúng sẽ hiểu các chuỗi số. Quá trình chuyển đổi từ thành vector được gọi là word-to-vec. Trong bài viết này, tôi muốn chia sẻ với bạn kinh nghiệm của mình trong việc tạo ra một mô hình chatbot đơn giản sử dụng ngôn ngữ Python sau đó áp dụng vào dự án của tôi là Corgiman. Những kiến thức này mình đã tự học và bên cạnh đó là sự giúp đỡ nhiệt tình của Developer-AI Club. Tôi tin rằng điều này sẽ cung cấp thông tin hữu ích về quá trình tạo ra một chatbot và những thách thức mà điều đó mang lại.
B. Tổng quát mô hình với Flask và MongoDB
Hãy đến với ví dụ thực tế là dự án Corgiman, chúng ta sử dụng Javascript cho phía Front-end và hệ thống speechSynthesis của Window để chuyển đổi các tin nhắn trả lời của chatbot thành giọng nói (text-to-speech). Ngoài ra, chúng ta sử dụng API SpeechRecognition để chuyển đổi giọng nói thành văn bản và gửi đến máy chủ. Javascript cũng tích hợp thư viện socketio để cho phép gửi tin nhắn mà không cần sử dụng các phương thức truyền thống như GET hoặc POST. Cho phần Back-end, chúng ta sử dụng thư viện Flask, một khung việc triển khai ứng dụng được sử dụng rộng rãi cho localhost. MongoDB được chọn là cơ sở dữ liệu do sử dụng định dạng dữ liệu JSON, giúp lưu trữ và truy xuất dữ liệu hiệu quả hơn. Trọng tâm của chúng tôi ở đây không phải là đi sâu vào mô hình này vì nó khá đơn giản. Mục đích của bài đăng này chỉ đơn giản là giới thiệu về mô hình chatbot, vì vậy chúng ta hãy chuyển sang phần tiếp theo.
C. Mô hình Chatbot
Dữ liệu huấn luyện sẽ có cấu trúc như sau:
C1. Mô hình huấn luyện
Tất cả các bước
Chuẩn bị dữ liệu để chuyển đổi từ sang vector
- Trước khi tiến hành, hãy phân tích dữ liệu. Dữ liệu bao gồm một mảng thông tin được viết dưới dạng JSON với cấu trúc "Tên": "Giá trị". Có ba thành phần cần xem xét: "tag" - phần này thể hiện chủ đề của từng đối tượng, chẳng hạn như greeting, occupation hoặc age; "patterns" - đây là nơi lưu trữ các câu hỏi hoặc câu lệnh để chatbot nhận dạng; "responses" - đây là nơi lưu trữ tất cả các câu trả lời dành cho chatbot.
- Tiếp theo chúng ta sẽ có một biến có tên là documents. Nó sẽ có dữ liệu là một mảng các tuple, trong các tuple sẽ bao gồm tất cả các pattern mà chúng ta có và các thẻ của nó. Các pattern sẽ được tách thành mảng và loại bỏ các ký hiệu đặc biệt sau đó là chữ thường. Ví dụ: chúng ta sẽ có một phần tử như (["hi", "there"], "greeting") hoặc (["morning"], "greeting")
- Thông qua dữ liệu mà chúng ta có, chúng tôi sẽ tách tất cả các pattern và đưa vào biến words. Tất nhiên là phải lược bỏ ký tự đặc biệt và biến thành chữ thường trước đó.
- Cuối cùng, tất cả các tag cũng sẽ được lưu vào một biến có tên là các classes, sau khi được làm sạch ( loại bỏ ký tự đặc biệt và biến thành chữ thường )
for intent in intents["intents"]: for pattern in intent['patterns']: word_list = nltk.word_tokenize(pattern) words.extend(word_list) documents.append((word_list, intent['tag'])) if intent['tag'] not in classes: classes.append(intent['tag']) Chuyển từ ngữ sang vector
- Để máy tính hiểu được, chúng ta cần chuyển từ thành vectơ. Khía cạnh quan trọng của mô hình này nằm ở bước này, vì vậy chúng tôi bắt buộc phải trình bày rõ ràng và hiệu quả.
- Trước tiên, chúng tôi sẽ duyệt qua tất cả các phần tử trong documents.
- Tiếp theo chúng ta sẽ có một vectơ gồm 0 phần tử có độ dài bằng độ dài của biến words. Ở những vị trí mà biến words trùng với các từ trong pattern thì nó sẽ được đổi thành 1. Để dễ hiểu chúng ta sẽ đến với ví dụ, chúng ta sẽ có các biến words là ["hi", "morning", "there" ", "bye"] thì đầu tiên ta tạo vector [0,0,0,0], so sánh với pattern ["hi", "there"] thì tại vị trí số 0 và 2 trong words và pattern sẽ trùng nhau, ta sẽ có một vectơ mới là [1,0,1,0] (*)
- Đối với tag cũng vậy, tag là nhãn gắn cho từng pattern mà chúng tôi cung cấp cho máy để xác định. Tương tự như bước trước, vị trí mà tag khớp trong classes sẽ có giá trị 1. Ví dụ: chúng ta có classes là ["greeting", "occupation", "age", "name"], vì vậy tag "age" sẽ là vectơ [0,0,1,0] (**)
- Như vậy ta có dữ liệu huấn luyện là các vectơ, nó có cấu trúc là mảng hai chiều [[vector_pattern, vector_tag],...]. Trong đó vector_pattern là vector được tạo tại (*) và vector_tag được tạo tại (**)
for document in documents: bag = [] word_patterns = document[0] word_patterns = [lemmatizer.lemmatize(word.lower()) for word in word_patterns] for word in words: bag.append(1) if word in word_patterns else bag.append(0) output_row = list(output_empty) output_row[classes.index(document[1])] = 1 training.append([bag, output_row])
Huấn luyện
- Sau khi chuẩn bị xong dữ liệu và biến nó thành vector, chúng ta sẽ huấn luyện mô hình. Loại hình đào tạo sẽ phụ thuộc vào từng mô hình và yêu cầu của chúng. Đối với Corgiman, tôi sử dụng mô hình Sequential bao gồm 4 lớp, lớp đầu tiên có 256 nơ ron, lớp tiếp theo có 128 nơ ron, lớp thứ 3 có 64 nơ ron và lớp cuối cùng có số nơ ron bằng chiều dài của đầu ra.
model = Sequential()
model.add(Dense(256, input_shape=(len(train_x[0]),), activation='relu'))
model.add(Dropout(0.5)) model.add(Dense(128, activation='relu'))
model.add(Dropout(0.5)) model.add(Dense(64, activation='relu'))
model.add(Dropout(0.5)) model.add(Dense(len(train_y[0]), activation='softmax')) sgd = gradient_descent_v2.SGD(lr=0.01, decay=1e-6, momentum=0.9, nesterov=True)
model.compile(loss='categorical_crossentropy', optimizer=sgd, metrics=['accuracy'])
Đánh giá
Kết quả
Trực quan hóa
C1. Mô hình dự đoán
Tất cả các bước
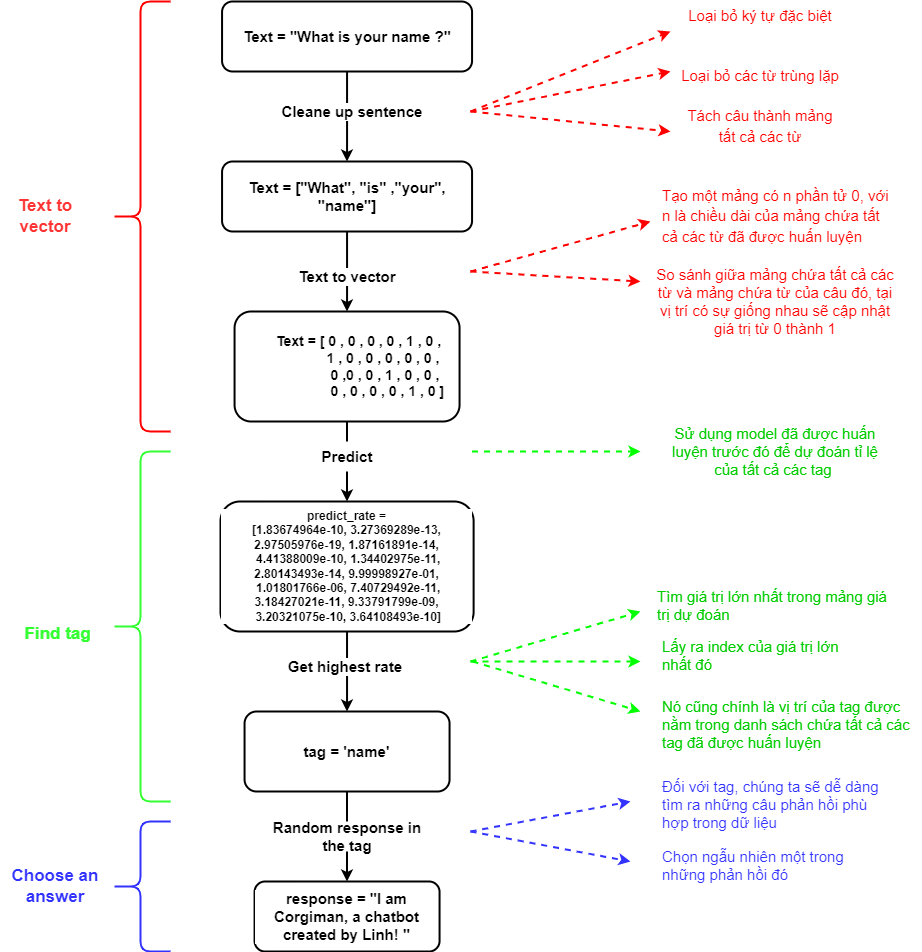
Dọn dẹp câu
- Loại bỏ các ký tự đặc biệt (., !, @, #, ?, ...). Ví dụ: "how old are you?" => "how old are you"
- Loại bỏ các từ lặp đi lặp lại. Ví dụ: "he is not a doctor, is he" => "he is not a doctor, is"
- Chia câu thành mảng từ. Ví dụ: "what's your name?" => ["what", "is", "yours", "name"]
def clean_up_sentence(sentence): sentence_words = nltk.word_tokenize(sentence) # split sentence to array sentence_words = [lemmatizer.lemmatize(word) for word in sentence_words] # check if same word return sentence_words
Chuyển văn bản thành vectơ
- Tạo mảng có n phần tử 0, trong đó n là độ dài của mảng chứa tất cả các từ được huấn luyện. Ví dụ ta có danh sách các các từ đã huấn luyện là 6 từ thì sẽ có mảng là [0,0,0,0,0,0]
- Tại các vị trí mà các từ trong câu đó khớp với nhau trong mảng tất cả các từ thì giá trị sẽ được cập nhật thành 1. Ví dụ mảng sẽ là [0,1,0,0,1,0]
def bag_of_word(sentence): sentence_words = clean_up_sentence(sentence) bag = [0] * len(words) for w in sentence_words: for i, word in enumerate(words): if word == w: bag[i] = 1 return np.array(bag)
Dự đoán
- Trong phần trước chúng ta đã huấn luyện mô hình. Bây giờ chúng ta chỉ cần lấy mô hình đó ra để sử dụng
- Ta sẽ có một mảng giá trị như hình trên, chính là tỉ lệ của câu trong từng tag
def predict_class(sentence): bow = bag_of_word(sentence) res = model.predict(np.array([bow]))[0]; ERROR_THRESHOLD = 0.25 results = [[i, r] for i,r in enumerate(res) if r > ERROR_THRESHOLD] # => result = the value > 0.25 results.sort(key = lambda x: x[1], reverse=True) # get the highest value [[2, 0.9970567]] return_list = [] # check meaningful sentences if len(results) == 0: return_list = [{'intent': 'no answer'}] elif results[0][1] < 0.6: return_list = [{'intent': 'no answer'}] else: for r in results: return_list.append({'intent': classes[r[0]], 'probability': str(r[1])}) # r[0] is index, r[1] is value. # example: [{'intent': 'greetings', 'probability': '0.9970567'}] return return_list Lấy ra phản hồi
- Ta sẽ tìm cách lấy giá trị lớn nhất trong mảng đó, và index của nó
- Vị trí chỉ mục của nó cũng chính là vị trí tag dự đoán trong mảng chứa tất cả các thẻ, ta sẽ được tag chính xác nhất.
- Với tag tìm được, chúng ta sẽ tìm các phản hồi phù hợp trong dữ liệu
- Chọn ngẫu nhiên một câu trả lời từ mảng câu trả lời
def get_response(intents_list, intents_json): # get the first value ( the value has probability highest) tag = intents_list[0]['intent'] for intent in intents_json: if intent['tag'] == tag: return random.choice(intent['responses']) return "I can't get it"
D. Ưu điểm và nhược điểm
Ưu điểm
- Flask cung cấp một mô hình đơn giản và rõ ràng cho việc xây dựng chatbot, giúp cho nhà phát triển dễ dàng hiểu và thực hiện.
- Chatbot hoạt động ổn định trên cấu hình chip i5 hoặc cao hơn, đảm bảo hiệu suất tốt cho người dùng của bạn.
- Dữ liệu huấn luyện được lưu trữ trong định dạng JSON, đây là một định dạng văn bản đơn giản dễ dùng và gửi đến bất kỳ máy chủ nào. JSON cũng thường được sử dụng để trao đổi dữ liệu văn bản giữa trình duyệt và máy tính.
- Quá trình huấn luyện chatbot hiệu quả và không mất nhiều thời gian, cho phép bạn triển khai chatbot của mình nhanh chóng.
- Vì chatbot được triển khai trên Flask, nó dễ dàng mở rộng và thêm các tính năng hoặc tùy chỉnh mới.
- MongoDB, là một cơ sở dữ liệu NoSQL, cung cấp sự linh hoạt và dễ dàng lưu trữ dữ liệu, cho phép bạn quản lý và tổ chức dữ liệu theo cách phù hợp với nhu cầu của người dùng
- MongoDB cũng cung cấp các tính năng bảo mật mạnh mẽ để bảo vệ dữ liệu của bạn, đảm bảo rằng chatbot của bạn và dữ liệu của nó được an toàn và bảo mật.
Nhược điểm
- Thiếu dữ liệu huấn luyện đa dạng và đầy đủ
- Quá tải dữ liệu huấn luyện có thể giảm độ chính xác của mô hình
- Các câu dài hơn cho chatbot phân tích và dự đoán sẽ làm giảm độ chính xác của câu trả lời của chatbot
- Chatbot xây dựng trên Flask có thể yêu cầu nhiều tài nguyên hơn và có thể làm giảm hiệu năng hệ thống
- MongoDB, là một cơ sở dữ liệu NoSQL, cung cấp tính linh hoạt và dễ dàng trong việc lưu trữ dữ liệu, nhưng cũng yêu cầu kỹ thuật để quản lý và bảo mật dữ liệu hiệu quả.
- Vì Flask là một nền tảng mã nguồn mở, có thể có lỗ hổng bảo mật hoặc tính năng không được hỗ trợ, điều này yêu cầu sự chú ý khi thực hiện.
E. Kết Luận
Trong bài viết này, mình mong muốn giới thiệu cho các bạn một công cụ hữu ích là chatbot. Mình đã xây dựng chatbot theo cách đơn giản nhất có thể để giúp các bạn hiểu rõ hơn. Tuy nhiên, để có độ chính xác cao hơn, từng bước cần được tối ưu hơn. Đây là bài viết đầu tiên của mình và có thể có sai sót hoặc nhầm tưởng, mình rất mong nhận được góp ý chỉnh sửa từ các bạn. Mình cảm ơn mọi người đã đọc và góp ý.
Corgiman là dự án mà mình đã áp dụng model này, bạn có thể tham khảo tại đây
Các bạn quan tâm hay có thắc mắc gì về bài viết, hãy để lại ý kiến của mình dưới phần comment nhé ^^. Mình rất cảm ơn sự theo dõi của các bạn.