Lời mở đầu
Hello các bạn trở lại với series bài viết "Những gì mình biết về MongoDB", series nói về một NoSQL DB cực kỳ phổ biến là MongoDB.
Trong phần trước mình đã giới thiệu cách cài đặt mongodb shard cluster trên các máy chủ Linux. Với cách cài đặt thủ công từng thành phần và cấu hình sharding, cấu hình các replicas sẽ giúp bạn hiểu rõ hơn về hệ thống.
Trong bài viết này mình sẽ hướng dẫn cách cài đặt mongodb shard cluster trên K8S sử dụng helm chart. Với cách cài đặt này thì yêu cầu các bạn cần hiểu về kiến trúc và các thành phần của MongoDB, từ đó mới dễ dàng tùy biến các tham số cấu hình có sẵn được cung cấp bởi bộ helmchart này.
 Việc cài đặt mongodb trên k8s sử dụng helm chart khá đơn giản. Bởi hầu hết các bước cài đặt, cấu hình đều đã được tự động hóa rồi. Việc của mình chỉ là lựa chọn cấu hình cụ thể cho từng thành phần mà mình muốn (mongos, configserver, shard), ví dụ:
- Có dùng sharding hay không
- Sử dụng bao nhiêu shard
- Mỗi shard có cấu hình replicaset hay không
- ConfigServer có cấu hình Replicaset hay không..
Mô hình triển khai
Mình sẽ cài đặt trên cụm K8S cài đặt trên các máy chủ EC2 như sau:
NAME STATUS ROLES AGE VERSION INTERNAL-IP EXTERNAL-IP OS-IMAGE KERNEL-VERSION CONTAINER-RUNTIME
ip-172-31-33-57 Ready control-plane 21d v1.26.3 172.31.33.57 <none> Ubuntu 20.04.6 LTS 5.15.0-1033-aws containerd://1.6.19
node-1 Ready <none> 17d v1.26.3 172.31.38.164 <none> Ubuntu 20.04.6 LTS 5.15.0-1033-aws containerd://1.6.19
node-2 Ready <none> 3d17h v1.26.3 172.31.41.7 <none> Ubuntu 20.04.6 LTS 5.15.0-1033-aws containerd://1.6.19
node-3 Ready <none> 3d17h v1.26.3 172.31.45.207 <none> Ubuntu 20.04.6 LTS 5.15.0-1033-aws containerd://1.6.19
node-4 Ready <none> 3d17h v1.26.3 172.31.40.59 <none> Ubuntu 20.04.6 LTS 5.15.0-1033-aws containerd://1.6.19
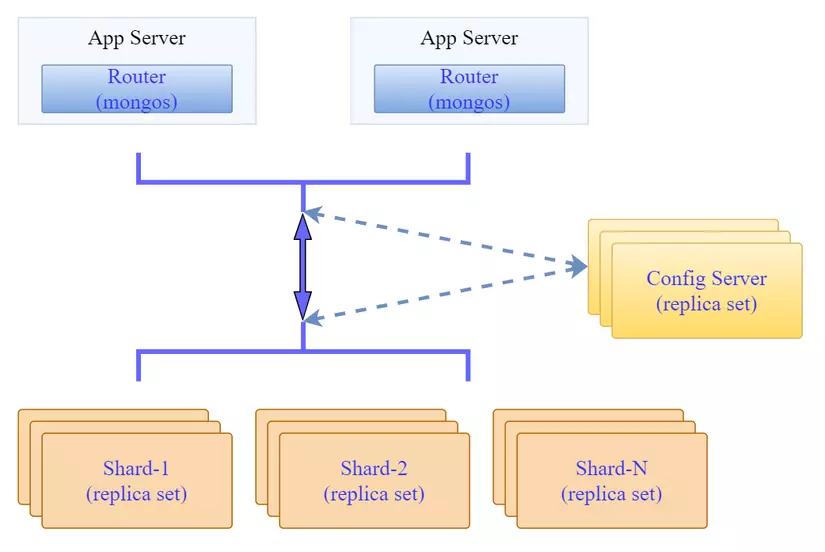
Cụm mongodb mình sẽ cài theo mô hình giống bài trước đó là cài đặt 3 shardsvc (mỗi shardsvr có 3 replicas), configsvr có 3 replicas và 2 service mongos.
Mục tiêu cần đạt được:
- Đảm bảo các replicas của cùng 1 shardsvr sẽ không nằm chung node
- Đảm bảo các replicas của configsvr sẽ không nằm chung node
Để lưu trữ dữ liệu cho mongodb trên k8s thì mình sẽ sử dụng Persistent Volume (Sử dụng luôn EBS Storage của AWS thông qua việc tạo một Storage Class để cấp phát PV tự động). Nếu các bạn sử dụng K8S Onprem thì các bạn có thể sử dụng NFS làm phần storage backend cho k8s, mình có hướng dẫn ở đây nhé!
Triển khai
Tóm tắt các bước triển khai như sau:
- Chuẩn bị môi trường: K8S, Storage Class
- Chuẩn bị helm-chart
- Tùy biến các tham số cài đặt
- Cài đặt helm-chart và kiểm tra kết quả.
Chuẩn bị môi trường Kubernetes
K8S mình đã dựng xong, gồm 4 worker node (để đặt được mô hình cài 3 shard thì nên có ít nhất 3 node nhé). Bây giờ mình sẽ cài đặt thêm phần storage class sử dụng AWS EBS.
Để làm được việc này thì cần thực hiện:
- Phân quyền cho các EC2 có quyền đọc ghi vào EBS
- Cài đặt EBS CSI Driver trên K8S
- Cài đặt Storage Class trên K8S
Các nội dung trên chủ yếu liên quan tới AWS mình sẽ không nói sâu về nó. Kết quả là mình có một Storage Class để tạo PV tự động và tên của Storage Class này sẽ được dùng cho các config khi cài mongo bằng helm chart.
ubuntu@base-node:~$ k get storageclasses.storage.k8s.io NAME PROVISIONER RECLAIMPOLICY VOLUMEBINDINGMODE ALLOWVOLUMEEXPANSION AGE
ebs-sc ebs.csi.aws.com Delete WaitForFirstConsumer false 17h
Tải helmchart của mongodb
Tạo thư mục cài đặt và tải về helmchart của mongodb:
ubuntu@base-node:~$ mkdir mongodb-installation
ubuntu@base-node:~$ cd mongodb-installation/
ubuntu@base-node:~/mongodb-installation$ helm repo add bitnami https://charts.bitnami.com/bitnami
ubuntu@base-node:~/mongodb-installation$ helm search repo mongodb
NAME CHART VERSION APP VERSION DESCRIPTION bitnami/mongodb 13.9.4 6.0.5 MongoDB(R) is a relational open source NoSQL da...
bitnami/mongodb-sharded 6.3.3 6.0.5 MongoDB(R) is an open source NoSQL database tha...
Mình sẽ sử dụng helmchart bitnami/mongodb-sharded để cài đặt. Trước tên là tải helmchart về lưu trên máy để tùy biến và sử dụng:
ubuntu@base-node:~/mongodb-installation$ helm pull bitnami/mongodb-sharded --version=6.3.3
ubuntu@base-node:~/mongodb-installation$ ls -lrt
total 52
-rw-r--r-- 1 ubuntu ubuntu 49908 Apr 21 08:15 mongodb-sharded-6.3.3.tgz
ubuntu@base-node:~/mongodb-installation$ tar -xzf mongodb-sharded-6.3.3.tgz ubuntu@base-node:~/mongodb-installation$ ls -lrt
total 56
-rw-r--r-- 1 ubuntu ubuntu 49908 Apr 21 08:15 mongodb-sharded-6.3.3.tgz
drwxrwxr-x 4 ubuntu ubuntu 4096 Apr 21 08:15 mongodb-sharded
Lúc này ta sẽ có thư mục mongodb-sharded chứa helmchart cài đặt mongodb. Trong đó có chứa một file values.yaml lưu các tham số để tùy biến khi cài đặt helmchart này. Mình sẽ copy nó ra ngoài để tùy biến các tham số phù hợp với nhu cầu của mình. Lúc này thư mục chứa file cài đặt sẽ như sau:
ubuntu@base-node:~/mongodb-installation$ cp mongodb-sharded/values.yaml custom-mongo-val.yaml
ubuntu@base-node:~/mongodb-installation$ tree . -L 2
.
├── custom-mongo-val.yaml
├── mongodb-sharded
│ ├── Chart.lock
│ ├── Chart.yaml
│ ├── README.md
│ ├── charts
│ ├── templates
│ └── values.yaml
└── mongodb-sharded-6.3.3.tgz
Tùy biến tham số cài đặt
Đây sẽ là phần quan trọng nhất khi cài một phần mềm từ helmchart và cũng đòi hỏi kinh nghiệm nhiều nhất. Bởi một file tham số (helm-value file) thường sẽ rất dài, có khi tới vài nghìn dòng. Nên trước khi cấu hình tham số, mình cần phải biết mình sẽ cài gì, và cần tùy biến các tham số gì.
Bài toán ban đầu mình đặt ra là cài mongo shard cluster với các mục tiêu:
- Có 3 shard, mỗi shard 3 replicas
- Configsvr có 3 replicas
- Mongos có 2 replicas
- Mongo sẽ dùng cho các ứng dụng trong k8s do đó không cần expose ra bên ngoài (sẽ chỉ cần service dạng ClusterIP là đủ). Trong trường hợp cần expose ra bên ngoài thì có thể sử dụng NodePort.
- Enable Metrics để sau này có thể monitor được nó trên Prometheus và Grafana
Về cơ bản thì các tham số của file helm-value sẽ cho phép chúng ta tùy biến các đối tượng chính là mongos, configsvr, shardsvr và phần metric để phục vụ cho việc monitor ứng dụng.
Mình sẽ check giải thích một số tham số cơ bản nhất để tùy biến từng thành phần bên trên.
Các tham số chung
global: imageRegistry: "" imagePullSecrets: [] storageClass: ""
image: registry: docker.io repository: bitnami/mongodb-sharded tag: 6.0.5-debian-11-r4 digest: "" pullPolicy: IfNotPresent pullSecrets: []
Trong phần này mình sẽ cần quan tâm tới thông tin image. Mình hay có thói quan tag các public image về private registry thì mình phải sửa thông tin image theo private registry ở phần này. Một lưu ý nữa là khi sử dụng private registry thì các bạn cần phải tạo secret để sử dụng cho việc pull image từ private registry này.
Tùy biến giá trị của helm-value
Về cơ bản các tham số mặc định của bộ helm chart này đã rất ổn rồi, cơ bản mình cũng chỉ cần thay đổi rất ít. Một số tham số chính cần thay đổi tùy vào cấu hình mình muốn triển khai.
Cấu hình xác thực, ở đây mình không cấu hình password cho các replicaset.
auth: enabled: true rootUser: root rootPassword: "Admin_123"
Cấu hình số lượng Shardsvr trong cluster, mình set là 3 đúng theo mô hình ban đầu:
shards: 3 Cấu hình service thì mặc định là ClusterIP và port 27017, cơ bản mình ko phải update gì ở đây nhưng vẫn nêu ra để nếu cần mình có thể đổi thành NodePort để expose ra bên ngoài chẳng hạn:
service: type: ClusterIP externalTrafficPolicy: Cluster ports: mongodb: 27017 clusterIP: "" nodePorts: mongodb: "" Tùy biến cấu hình của configsvr: Thì mình sẽ set tham số để tạo 3 replicas cho configsvr và cấu hình persistent volume cho nó gồm thông tin storageClass và dung lượng lưu trữ cần thiết:
configsvr: replicaCount: 3 podAntiAffinityPreset: soft persistence: enabled: true storageClass: "ebs-sc" size: 8Gi Tùy biến cấu hình của mongos: Đơn giản là set 2 replicas. Tham số podAntiAffinityPreset sẽ tự động ra một rule podAntiAffinity với mục tiêu cố gắng phân bổ các Pod của ứng dụng này trên các node khác nhau:
mongos: replicaCount: 2 podAntiAffinityPreset: soft Tùy biến cấu hình của shardsvr: Tương tự mình set 3 replicas cho mỗi shard, cấu hình podAntiAffinityPreset: soft để các Pod của các shardsvr sẽ ưu tiên không chạy cùng trên một node.
shardsvr: dataNode: replicaCount: 3 podAntiAffinityPreset: soft persistence: enabled: true storageClass: "ebs-sc" size: 8Gi
Lưu ý chúng ta chỉ nên setup tham số PodAntiAffinity ở dạng soft, tương ứng với cấu hình
preferredDuringSchedulingIgnoredDuringExecution. Việc này sẽ tránh trường hợp Pod không tìm dc node thỏa mãn điều kiện về antiAffinity và ở trạng thái Pending.
Tổng hợp lại mình sẽ có file custom-mongo-val.yaml chứa các tham số tùy chỉnh như sau:
auth: enabled: true rootUser: root rootPassword: "Admin_123" shards: 3 service: type: ClusterIP externalTrafficPolicy: Cluster ports: mongodb: 27017 clusterIP: "" nodePorts: mongodb: "" configsvr: replicaCount: 3 podAntiAffinityPreset: soft persistence: enabled: true storageClass: "ebs-sc" size: 8Gi mongos: replicaCount: 2 podAntiAffinityPreset: soft shardsvr: dataNode: replicaCount: 3 podAntiAffinityPreset: soft persistence: enabled: true storageClass: "ebs-sc" size: 8Gi
Cài đặt
Trước khi cài đặt mình có thể review lại một lượt cấu hình sẽ triển khai thực tế trước khi apply vào hệ thống. Mình sẽ sử dụng lệnh helm template để kiểm tra xem với cấu hình tùy biến như trên thì bộ helmchart này sẽ tạo ra các resource ntn:
ubuntu@base-node:~/mongodb-installation$ helm template mongodb -f custom-mongo-val.yaml ./mongodb-sharded > out.yaml
Với các cấu hình affinity mặc định như trên thì bộ helmchart đã tạo cho chúng ta rule của affinity kiểu như sau:
affinity: podAffinity: podAntiAffinity: preferredDuringSchedulingIgnoredDuringExecution: - podAffinityTerm: labelSelector: matchLabels: app.kubernetes.io/name: mongodb-sharded app.kubernetes.io/instance: mongodb app.kubernetes.io/component: configsvr topologyKey: kubernetes.io/hostname weight: 1
Với mỗi thành phần sẽ có label app.kubernetes.io/component tương ứng là mongos, configsvr hay shardsvr và đó sẽ yếu tố chính để thực hiện rule PodAntiAffinity.
Hiểu một cách đơn giản là hệ thống sẽ ưu tiên không tạo Pod của configsvr khi node đó đã có Pod có label app.kubernetes.io/component=configsvr chạy trên đó. Và từ đó sẽ giúp "phân bổ" các Pod của cùng một chức năng trên các node khác nhau.
Đến đây ta có thể thực hiện cài đặt:
ubuntu@base-node:~/mongodb-installation$ helm install mongodb -f custom-mongo-val.yaml ./mongodb-sharded NAME: mongodb
LAST DEPLOYED: Fri Apr 21 10:21:55 2023
NAMESPACE: default
STATUS: deployed
REVISION: 1
TEST SUITE: None
NOTES:
CHART NAME: mongodb-sharded
CHART VERSION: 6.3.3
APP VERSION: 6.0.5 ** Please be patient while the chart is being deployed ** The MongoDB® Sharded cluster can be accessed via the Mongos instances in port 27017 on the following DNS name from within your cluster: mongodb-mongodb-sharded.default.svc.cluster.local To get the root password run: export MONGODB_ROOT_PASSWORD=$(kubectl get secret --namespace default mongodb-mongodb-sharded -o jsonpath="{.data.mongodb-root-password}" | base64 -d) To connect to your database run the following command: kubectl run --namespace default mongodb-mongodb-sharded-client --rm --tty -i --restart='Never' --image docker.io/bitnami/mongodb-sharded:6.0.5-debian-11-r4 --command -- mongosh admin --host mongodb-mongodb-sharded --authenticationDatabase admin -u root -p $MONGODB_ROOT_PASSWORD To connect to your database from outside the cluster execute the following commands: kubectl port-forward --namespace default svc/mongodb-mongodb-sharded 27017:27017 & mongosh --host 127.0.0.1 --authenticationDatabase admin -p $MONGODB_ROOT_PASSWORD
Kiểm tra kết quả:
ubuntu@base-node:~/mongodb-installation$ k get pods -owide
NAME READY STATUS RESTARTS AGE IP NODE NOMINATED NODE READINESS GATES
mongodb-mongodb-sharded-configsvr-0 2/2 Running 0 2m35s 192.168.247.33 node-2 <none> <none>
mongodb-mongodb-sharded-configsvr-1 2/2 Running 0 104s 192.168.139.77 node-3 <none> <none>
mongodb-mongodb-sharded-configsvr-2 2/2 Running 0 66s 192.168.84.139 node-1 <none> <none>
mongodb-mongodb-sharded-mongos-6778d6c6c8-jjtlt 2/2 Running 0 2m35s 192.168.247.31 node-2 <none> <none>
mongodb-mongodb-sharded-mongos-6778d6c6c8-xs295 2/2 Running 0 2m35s 192.168.139.75 node-3 <none> <none>
mongodb-mongodb-sharded-shard0-data-0 2/2 Running 0 2m35s 192.168.84.140 node-1 <none> <none>
mongodb-mongodb-sharded-shard1-data-0 2/2 Running 0 2m35s 192.168.139.76 node-3 <none> <none>
mongodb-mongodb-sharded-shard2-data-0 2/2 Running 0 2m35s 192.168.247.32 node-2 <none> <none>
Như vậy ta có thể thấy:
- 2 Pod của
mongoschạy trên 2 node lànode-2vànode-3 - 3 Pod của
configsvrchạy trên 3 node khác nhau lànode-1,node-2vànode-3 - 3 Pod đầu tiên của các shardsvr chạy trên 3 node khác nhau
Bản chất ở đây khi ta tạo ra 3 shard thì helmchart này sẽ tạo cho chúng ta 3 statefulset tương ứng 3 shardsvr:
ubuntu@base-node:~/mongodb-installation$ k get statefulsets.apps NAME READY AGE
mongodb-mongodb-sharded-configsvr 3/3 5m2s
mongodb-mongodb-sharded-shard0-data 3/3 5m2s
mongodb-mongodb-sharded-shard1-data 3/3 5m2s
mongodb-mongodb-sharded-shard2-data 3/3 5m2s
Và theo đặc tính của statefulset thì các Pod của nó sẽ sinh ra tuần tự, do vậy 3 Pod đầu của mỗi Statefulset sẽ tạo ra trước, khi Pod này tạo ok thì tiếp tục tạo Pod thứ 2, thứ 3.
Và kết quả cuối cùng khi cài đặt xong:
ubuntu@base-node:~/mongodb-installation$ k get pods -owide
NAME READY STATUS RESTARTS AGE IP NODE NOMINATED NODE READINESS GATES
mongodb-mongodb-sharded-configsvr-0 2/2 Running 0 7m6s 192.168.247.33 node-2 <none> <none>
mongodb-mongodb-sharded-configsvr-1 2/2 Running 0 6m15s 192.168.139.77 node-3 <none> <none>
mongodb-mongodb-sharded-configsvr-2 2/2 Running 0 5m37s 192.168.84.139 node-1 <none> <none>
mongodb-mongodb-sharded-mongos-6778d6c6c8-jjtlt 2/2 Running 0 7m6s 192.168.247.31 node-2 <none> <none>
mongodb-mongodb-sharded-mongos-6778d6c6c8-xs295 2/2 Running 0 7m6s 192.168.139.75 node-3 <none> <none>
mongodb-mongodb-sharded-shard0-data-0 2/2 Running 0 7m6s 192.168.84.140 node-1 <none> <none>
mongodb-mongodb-sharded-shard0-data-1 2/2 Running 0 5m15s 192.168.247.34 node-2 <none> <none>
mongodb-mongodb-sharded-shard0-data-2 2/2 Running 0 4m29s 192.168.247.35 node-2 <none> <none>
mongodb-mongodb-sharded-shard1-data-0 2/2 Running 0 7m6s 192.168.139.76 node-3 <none> <none>
mongodb-mongodb-sharded-shard1-data-1 2/2 Running 0 5m22s 192.168.139.78 node-3 <none> <none>
mongodb-mongodb-sharded-shard1-data-2 2/2 Running 0 4m31s 192.168.139.79 node-3 <none> <none>
mongodb-mongodb-sharded-shard2-data-0 2/2 Running 0 7m6s 192.168.247.32 node-2 <none> <none>
mongodb-mongodb-sharded-shard2-data-1 2/2 Running 0 5m32s 192.168.217.68 node-4 <none> <none>
mongodb-mongodb-sharded-shard2-data-2 2/2 Running 0 4m37s 192.168.84.137 node-1 <none> <none>
Và với mỗi Pod của statefulset ta sẽ có 1 PVC,PV tương ứng:
ubuntu@base-node:~/mongodb-installation$ k get pvc
NAME STATUS VOLUME CAPACITY ACCESS MODES STORAGECLASS AGE
datadir-mongodb-mongodb-sharded-configsvr-0 Bound pvc-3a5ad952-47cb-4003-a454-33eb53529e6e 8Gi RWO ebs-sc 8m35s
datadir-mongodb-mongodb-sharded-configsvr-1 Bound pvc-8c7d94da-cb53-40c1-bfec-8b9a539901d6 8Gi RWO ebs-sc 7m44s
datadir-mongodb-mongodb-sharded-configsvr-2 Bound pvc-2d4a8f7d-7211-429c-906a-6b62db3c7a67 8Gi RWO ebs-sc 7m6s
datadir-mongodb-mongodb-sharded-shard0-data-0 Bound pvc-2c580f47-aa51-4f7d-9311-b664a74f30a3 8Gi RWO ebs-sc 8m35s
datadir-mongodb-mongodb-sharded-shard0-data-1 Bound pvc-c0494f6a-33d0-4ffb-8cb0-24d82f32a7fa 8Gi RWO ebs-sc 6m44s
datadir-mongodb-mongodb-sharded-shard0-data-2 Bound pvc-1e7c8c76-981f-4616-bb32-3c9edc807a82 8Gi RWO ebs-sc 5m58s
datadir-mongodb-mongodb-sharded-shard1-data-0 Bound pvc-9a5b91c9-f098-4232-8129-b422f2638103 8Gi RWO ebs-sc 8m35s
datadir-mongodb-mongodb-sharded-shard1-data-1 Bound pvc-a55185a8-c576-4e4e-81ca-ea41bfeb04a9 8Gi RWO ebs-sc 6m51s
datadir-mongodb-mongodb-sharded-shard1-data-2 Bound pvc-dc401669-803d-4598-abff-7e99cb22a0ba 8Gi RWO ebs-sc 6m
datadir-mongodb-mongodb-sharded-shard2-data-0 Bound pvc-90cd4027-174e-4d60-9e43-ab242ec686f3 8Gi RWO ebs-sc 8m35s
datadir-mongodb-mongodb-sharded-shard2-data-1 Bound pvc-107214c4-24d4-4232-8042-30c467574821 8Gi RWO ebs-sc 7m1s
datadir-mongodb-mongodb-sharded-shard2-data-2 Bound pvc-c26f4a29-6021-4e8a-8121-1626db39372d 8Gi RWO ebs-sc 6m6s
Kiểm tra kết nối vào DB
Khi cài đặt xong bằng helmchart sẽ out ra cho chúng ta hướng dẫn để kết nối tới db. Mình tạo Pod có mongodb client để kết nối vào cluster vừa cài:
buntu@base-node:~/mongodb-installation$ export MONGODB_ROOT_PASSWORD=$(kubectl get secret --namespace default mongodb-mongodb-sharded -o jsonpath="{.data.mongodb-root-password}" | base64 -d)
ubuntu@base-node:~/mongodb-installation$ echo $MONGODB_ROOT_PASSWORD Admin_123
ubuntu@base-node:~/mongodb-installation$ kubectl run --namespace default mongodb-mongodb-sharded-client --rm --tty -i --restart='Never' --image docker.io/bitnami/mongodb-sharded:6.0.5-debian-11-r4 --command -- mongosh admin --host mongodb-mongodb-sharded --authenticationDatabase admin -u root -p $MONGODB_ROOT_PASSWORD
If you don't see a command prompt, try pressing enter.
Current Mongosh Log ID: 64426c8f1baee5fdc3a59f9e
Connecting to: mongodb://<credentials>@mongodb-mongodb-sharded:27017/admin?directConnection=true&authSource=admin&appName=mongosh+1.8.0
Using MongoDB: 6.0.5
Using Mongosh: 1.8.0 For mongosh info see: https://docs.mongodb.com/mongodb-shell/ To help improve our products, anonymous usage data is collected and sent to MongoDB periodically (https://www.mongodb.com/legal/privacy-policy).
You can opt-out by running the disableTelemetry() command. [direct: mongos] admin> show dbs;
admin 172.00 KiB
config 2.10 MiB
[direct: mongos] admin>
Việc tạo và add các shardsvr vào cluster, cũng như cấu hình replicas cho các shardsvr/configsvr được setup tự động hoàn toàn. Mình có thể kiểm tra trạng thái sharding của cluster như sau:
[direct: mongos] admin> sh.status()
shardingVersion
{ _id: 1, minCompatibleVersion: 5, currentVersion: 6, clusterId: ObjectId("64426a2d7858463604dbec98")
}
---
shards
[ { _id: 'mongodb-mongodb-sharded-shard-0', host: 'mongodb-mongodb-sharded-shard-0/mongodb-mongodb-sharded-shard0-data-0.mongodb-mongodb-sharded-headless.default.svc.cluster.local:27017,mongodb-mongodb-sharded-shard0-data-1.mongodb-mongodb-sharded-headless.default.svc.cluster.local:27017,mongodb-mongodb-sharded-shard0-data-2.mongodb-mongodb-sharded-headless.default.svc.cluster.local:27017', state: 1, topologyTime: Timestamp({ t: 1682074269, i: 3 }) }, { _id: 'mongodb-mongodb-sharded-shard-1', host: 'mongodb-mongodb-sharded-shard-1/mongodb-mongodb-sharded-shard1-data-0.mongodb-mongodb-sharded-headless.default.svc.cluster.local:27017,mongodb-mongodb-sharded-shard1-data-1.mongodb-mongodb-sharded-headless.default.svc.cluster.local:27017,mongodb-mongodb-sharded-shard1-data-2.mongodb-mongodb-sharded-headless.default.svc.cluster.local:27017', state: 1, topologyTime: Timestamp({ t: 1682074247, i: 2 }) }, { _id: 'mongodb-mongodb-sharded-shard-2', host: 'mongodb-mongodb-sharded-shard-2/mongodb-mongodb-sharded-shard2-data-0.mongodb-mongodb-sharded-headless.default.svc.cluster.local:27017,mongodb-mongodb-sharded-shard2-data-1.mongodb-mongodb-sharded-headless.default.svc.cluster.local:27017,mongodb-mongodb-sharded-shard2-data-2.mongodb-mongodb-sharded-headless.default.svc.cluster.local:27017', state: 1, topologyTime: Timestamp({ t: 1682074248, i: 2 }) }
]
---
active mongoses
[ { '6.0.5': 2 } ]
---
autosplit
{ 'Currently enabled': 'yes' }
---
balancer
{ 'Currently enabled': 'yes', 'Failed balancer rounds in last 5 attempts': 0, 'Currently running': 'no', 'Migration Results for the last 24 hours': 'No recent migrations'
}
---
databases
[ { database: { _id: 'config', primary: 'config', partitioned: true }, collections: { 'config.system.sessions': { shardKey: { _id: 1 }, unique: false, balancing: true, chunkMetadata: [ { shard: 'mongodb-mongodb-sharded-shard-0', nChunks: 1024 } ], chunks: [ 'too many chunks to print, use verbose if you want to force print' ], tags: [] } } }
]
Như vậy là mình đã cài đặt xong mongodb shard cluster trên K8S một cách khá đơn giản. Tóm tắt lại khi quen tay thì các bạn chỉ phải sửa vài tham số và cài câu lệnh là setup xong được một cụm mongodb rồi.
Cảm ơn các bạn đã dành thời gian đọc tới đấy. Nếu thấy bài viết hữu ích thì hãy để lại 1 upvote và bookmark bài viết ủng hộ mình nhé!