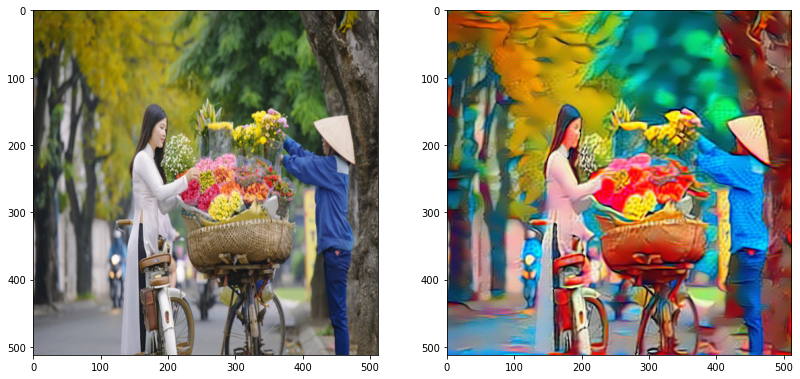
Bạn nghĩ sao về một bức ảnh chụp (máy ảnh) Hà Nội nhưng lại mang phong cách tranh thiên tài Picasso. Với sự ra đời của thuật toán Style Transfer, chuyện đó là hoàn toàn có thể."
1. Thuật toán.
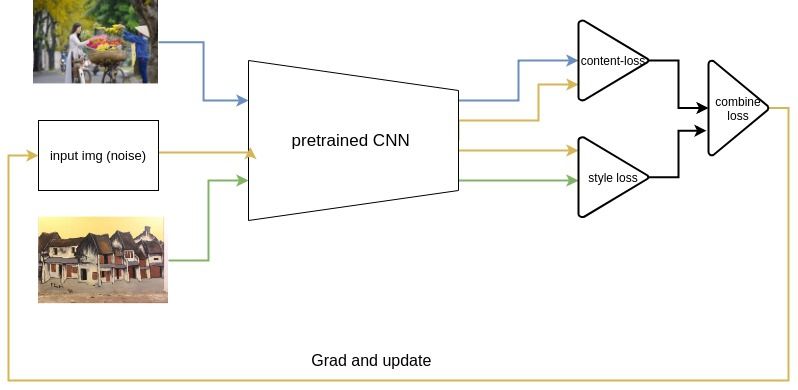
Dưới đây là hình minh họa cho thuật toán. Chúng ta có 3 ảnh gồm:
- input_image: Được khởi tạo random, lúc đầu là ảnh nhiễu bất kì, sau quá trình update, tối ưu thành kết quả ta muốn (output image)
- content_image: chứa nội dung mà ảnh output_image sẽ chứa.
- style_image: chứa style (phong cách) mà output_image sẽ chứa sau quá trình update sẽ thành ảnh mong muốn.

Ý tưởng thuật toán rất đơn giản: cả 3 ảnh cùng đưa vào 1 pretrained-CNN để trích xuất ra các feature_map. Những Feature map này là những thông tin đặc trưng, chứa đựng thông tin về nội dung, đường nét, màu sắc của ảnh, hay còn gọi là content_feature. Style của một họa sĩ, 1 bức tranh thực tế chính là mối quan hệ giữa các đường nét, màu sắc trong tranh. Như vậy, bằng một phép biến đổi (gram_matrix), ta có thể tính ra được style_feature dựa trên content_feature. Thuật toán cụ thể như sau:
- Gọi 3 ảnh input_image, content_image, style_image lần lượt là A, B, C
- Đưa cả 3 ảnh vào cùng 1 pretrained_CNN để trích xuất ra các feature cho 3 ảnh, lần lượt là: A_content, B_content, C_content. Các feature này chính là feature đặc trưng về nội dung (content)
- Để biến đổi content_feature sang style_feature, ta dùng 1 thuật toán gọi là hàm GramMatrix()
- A_style = GramMatrix(A_content), C_style = GramMatrix(C_content)
- Ta có ContentLoss = MSE(A_content, B_content), StyleLoss = MSE(A_style, C_style). Với MSE là hàm MeanSquareError được dùng phổ biến trong Machine learning.
- Tính CombineLoss = w1ContentLoss + w2 StyleLoss
- Tính đạo hàm input_image theo CombineLoss. Update input_image với thuật toán gradient descent. Chú ý, thứ chúng ta tối ưu ở đây là input_image chứ không phải các params của pretrained_model.
- Quy trình sẽ lặp đi lặp lại nhằm tối ưu giá trị CombineLoss. Ảnh input_image dần được update sao cho ContentLoss và StyleLoss giảm dần. Tức có nội dung giống với content_image, phong cách giống với style_image. Dừng thuật toán khi input_image đủ tốt
1.2 Style_feature
Mình sẽ nói kĩ hơn về Style_feature. Như bạn đã biết, content_feature đã bao hàm thông tin về đường nét, nội dung, hình ảnh của 1 ảnh. style_feature chính là mối quan hệ tương quan giữa các thông tin này với nhau. Trong Đại số, ta có khái niệm GramMatrix. GramMatrix chính là thứ chúng ta cần.
Phép nhân trong công thức này là phép nhân ma trận (dot product). Thuật toán về cơ bản là thế, bắt tay vào code bạn sẽ dễ hiểu hơn.
2. Thực hành code
2.1 Chuẩn bị
Để tiện cho việc code và train, mình sẽ code trên Google Colab. Hãy download và đọc code ở link sau:
- Drive: My Drive
Torch khá tiện khi tính gradient của 1 biến và update biến đó theo các thuật toán optimizer. Vì vậy, mình quyết định dùng Torch thay vì tensorflow. Cũng bài này, 2 năm trước mình code bài này bằng Tensorflow thuần khá vất vả nên mình quyết định đổi sang torch.
2.2 Gõ code 
Chắc hẳn đây là phần được mong đợi nhất. Mình sẽ tiến hành code.
Trước hết, do cả project bao gồm code và dataset được lưu trên drive, ta cần mount drive vào môi trường ảo của colab. Bước này có thể bỏ qua nếu bạn run trên máy local
## mount drive to notebook (dataset is saved in mydrive)
from google.colab import drive
drive.mount('/content/drive')
%cd '/content/drive/MyDrive/Project by me/Colab/Code in AI Blog/Style_transfer_1'
Import lib and init some variable
import torch
import torch.nn as nn
import torch.nn.functional as F
from torch import optim
from PIL import Image
from torchvision import transforms as T
from torchvision import models
from matplotlib import pyplot as plt img_size = 512
device = torch.device('cuda')
img_transforms = T.Compose([ T.Resize((img_size, img_size)), T.ToTensor()
])
Một vài hàm phụ trợ:
def load_img(img_fn): global device global img_transforms image = Image.open(img_fn) image = img_transforms(image) # to batch image = image.unsqueeze(0).to(device, torch.float) return image def to_image(img_tensor): image = img_tensor.cpu().clone() image = image.squeeze(0) image = T.ToPILImage()(image) return image def plot_imgs(imgs, cols=3, size=7, title=""): rows = len(imgs)//cols + 1 fig = plt.figure(figsize=(cols*size, rows*size)) for i, img in enumerate(imgs): image = to_image(img) if isinstance(img, torch.Tensor) else img fig.add_subplot(rows, cols, i+1) plt.imshow(image) plt.suptitle(title) plt.show()
Các function và module quan trọng, bao gồm: ContentLoss, StyleLoss, GramMatrix, Normalization
def compute_gram_matrix(feature_map): batchsize, c, w, h = feature_map.size() feature = feature_map.view(batchsize*c, w*h) gram_matrix = torch.mm(feature, feature.T) gram_matrix = gram_matrix/(batchsize*c*w*h) #normalize return gram_matrix # ContentLoss (perceptual loss) is MSE between input_feature and target feature
class ContentLoss(nn.Module): def __init__(self, target_feature): super(ContentLoss, self).__init__() # target_feature is an constant, not variable  self.target_feature = target_feature.detach() def forward(self, input_feature): self.loss = F.mse_loss(input_feature, self.target_feature) return input_feature # styleLoss is MSE between gram_matrix of input_feature and target feature
class StyleLoss(nn.Module): def __init__(self, target_feature): super(StyleLoss, self).__init__() gram_matrix = compute_gram_matrix(target_feature) self.target_gram_matrix = gram_matrix.detach() def forward(self, input_feature): input_gram_matrix = compute_gram_matrix(input_feature) self.loss = F.mse_loss(input_gram_matrix, self.target_gram_matrix) return input_feature # Additionally, VGG networks are trained on images with
# each channel normalized by mean=[0.485, 0.456, 0.406] and std=[0.229, 0.224, 0.225].
# We will use them to normalize the image before sending it into the network.
class Normalization(nn.Module): def __init__(self): super(Normalization, self).__init__() self.mean = torch.tensor([0.485, 0.456, 0.406]).view(-1, 1, 1).to(device) self.std = torch.tensor([0.229, 0.224, 0.225]).view(-1, 1, 1).to(device) def forward(self, image_tensor): return (image_tensor - self.mean) / self.std
Load pretrained-CNN model, build Style Transfer model
def build_ST_model( cnn_model, normalization, content_layer_names, style_layer_names, content_img, style_img): """Build a style_transfer model with specify style and content""" cnn_model.eval() ST_model = nn.Sequential(normalization) all_content_loss = [] all_style_loss = [] i = 0 for layer in cnn_model.children(): if isinstance(layer, nn.Conv2d): i += 1 name = 'conv_{}'.format(i) elif isinstance(layer, nn.ReLU): name = 'relu_{}'.format(i) layer = nn.ReLU(inplace=False) elif isinstance(layer, nn.MaxPool2d): name = 'pool_{}'.format(i) elif isinstance(layer, nn.BatchNorm2d): name = 'bn_{}'.format(i) ST_model.add_module(name=name, module=layer) if name in content_layer_names: target_feature = ST_model(content_img) c_loss = ContentLoss(target_feature=target_feature) ST_model.add_module(f'content_loss_{i}', module=c_loss) all_content_loss.append(c_loss) if name in style_layer_names: target_feature = ST_model(style_img) s_loss = StyleLoss(target_feature=target_feature) ST_model.add_module(f'style_loss_{i}', module=s_loss) all_style_loss.append(s_loss) return ST_model, all_content_loss, all_style_loss # load pretrain-model and build StyleTransfer model
cnn_model = models.vgg19(pretrained=True).features.to(device).eval()
normalization = Normalization()
content_layers = ['conv_4']
style_layers = ['conv_1', 'conv_2', 'conv_3', 'conv_4', 'conv_5']
ST_model, all_content_loss, all_style_loss = build_ST_model( cnn_model, normalization, content_layers, style_layers, content_img, style_img)
Function chính, chứa trương trình chính để transfer style từ một ảnh sang ảnh khác.
def run_style_transfer( cnn_model, normalization, content_layers, style_layers, content_img, style_img, num_steps=100, style_weight=10000, content_weight=1): """Run main program to transfer style from style_img to content_img""" ST_model, content_losses, style_losses = build_ST_model( cnn_model, normalization, content_layers, style_layers, content_img, style_img) input_image = content_img.clone() input_image.requires_grad_() optimizer = optim.RMSprop([input_image]) for i in range(num_steps): input_image.data.clamp_(0,1) optimizer.zero_grad() content_score, style_score = 0, 0 ST_model(input_image) for c_loss in content_losses: content_score += c_loss.loss for s_loss in style_losses: style_score += s_loss.loss total_loss = content_score*content_weight + style_score*style_weight total_loss.backward() optimizer.step() if (i+1)%50 == 0: print("content_loss: ", content_score.item(), "style_loss: ", style_score.item()) input_image.data.clamp_(0, 1) return input_image
Thay vì khởi tạo random ảnh input_image, mình quyết định gán ảnh content_image cho input_image. Như thế input_image sẽ dễ dàng và học nhanh hơn, không tốn thời gian trong việc khôi phục content. Cũng bởi vậy, trong số của StyleLoss được chọn lớn hơn rất nhiều trọng số của ContentLoss.
style_img = load_img('dataset/style-3.jpg')
content_img = load_img('dataset/content_1.jpg') output_img = run_style_transfer( cnn_model, normalization, content_layers, style_layers, content_img, style_img, num_steps=700, style_weight=1000000, content_weight=1) plot_imgs([content_img, style_img, output_img], size=10)

3 Kết luận
Như bạn thấy, thuật toán StyleTransfer này thực sự không khó, ý tưởng và cách làm rất đơn giản. Trong đề tài StyleTransfer, người ta còn áp dụng cả GAN. Trong thời gian tới, mình sẽ cố gắng viết bài về StyleTransfer với GAN. Hiện tại mình mới lập blog cá nhân tại https://trungthanhnguyen0502.github.io . Bạn có thể follow mình trên Viblo hoặc đón đọc bài trực tiếp từ Blog cá nhân. Cảm ơn bạn đã đọc
Tham khảo
Bài viết cách đây 2 năm của chính mình: https://forum.machinelearningcoban.com/t/style-transfer-tutorial/4026
https://pytorch.org/tutorials/advanced/neural_style_tutorial.html
https://www.tensorflow.org/tutorials/generative/style_transfer